If you experience one of the following, this could be due to a low battery:
What affects the battery life of my Logger?
The estimated battery life on the products page and/or the battery specifications table is based on
15-minute logging interval and monthly data download. Battery life of your logger can differ and is affected by many different factors:
It should also be noted that not all battery cells have exactly the same characteristics. Although they are manufactured to stringent quality specifications, some cells have naturally longer life than others due to the processes used in their manufacture.
Our battery specifications table contains an estimate for typical battery life (average between 2-3 years) in normal conditions; this is based on monthly download and 15-minute logging. Clients have reported shorter battery life for applications of frequent downloading (twice a day) with relatively rapid logging (every minute or less). On the other hand loggers have been reported to well exceed the specifications, particularly if they are hibernated between uses.
Remember, our Loggers have a 12 month warranty, so if you have a Logger that is relatively new, but still encounter a battery problem, please send us a diagnostics file.
How can I tell if a LogTag battery is low?
LogTag Analyzer displays the current battery condition of a logger during configuration and also after download.
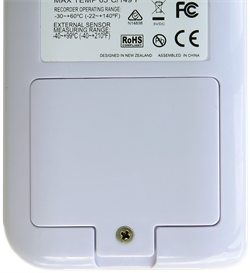
TRIX-8, TREX-8 & HAXO-8 models contain a simple battery diagnostic circuit, which measures the battery voltage and returns ‘OK’ or ‘LOW’. This is just a status and it is not possible to calculate a %remaining battery life from this data. The point at which the battery reports ‘LOW’ is typically when around 15%-20% capacity is left, which in normal operating conditions is equivalent to around 3-4 months of typical use.
SRIC-4, TRIL & SRIL designs contain a battery life monitoring system. These products not only return the actual battery voltage to the software, but also keep track of their activities so LogTag Analyzer can calculate a ‘% battery life remaining’ value, once the battery capacity falls below 50% of its original value.
TRID and TRED models report high or low based on battery voltage. If the low battery indicator is not showing, the Logger is OK for the next trip / recording period. Once the low battery indicator is showing, the battery should be replaced before the next use.
An incorrect low battery indication can occur if the logger is still very cold during communication, as it is more difficult for the battery to deliver power at low temperatures due to the chemistry used. The battery condition is therefore more representative when reported at room temperature, around 20°C.
What happens if I keep using a Logger which shows a low battery?
If a Logger reports a battery as ‘OK’ during configuration, there is typically enough operational life left to complete a trip before being completely exhausted. Sometimes such a trip can even last several months, as the battery threshold that triggers a ‘LOW’ reading has enough safety margin built in to allow for the battery to go ‘low’ during the trip. If, however, a product shows ‘LOW’ when being configured or downloaded, it should not be used again, but discarded in accordance with local regulations.
If you continue to use the Logger despite a low battery warning, there may not be enough power left to correctly record and store data, or to communicate with a PC. Often this leads to data corruption and sometimes complete data loss. For SRIC-4, TRIL & SRIL models the software can calculate the estimated % remaining at the conclusion of a configured logging trip and block configurations that can result in a battery being empty before the trip end.
The batteries used in LogTag products are Lithium-metal button cells of 3V rating. LogTag loggers are safe to operate during air transportation and comply with the RTCA DO-160G standard. They are classified as non-dangerous goods when used to monitor shipments.
For LogTag's DO-160G declaration of compliance , please click here.
For any questions or further inquiries about bulk shipments, please contact us.
All LogTag loggers and indicators are powered by batteries, or have backup batteries if powered via USB.
Depending on the model, the battery is either fixed, or can be replaced by the user.
For a list of LogTag products and each of their battery specifications, refer to the battery specifications table here.
Please only use batteries from a reputable brand.
If you operate a logger with a flat battery, you risk that the logger suffers memory corruption as a result, which may cause a loss of data.
When the display shows that the battery is almost empty ( ) new batteries should be fitted.
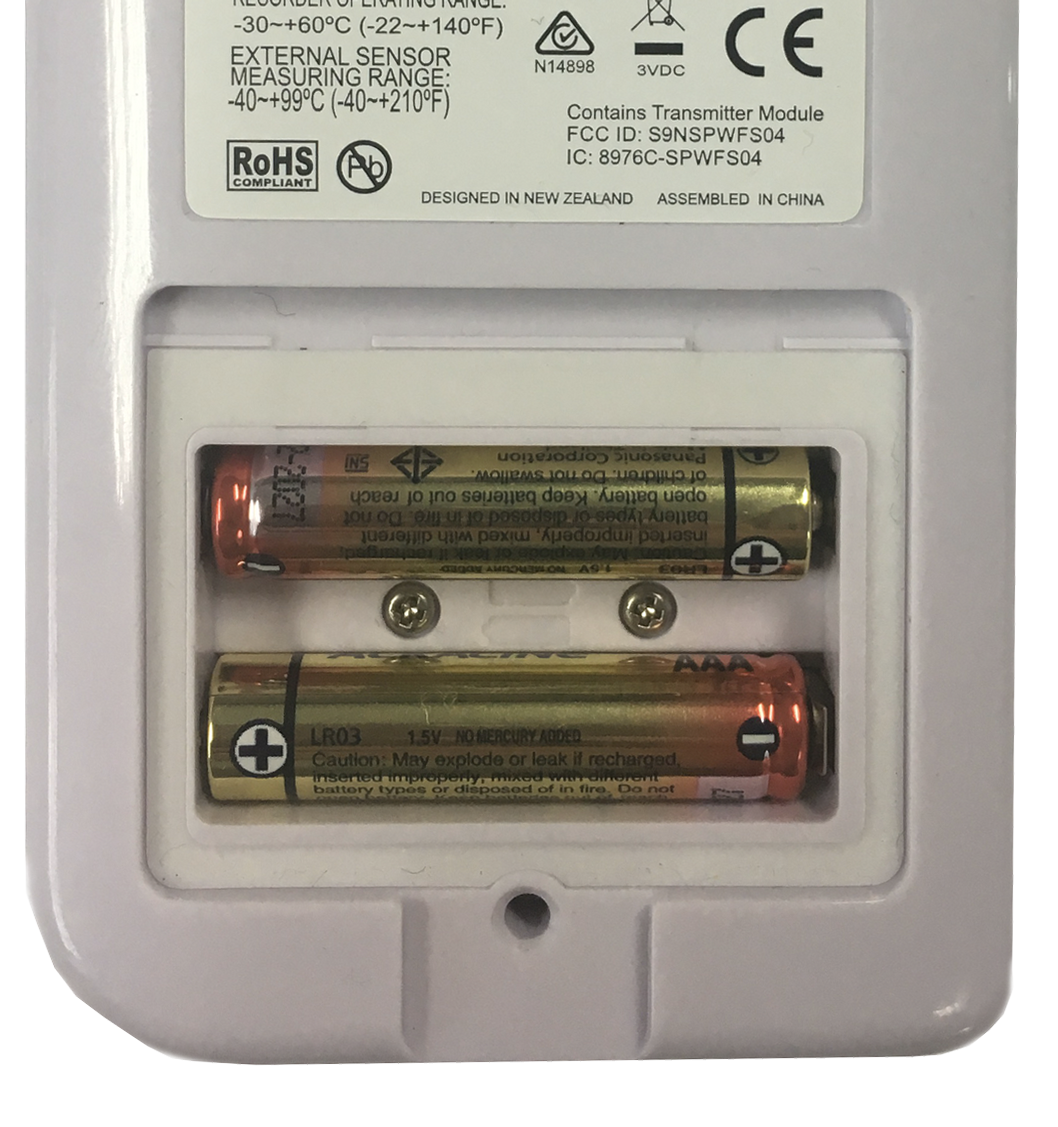
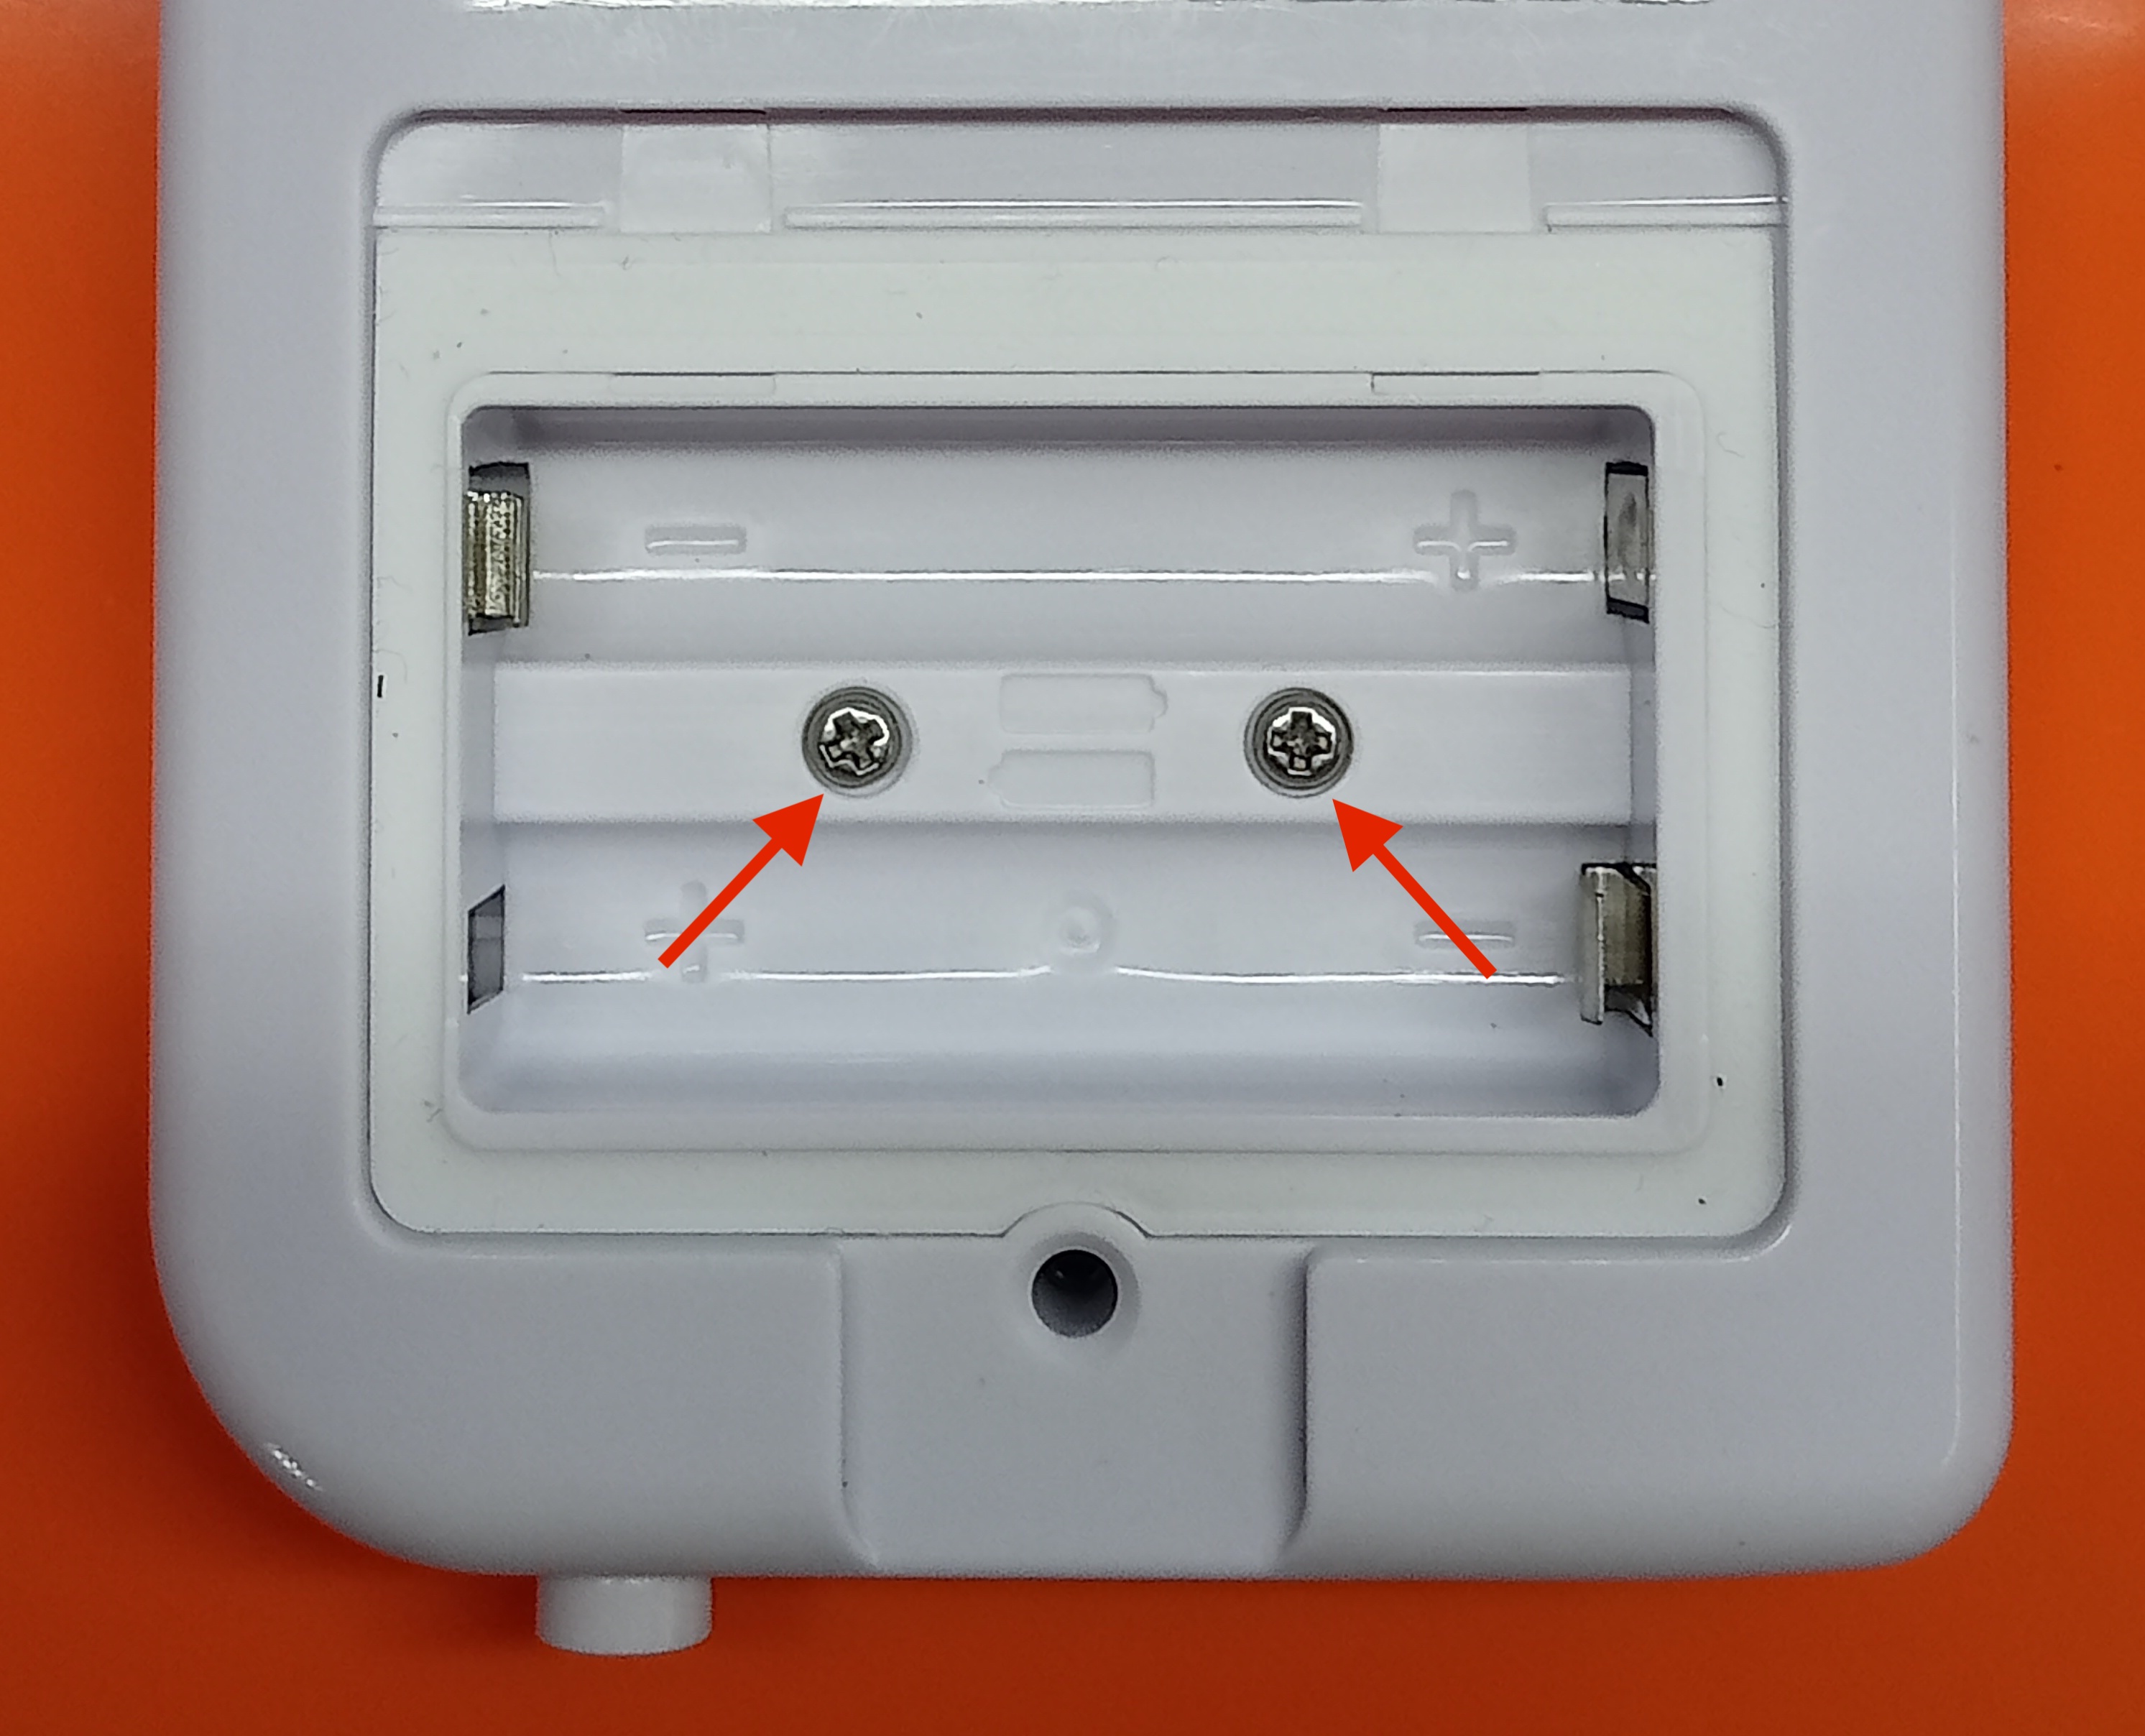
1. Remove the screw from the rear compartment lid.
2. Remove the existing batteries
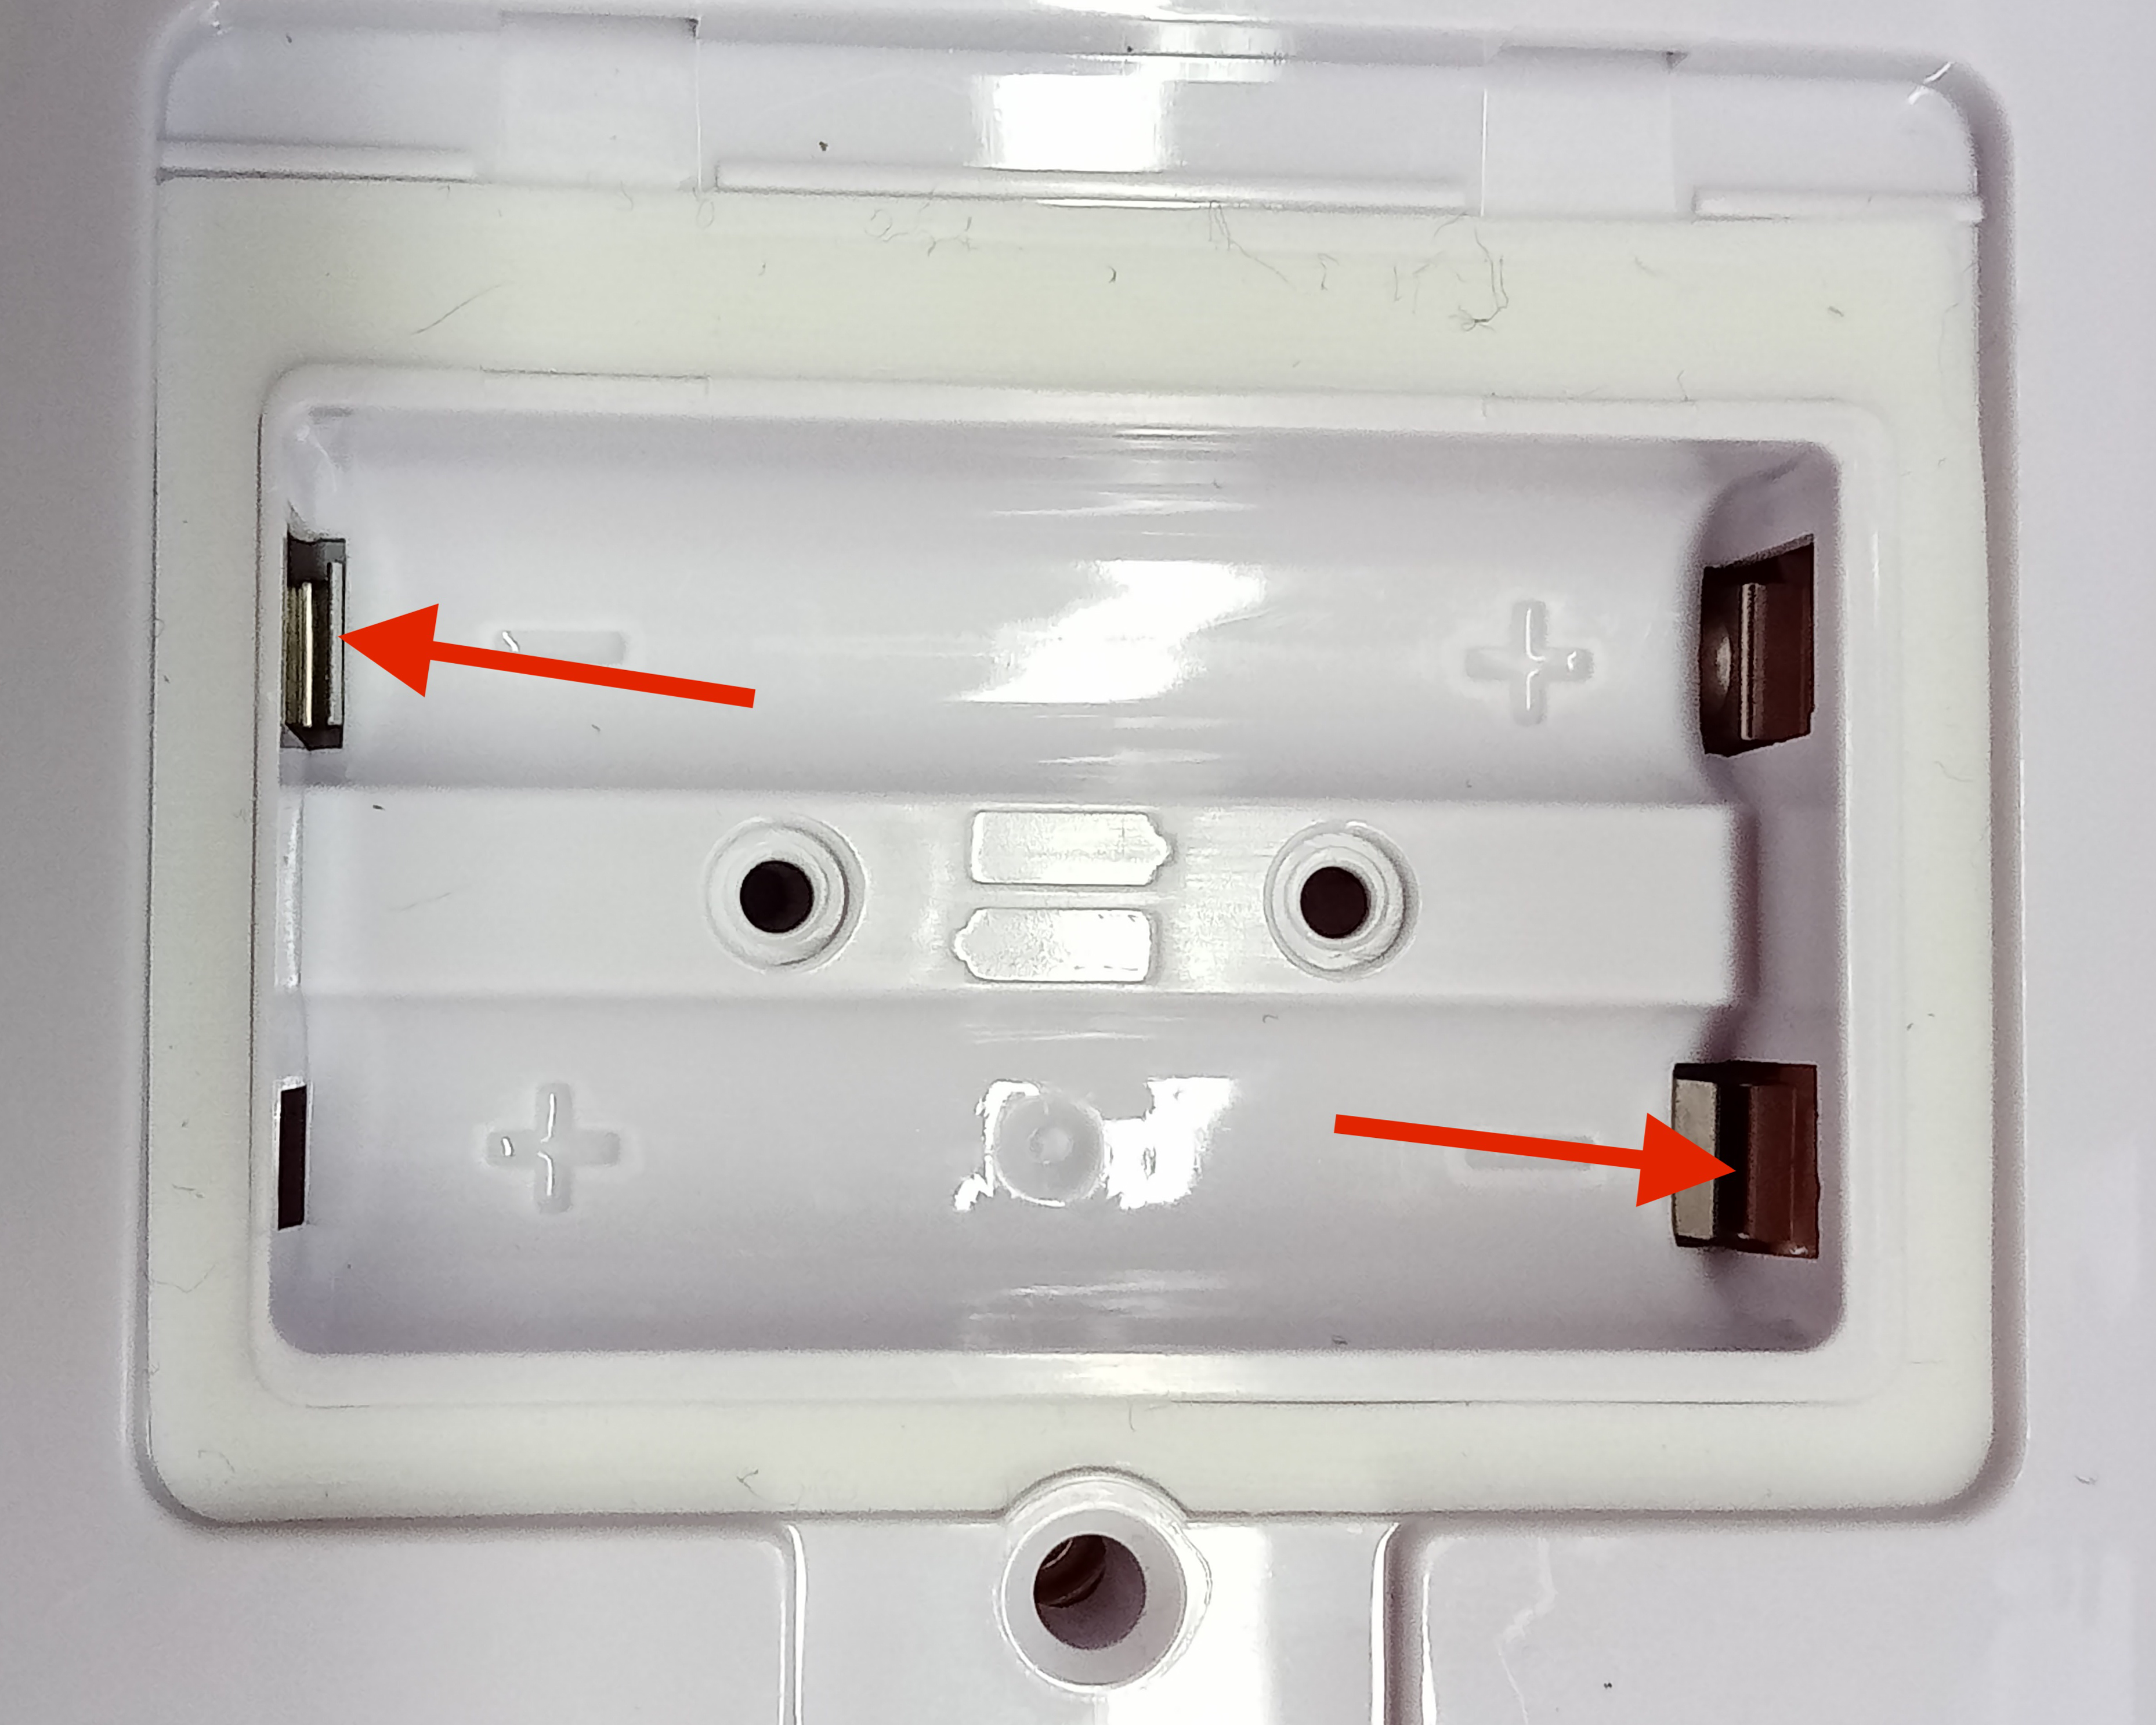
3. When using different batteries to the one's we recommend, you may need to bend the two metal tabs, marked below, slightly inwards with a soft tool, to ensure good contact with the battery terminals.
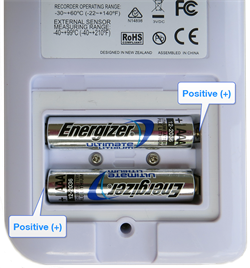
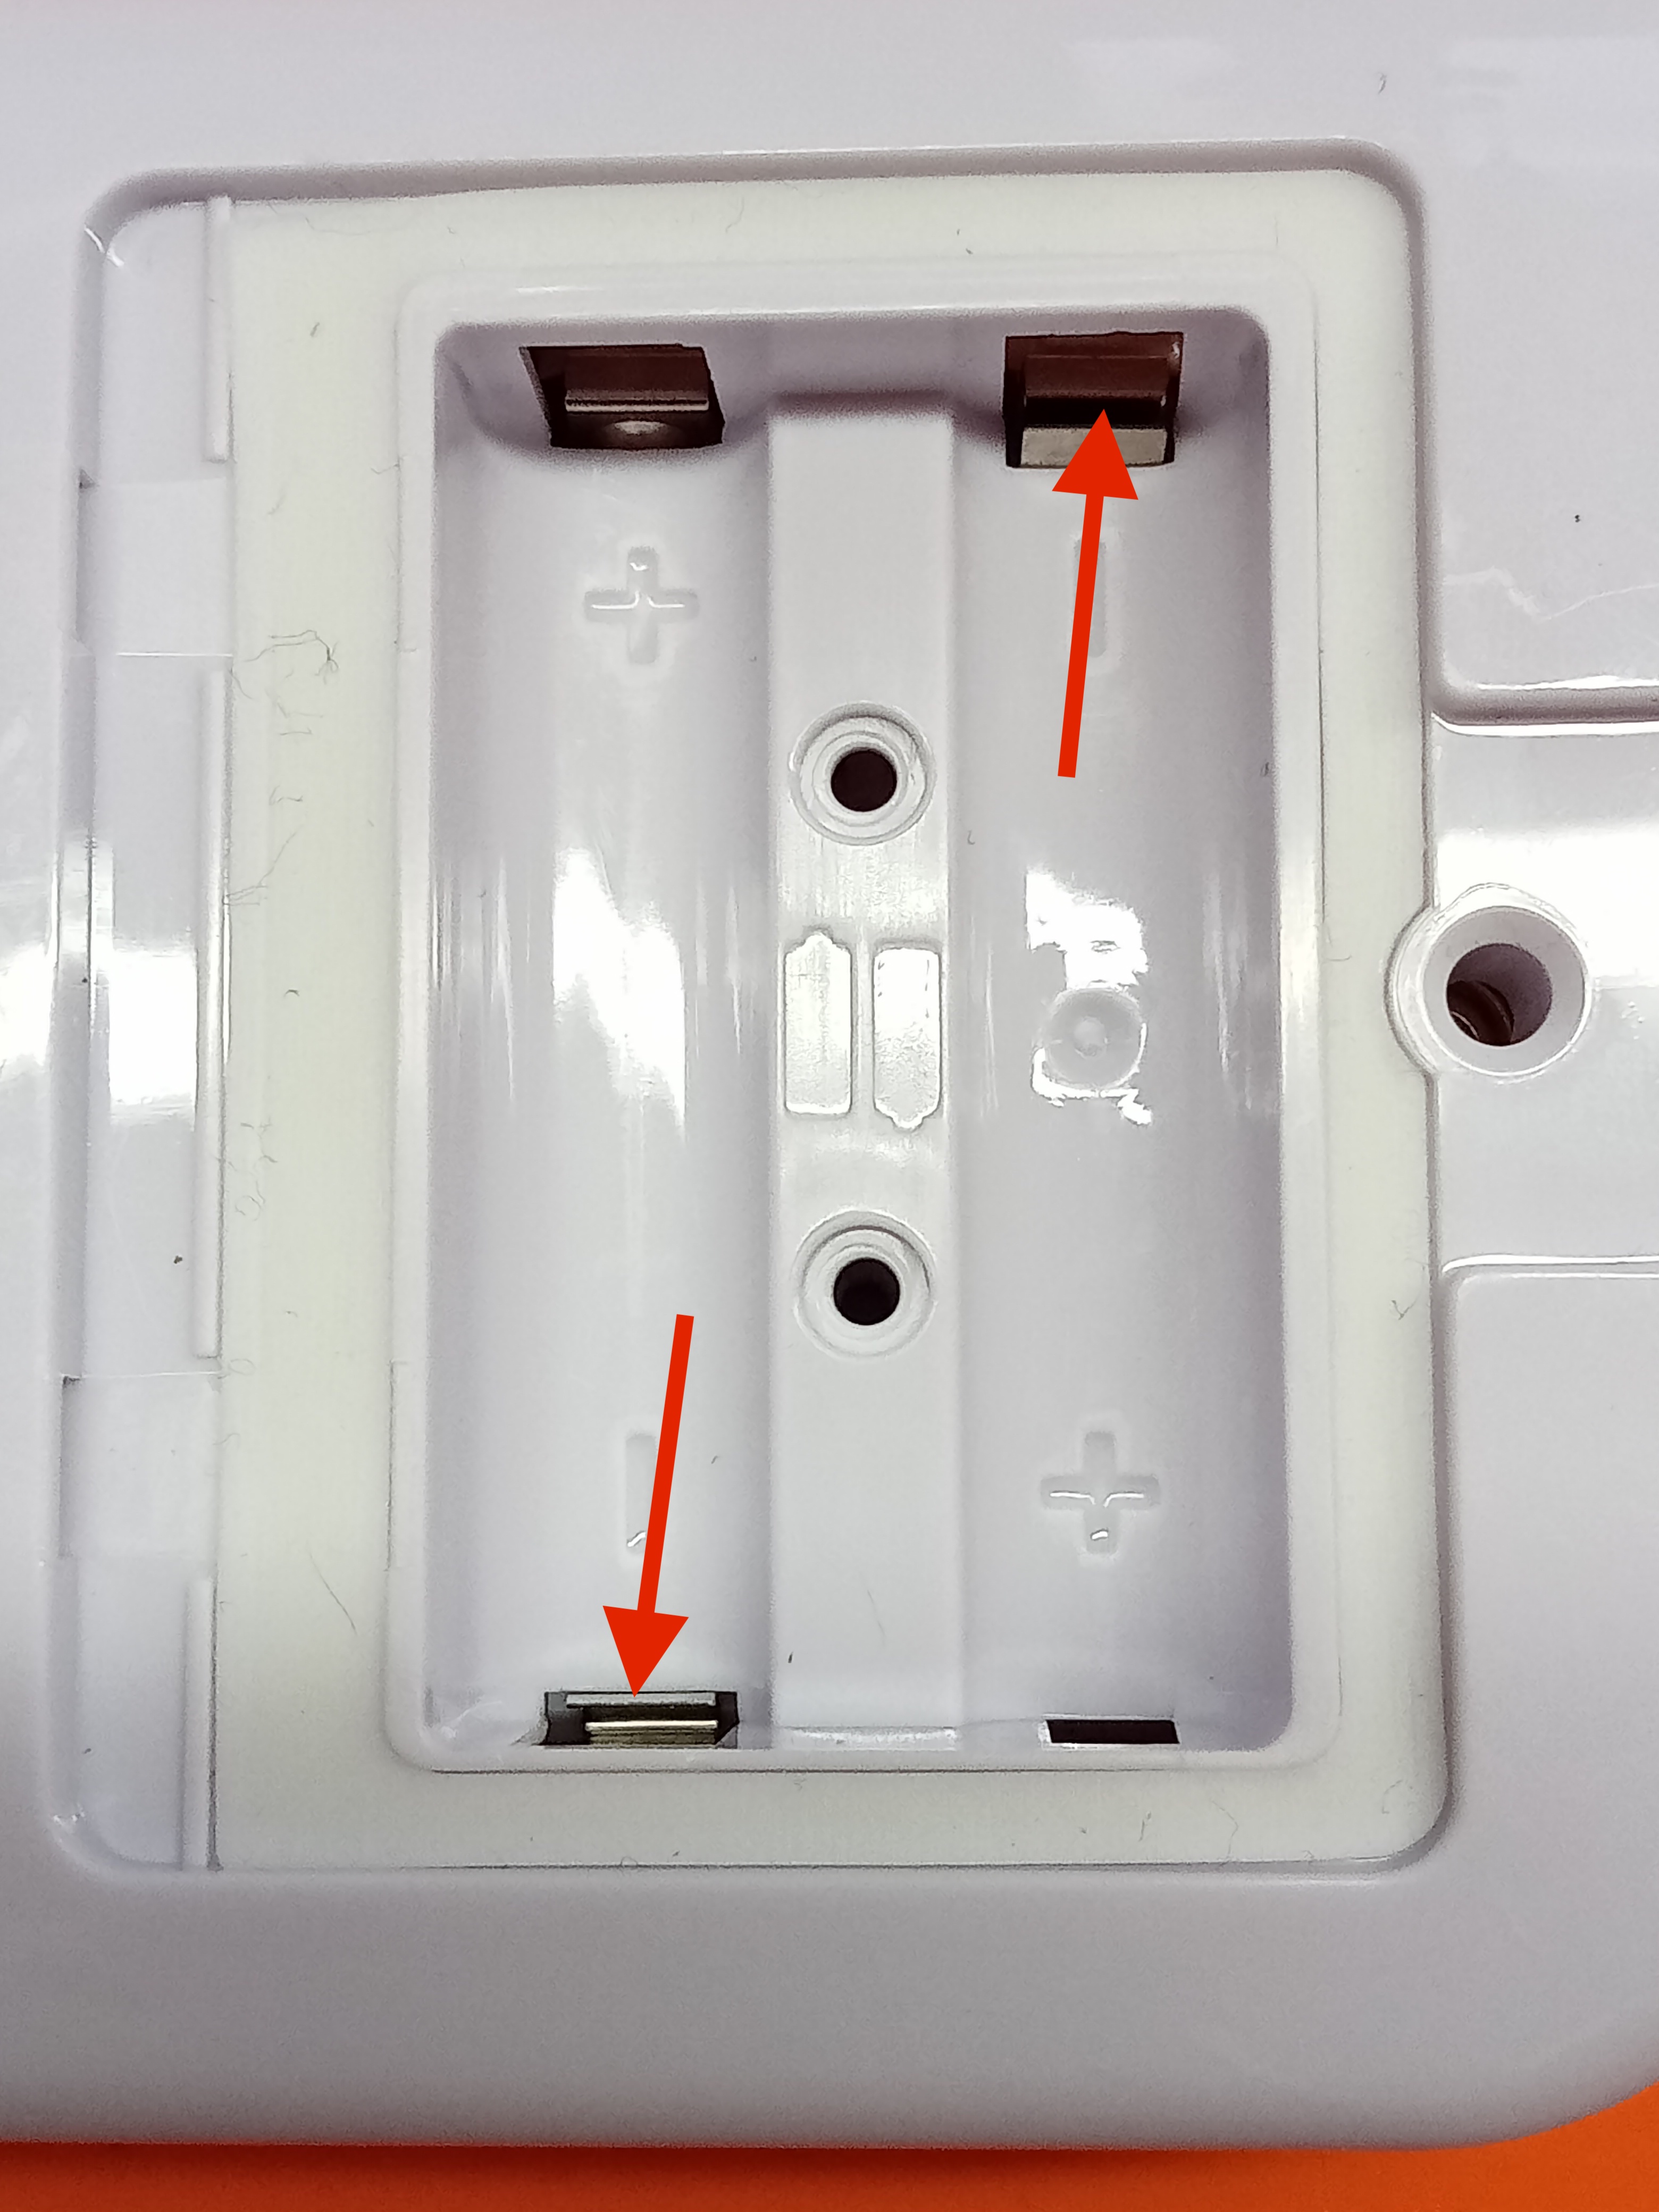
4. Insert the new AAA batteries in the correct orientation, as shown. The polarity is marked inside the battery compartment.
We recommend high-quality Energizer Ultimate batteries, as they have a special long-life chemistry.
The battery compartment is a good place to keep the surplus sensor socket covers. You may wish to remove these now for each channel you want to use and add them to the compartment before closing it.
5. Replace the rear cover and the screw.
As a last step, press any button on the front to turn on the display.
The battery replacement is now complete.
If you see this symbol  on the display of your UTRED30-16 or UTRED30-WIFI display, the internal CR2032 coin cell backup battery is empty.
You must replace this battery immediately, or you risk losing recorded data when the UTRED30's power supply is removed or inserted.
This coin cell battery typically lasts many years, however, when you frequently operate the device with near empty AAA batteries, extra load is put on the coin cell, and it depletes significantly faster.
TO UNDERTAKE THIS PROCEDURE, YOU MUST OBSERVE PROPER ANTI-STATIC PRECAUTIONS. THIS IS BEST DONE BY A TECHNICIAN WITH THE APPROPRIATE EQUIPMENT.
1. Remove the rear battery cover and remove the AAA batteries, as if you would for a battery replacement.
2. Remove the 2 screws in the battery compartment.
3. Separate the top and bottom halves of the case. Start prying near the bottom edge of the logger, at the sensor and power supply connections.
4. Remove the coin cell battery from the holder. Slide the cell from the rear using a blunt, non-metal object like a Popsicle stick or a toothpick.
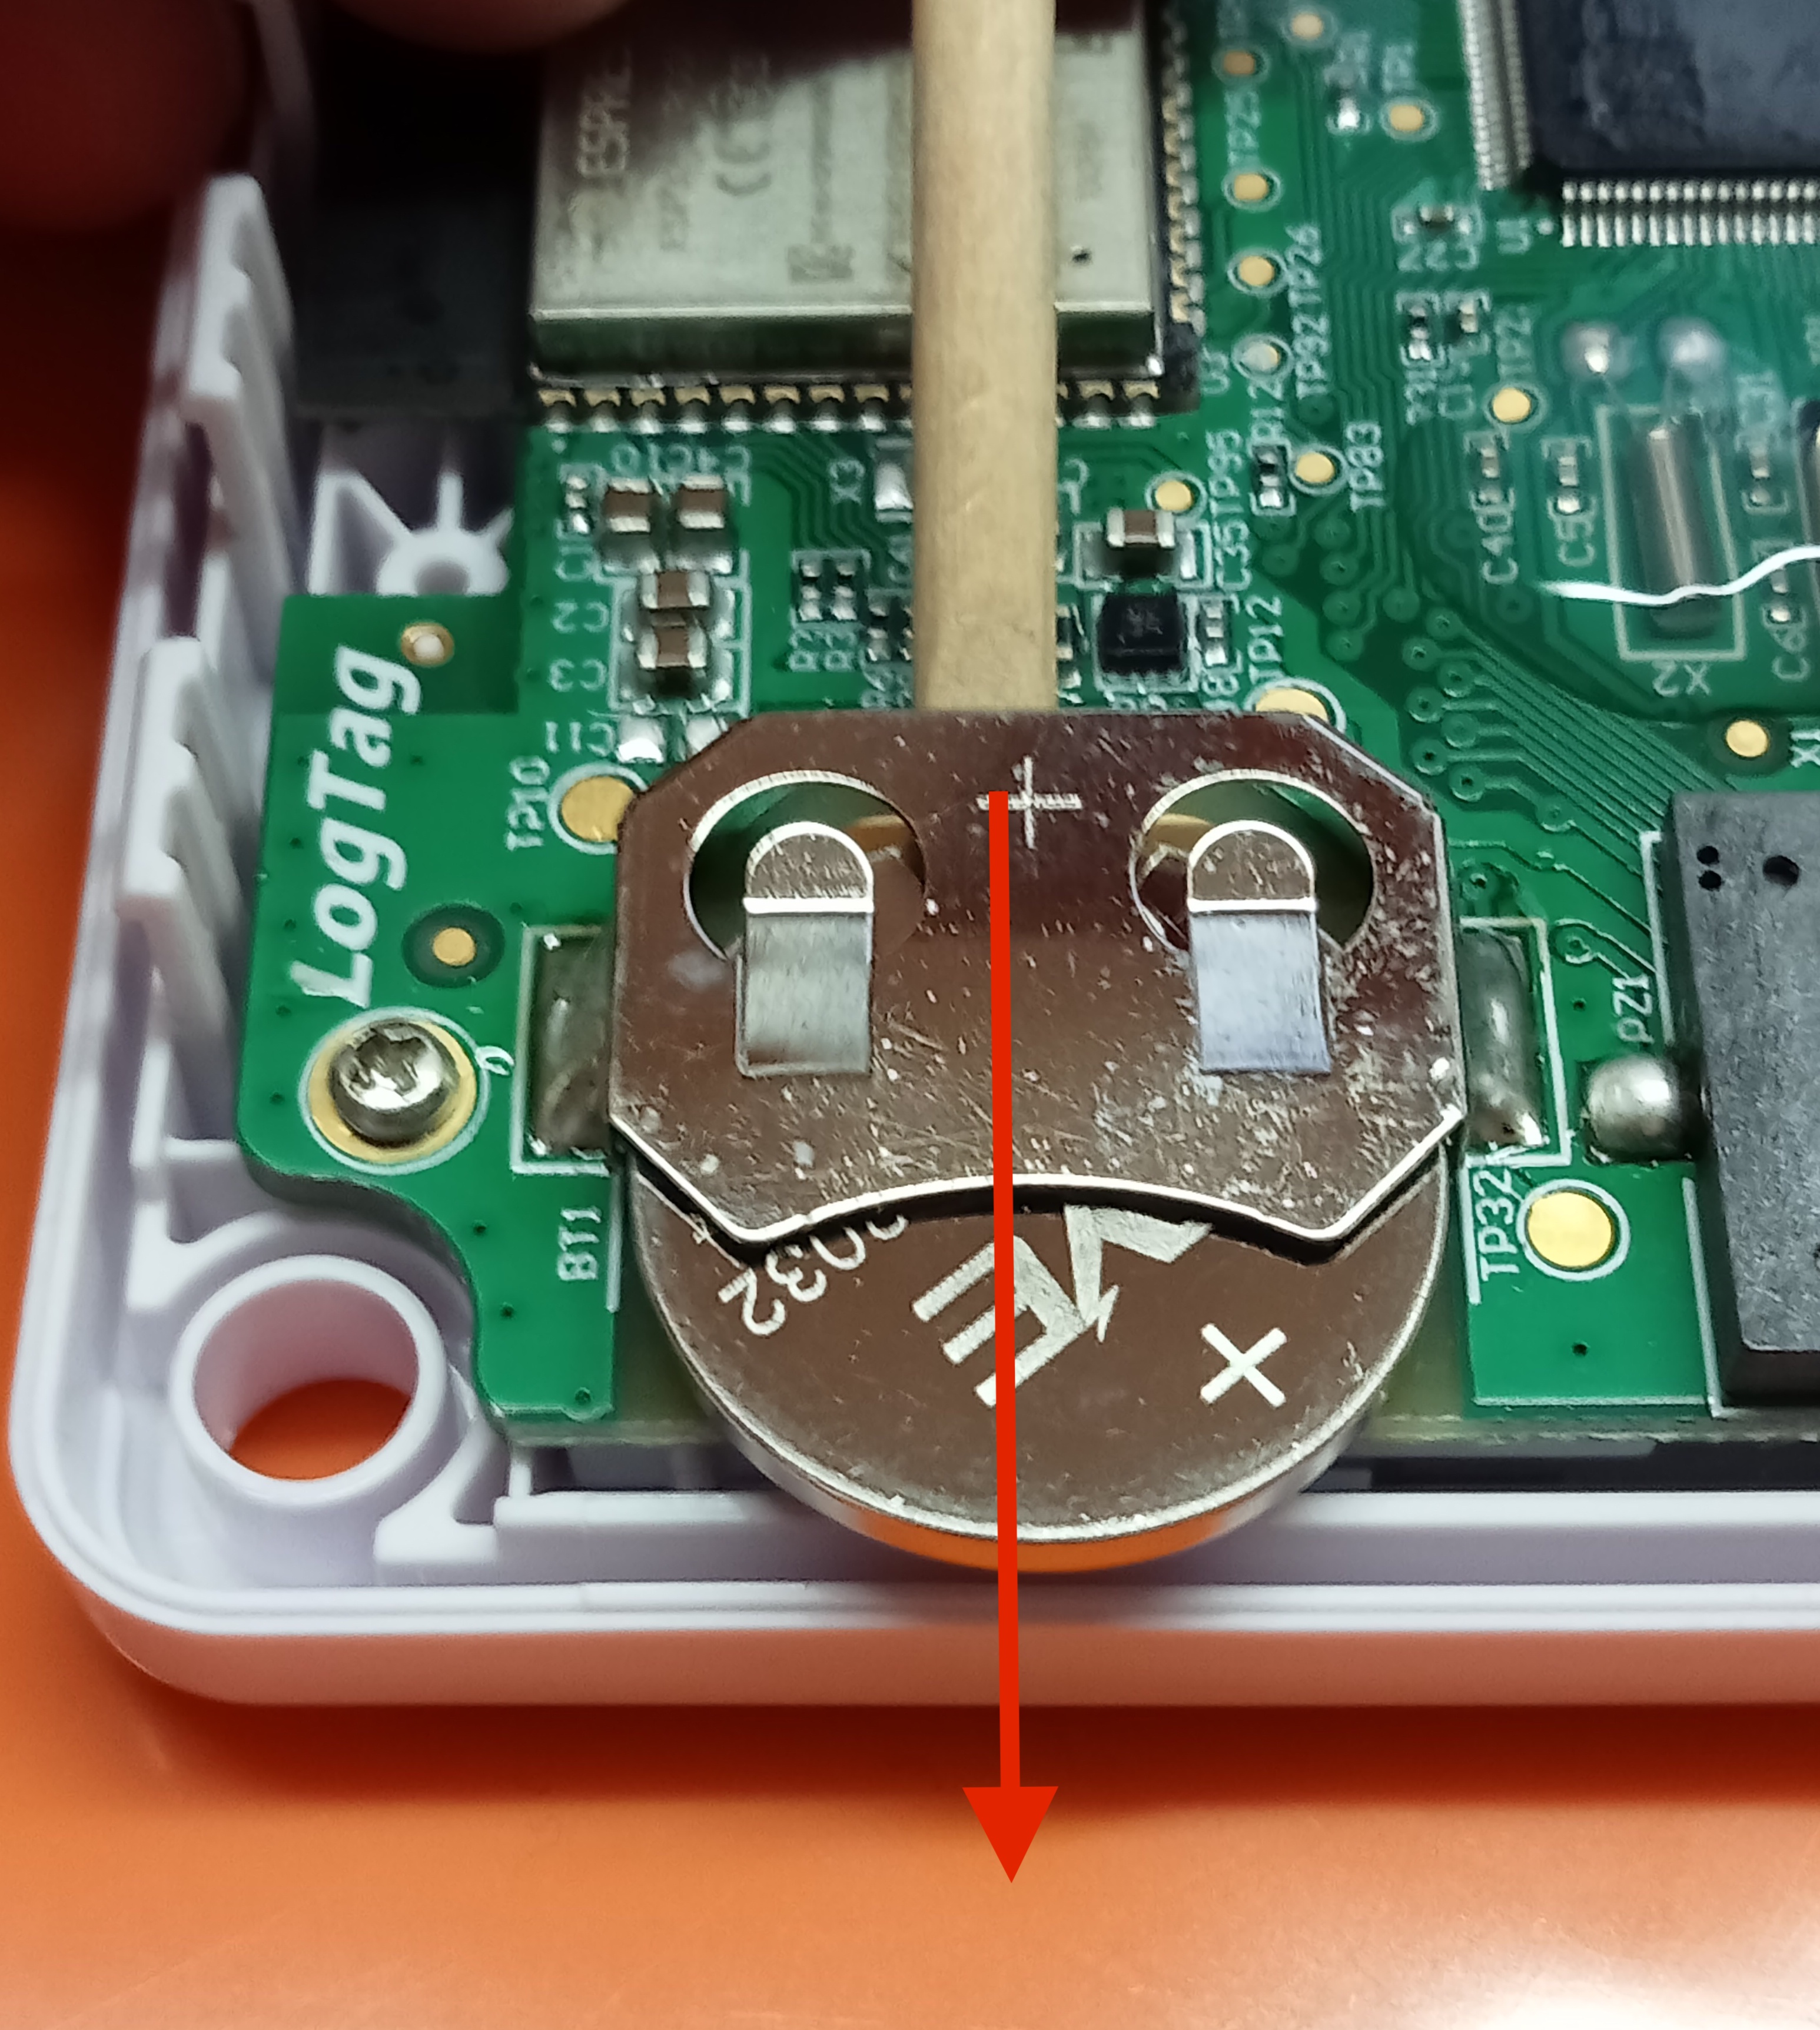
5. Add the new battery.
6. Reassemble the two case halves. Make sure the battery contacts clear the opening when closing the case.
7. Replace the screws, batteries and re-fit the rear cover.
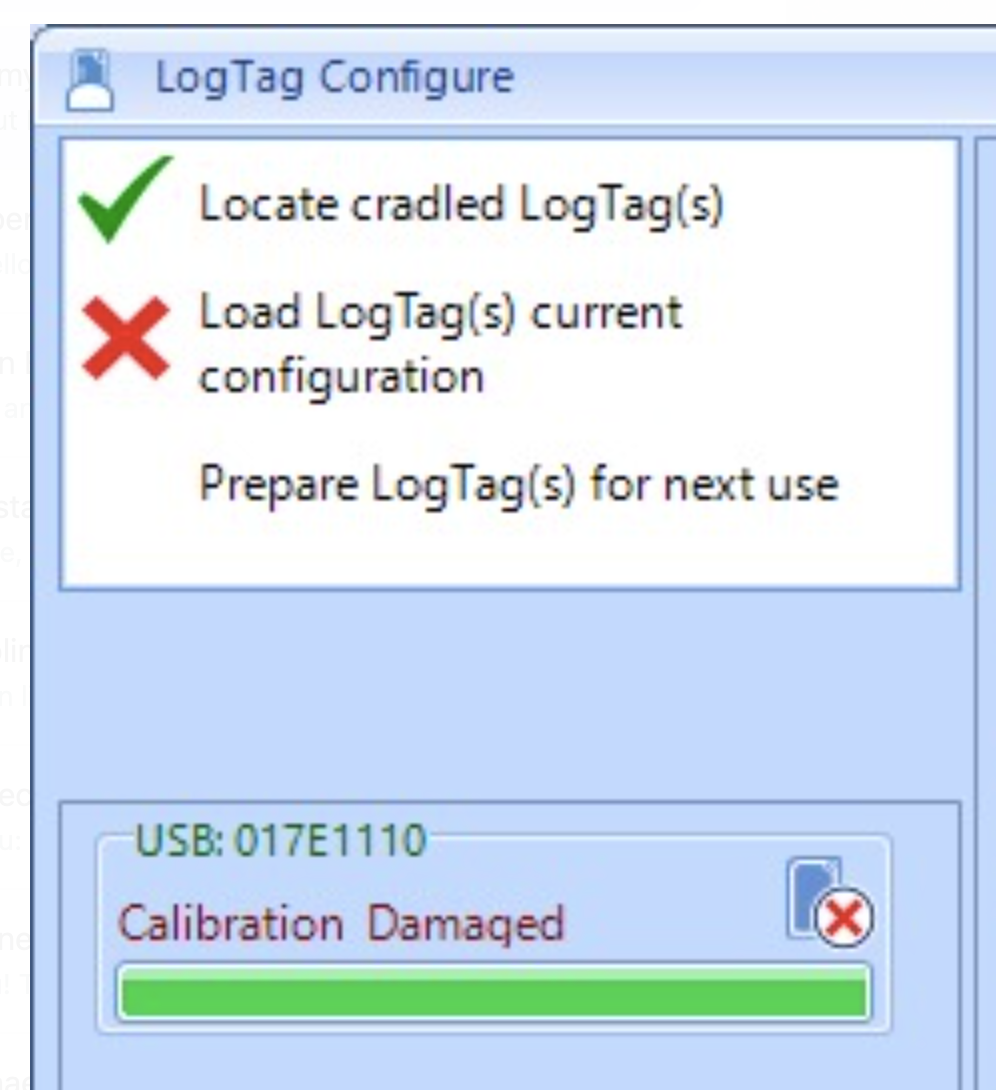
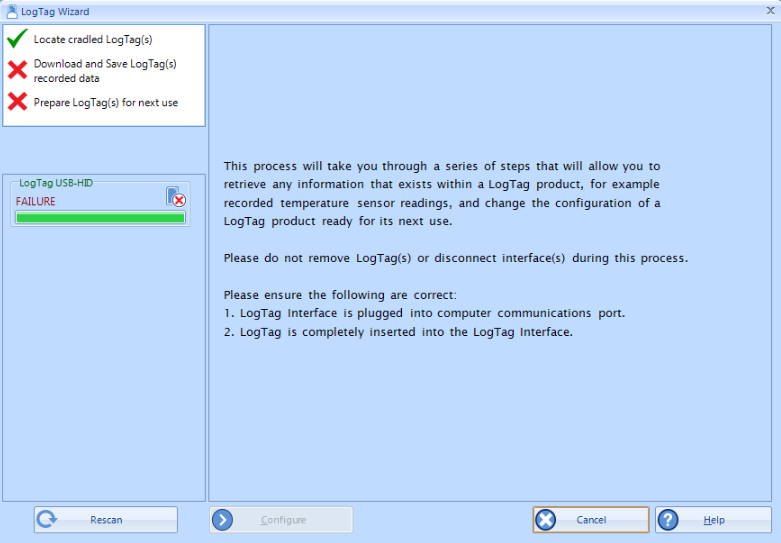
On rare occasions, you may receive a message during configuration that a logger has a damaged calibration.

We are aware of an issue that affects a small number of TRED30-16R, TREL30-16 and TRID30-7 loggers when used with an LTI-HID interface.
If you encounter this issue, please download this repair tool from here.
Close LogTag Analyzer. Download the tool, extract, and start it.
Cradle the LogTag logger with the damaged calibration and click on the "Start repair" button. Once the repair is completed, the text "LogTag repaired" will be displayed.
If you encounter any issues during the repair, please send us an email for further support.
LogTag data loggers carry unique serial numbers, and can therefore be calibrated*. We recommend calibration is done by an laboratory that can provide traceable calibrations,
LogTag loggers can also be adjusted. For this, you need to use LogTag Calibrate software, LogTag's proprietary adjustment software. LogTag Calibrate is free for calibration laboratories, however, it is restricted to approved users who have suitable equipment and credentials relating to standard practices of Temperature and/or Humidity calibration.
If you require calibration of your logger, please contact your local supplier.
Calibrate after a battery change
Loggers that had their case opened have potentially been exposed to electrostatic or other damaging effects.
Such loggers should be validated for correct operation and performance after the battery change, preferably by re-calibrating the unit, where ideally the product should be exposed to its full temperature measuring range.
Logger calibration certificates
Calibration certificates for factory-new loggers can be obtained directly from LogTag Analyzer. Please see here for instructions.
If your logger was calibrated by an external laboratory, please contact that laboratory for information.
* External probes must be calibrated together with a logger to form a calibrated bundle
You can view, download and print calibration certificates for your loggers directly from LogTag Analyzer 3.
Calibration certificate issue
Calibration certificates are valid for 12 months from the date of first configuration, or the first temperature recorded, whichever is the earlier.
The last possible issue date for a certificate is 18 months from the date of manufacture of the unit, which accounts for 6 months of storage at our warehouses, and a further 12 months storage at the client's premises.
If a logger has been first configured more than 18 months after its manufacturing date, the certificate will show the date of issue as 18 months after its manufacturing date.
Calibration certificate availability
Calibration certificates are only available in the software if the logger was manufactured after April 2019.
You must use the logger solely with LogTag Analyzer 3. If you or someone else have configured a logger first with LogTag Analyzer 2 before using it with LogTag Analyzer 3, a certificate will not be available.
Calibration certificates are also not available for vaxtag loggers, or for indicator products TIC20, TICT and iS0ºTag.
If you have requested a calibration from a lab, and the lab has adjusted the logger, the factory calibration certificate will no longer be available. The 'Certificate of calibration' button will be inactive.
If your logger was calibrated by an external laboratory, but they did not adjust the logger, LogTag Analyzer will still show the original (now expired) calibration certificate. You can ask your laboratory to invalidate this certificate (your laboratory will know how to do this) so it will no longer show, but you cannot view the new certificate in LogTag Analyzer.
Which version of software do I need?
The availability of certificates was first introduced in LogTag Analyzer 3.1r6. Generally, if a logger was first configured with this or a later version, the software will allow you to print a certificate, however, printing is reduced to the period for which the certificate is valid. You will also not be able to see a certificate, if you activated the logger later than 18 months from date of manufacture.
A change to the availability of certificates was made with the introduction of LogTag Analyzer 3.1r12. If you first configured your logger with this version, the date for which a logger's certificate is available has increased, as has the period in which a logger must be activated to be able to see the certificate, however, the general rules for the validity of the certificate have not changed.
Calibration certificates can be viewed:
in LogTag Analyzer 3, in the LogTag Configure window (after it has been configured once):
in the LogTag Analyzer 3 Report tab when viewing a file or downloaded the logger:

What to do if you cannot click the Certificate button?
If you cannot click the button, and you cannot retrieve the certificate, you should try the following (note that this process triggers the 12-month validity for the certificate):
1. Configure the logger (click LogTag - Configure, or press F3, the click Configure from the Configuration screen).
2. Once configured, click Restart. The certificate should now be available.
If you still cannot see a certificate, and you believe one should be available, contact LogTag for technical support, they can assist with providing a certificate.
Chemical vapors or pollutants
Exposure of the internal sensor to chemical vapors or high levels of pollutants may interfere with the internal sensor and cause a shift in both offset and sensitivity, resulting in inaccurate readings to be logged. This includes chemical hand sanitizers and other cleaning products. High levels of pollutants may cause permanent damage to the humidity sensor’s polymer.
Optimal Storage Conditions
For optimal Humidity logger storage, store units in original packaging in an air conditioned area. Storage temperature shall be in the range of 10°C to 50°C and humidity at 20 to 60%RH. Ensure good ventilation (fresh air supply) in storage area to avoid high concentrations of volatile chemicals. Do not store units in the same room as solvents or any other strong smelling products.
Re-conditioning Procedure
Exposure of the internal sensor to chemical vapors may interfere with the internal sensor and cause inaccurate readings to be logged. In a clean environment, this will slowly rectify itself. However, exposure to extreme conditions or chemical vapors will require the following reconditioning procedure to bring the internal sensor back to calibration state.80°C (176°F) at<5%RH for 36 hours (baking) followed by 20-30°C (70-90°F) at>74%RH for 48 hours (re-hydration) High levels of pollutants may cause permanent damage to the internal senso
The Long Term Drift of LogTag's Humidity Loggers, UHADO-16, HAXO-8, HASO-8) is typically less than 0.25% RH and less than 0.02°C per year when operating in the normal relative humidity and temperature range (0 - 65°C, 10-80%RH).
The long term drift value may be higher in environments with vaporized solvents, out-gassing tapes, adhesives, packaging materials, etc.
Where long term high accuracy is required, an appropriate calibration schedule should be set up and the unit calibrated by a laboratory for humidity measurement.
The contacts are isolated from the critical internal component such that incidental static discharge will not harm the Logger. Deliberate application of a full mains voltage (100˜240 volts AC or 12˜24 volts DC) to the Logger, however, will cause permanent damage.
Although we have no test data or specifications for the components used in a Logger it seems generally accepted that CMOS semiconductor components may have marginal performance above 5 kilorads of Gamma radiation dose. Typically most commercial (i.e non rad-hardened) electronics will fail for doses greater than 10-50krad. Depending on the intensity of the radiation the failure could be just a memory corruption, temporary loss of function or permanent damage/loss of function.
Providing metal shielding for the logger (such as a lead container) will lessen the impact of the radiation.
Loggers are not rated for direct immersion into any liquid. Only the stainless steel tip of the external sensor is suitable for immersion. A waterproof enclosure is available for some models. TREX, TRED and TREL models are fitted with an External Sensor.
We also recommend to hang your Logger vertically using the lug hole. This will allow any water or moisture to drain out of the unit.
For more specific information, check your user guide on the logger's product page for the IP rating.
LogTag Recorders do not operate any return or recycling programme. The cost of recovering components exceeds the cost of replacement by far. Loggers which have reached the end of their working life should be disposed of in accordance with local regulations.
Please contact your local distributor, who may operate a recycling, rental or leasing system.
The best way to clean your Loggers is with Isopropyl alcohol. This disinfects the Loggers. An exception is the HAXO-8; for this Logger, the alcohol may cause damage to the sensor. Please note LogTag products can be wiped with isopropyl alcohol but must not be immersed in alcohol or any other solution.
Clorox cleaning solution or any bleach-based cleaning solution is not approved or recommended.
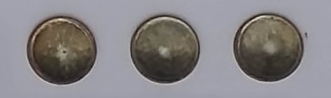
CLEANING CONTACTS
If you have an Logger that works together with the interface cradle, make sure that the three metal contacts at the back of the Logger are clean and free from tape residue, dirt or other contaminants, as these usually result in communications problems. If required, clean them with a soft pencil eraser, but don’t use abrasive materials as you may permanently damage them. The images below show the differences between clean and dirty contacts.
Dirty contacts

Clean contacts
If you need the (configure/download) password of your Logger, please send the diagnostics file to your LogTag supplier, who will retrieve it for you.
If you do not know who your supplier is, please send the diagnostics file to LogTag and we will retrieve it for you.
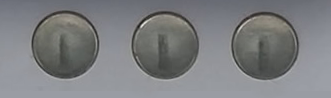
The number 1 reason for this error is the use of an incorrect probe.
The probes for TRED30-16R and TREL30-16 loggers are not interchangeable.
TRED30-16R loggers have a blue front label and are only compatible with the ST100 probes, which have a blue sleeve.

TREL30-16 loggers have a turquoise front label and are only compatible with the ST10 probes, which have a green sleeve.
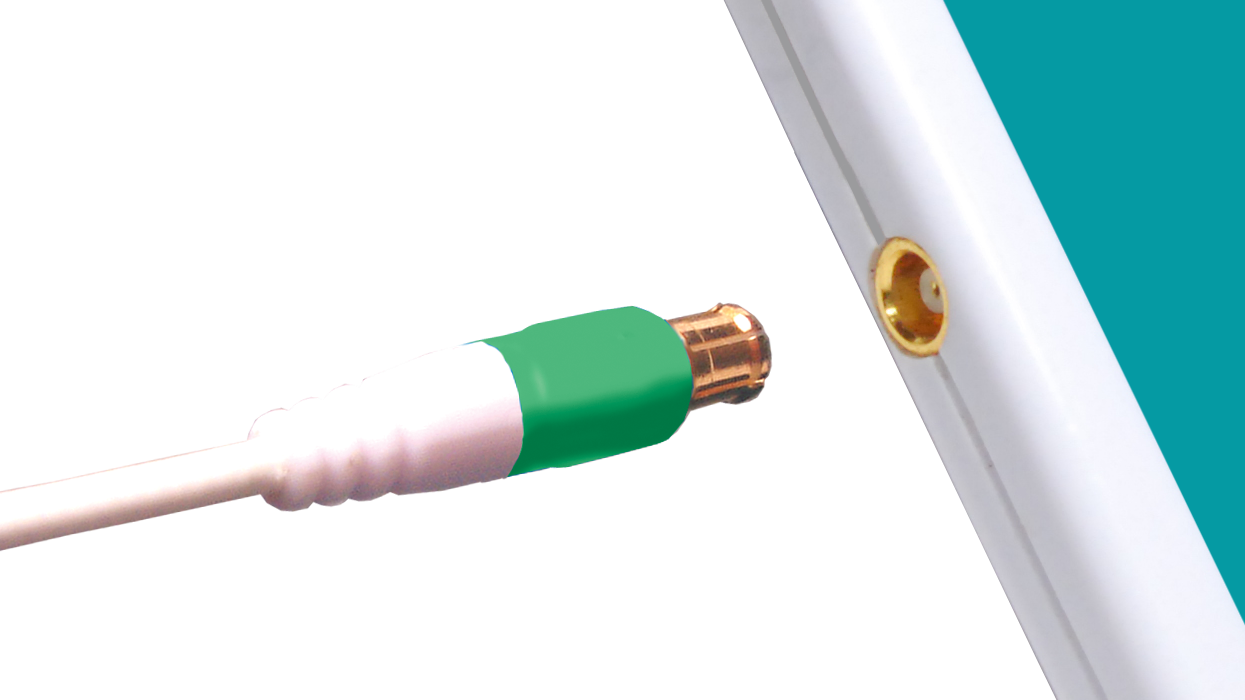
For either logger, you must use the correct probe that is compatible with the logger, or the temperatures on the display and in the downloaded data will be incorrect.
If for some reason the color sleeve on the sensor has detached, you can identify if you have the correct probe with a simple test at room temperature. Correct and incorrect temperatures are shown below.
| TRED30-16R room temperature, approx 25 ºC |
TREL30-16 room temperature, approx 25 ºC |
|
| ST100 probe | ||
| ST10 probe |
The temperature units on a logger's display are set during configuration with LogTag Analyzer. It can be changed as many times as you need, however, it can only be changed at the time you configure the logger. It is not possible to change the units during or after recording without losing the data just recorded.
USB Loggers (USRIC-16, UTRID-16, UTRED30-16 ETC...)
The temperature units are set in the File Settings tab during configuration:
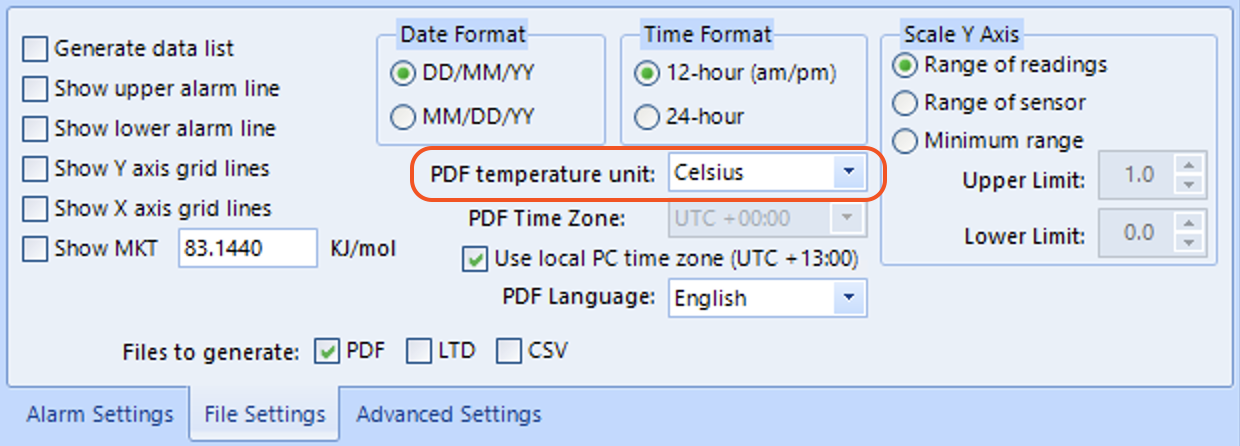
Here, you don't only set the temperature units for the PDF, but also for the display, if the logger has one. Temperature units for the display and the PDF cannot be different.
Non-USB Loggers with display (TRED30-16R, TRID-30-7 etc...)
For loggers with a display, but without USB and PDF generation, the temperature units are set in the Alarm Settings tab during configuration:
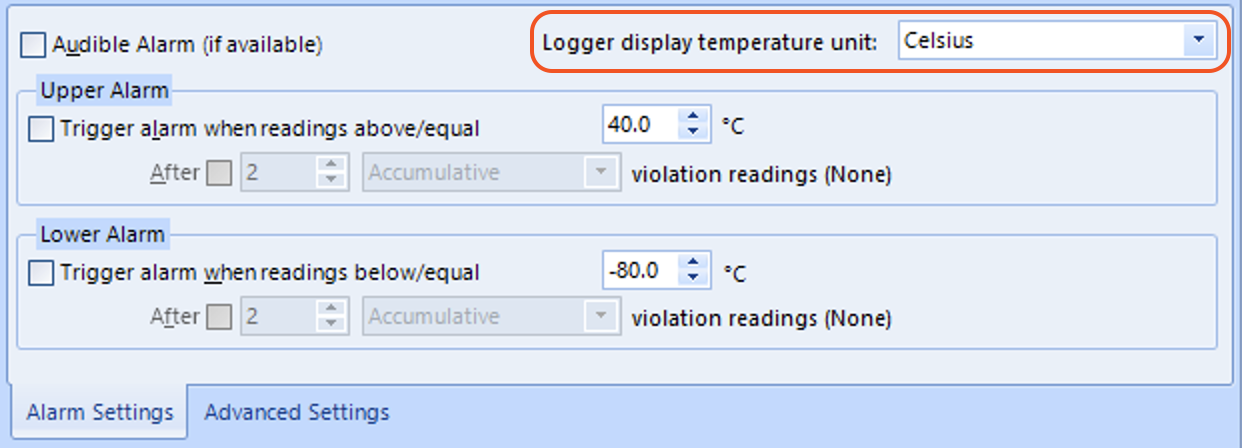
Note: This does not change the temperature unit used on the PC's screen for reports and charts.
See here how to change the temperature unit for that.
To see an overall preview of our LogTag products, we have resources available below to help you make comparisons and differences between each of the product features side-by-side, as well as the application type(s) each logger is suited for:
Click the links below to download:
LogTag® products support a feature called pre-start logging, which can be selected during configuration.
When pre-start logging is enabled, the logger will automatically start recording as soon as configuration is completed. It will record at the sampling interval defined during configuration and will continue to record until the user starts the logger by pressing the START button. Once the logger has been started, it will record started readings. While the logger is recording pre-start readings the Alert LED will not activate, even if an alert condition is present, no PDF is produced for USB PDF loggers when plugging into USB and when downloaded to LogTag Analyzer, the report tab will not be available.
Pre-start logging is useful as a fail-safe recording setting so if the logger is not started at the appropriate time, the readings will still be available to view later, albeit without the alerting functionality.
When the readings are retrieved from the logger, any pre-start readings will be separately displayed, so the user can quickly identify the readings recorded before and after the logger was started.
All LogTag® products have a finite amount of memory to store the readings they records. Therefore, while the logger is recording pre-start readings the LogTag® will operate in continuous operation. In this mode, the oldest pre-start reading will be overwritten with the latest pre-start reading once the logger's memory is full, or the latest started reading if the logger has been started.
Once started, the logger will first fill any remaining memory, then overwrite the oldest pre-start readings until the complete memory is filled with started readings.
If a logger was configured to start recording at a certain date/time, or for push button start from hibernation, no pre-start readings will be recorded. If you configure a logger with a start delay and have pre-start logging enabled, pre-start readings will also be recorded during the start delay.
Logging cannot be manually stopped on the Logger itself. If you want a Logger to stop recording at a specific time, select a specific number of readings or select a specific time period to be covered in the “configure for next use" screen.
The Logger will then stop recording data when that point is reached. If you choose “Record Readings Continuously", the oldest recording will be overwritten once the memory of the Logger is full, and the Logger can only be stopped by re-configuring or hibernating it with the LogTag Analyzer Software. An exception to this are TRID30-7 and TRED30-7 loggers, which can be stopped with the Start/Stop/Clear button, but this feature must be enabled when the loggers are configured.
Tip: Use the “Inspection Mark" feature to indicate when a load has safely reached its destination. When the “Start-Mark" button is pressed while logging is in progress, an inspection mark is inserted in the recorded data. This enables confirmation that the load has been manually checked at certain times in the journey, and also enables the recipient of the shipment to show when the load arrived at its destination.
The model number of your LogTag logger is printed on the model label on the rear of the logger.
You can find the serial number for your logger in one of two places:
On the front of the logger, above the barcode
USB loggers feature a special recess at the front which contains the barcode/serial number label.
On the model label on the rear of the logger
Loggers with a traditional 3-pin interface contain the serial number on the model label on the rear of the product.
The serial number is preceded by the letters "S/N:".
You can find more about the composition of serial numbers here.
When sending diagnostics, please send both the model and serial number. With this information it is faster for us to find the information about your Logger.
In order to download readings, first open LogTag Analyzer and then connect your Logger with your computer via interface cradle or via USB, depending on which type of Logger you have.
After a few seconds, the downloaded data will appear. You can turn off automatic download by clicking on “Auto-download is ON” at the top right of your screen. Data can be displayed in Chart-, Data-, Summary- or Day Summary formats by clicking the tabs at the bottom of the chart dialog. Data can also be saved in a number of formats including TXT, PDF, HTML and CSV for import.
All loggers with a display indicate whether they are recording, or have finished.
Applies to following models:
TRID30-7R, TRID30-7F, TRED30-7R, TRED30-7F, TRED30-16R
UTRED30-16, UTREL30-16, UTRED30-WiFi, UTREL30-WiFi
UTRID-16, USRID-16, UTRED-16, UTREL-16
UHADO-16
Typically, the logger's display shows REC if it is recording.
It shows STOPPED
If the logger is a multi-use model, you can get it to log again with the following procedures:
For both procedures, please refer to the respective user guides for your model, which you can access from the Products page of our website or the documentation section here.
The batteries used in Loggers are Lithium-metal button cells of 3V rating. They are classified under the IATA Dangerous Goods Regulations as lithium metal batteries contained in equipment.
The batteries have been tested and comply with the IATA requirements for safe transport by air when contained in equipment and packed according to the relevant standard. Our products do not affect aircraft and have passed all necessary electromagnetic emissions tests prior to going into manufacture.
Material Safety Data Sheets (MSDS) can be provided on request.
For a push-button start (with the TRID/TRED/TREL models) use the following procedure:

The recorder must be in "READY" mode for it to be started. The current time and the "READY" symbol are shown. If the displays shows "NOT RDY", your logger has been hibernated.

Press and hold the "START" button. First, "STARTING" is showing in addition to "READY".
Then "READY" disappears.
Once "READY" disappears, release the button within 2 seconds. "STARTING" will also disappear, and the "REC" symbol will be shown. The Logger now records temperature data.
Note: The Logger will not start if you release the button before "READY" disappears or when you keep holding the button for more than 2 seconds after "READY" disappears.
If you have one of the other models not mentioned in step 2, this procedure won’t work. Please check your user guide for more information.
Each LogTag data logger can be identified via a unique serial number. This number allows LogTag to identify production information, as well as giving you, the client, the ability to create records that are unique to each logger.
Over the years we have introduced several different formats of serial numbers. These numbers can be found on the front or rear of the loggers, typically together with a Code-128 barcode that represents this serial number, preceded by "S/N:".
10-DIGIT NUMBERS
10-digit serial numbers are typically used for our older 3-pin models such as TRIX-8 and SRIC-4. They consist solely of digits and are typically found as part of the model label on the rear of the product.
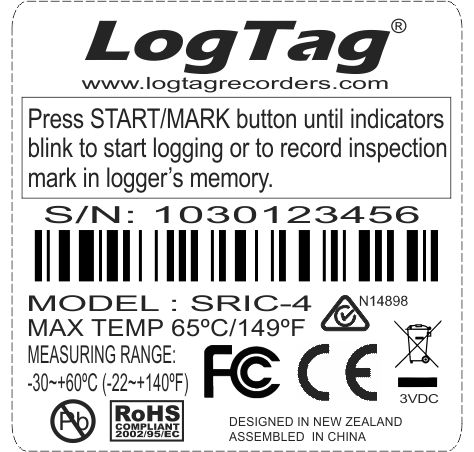
The serial number contains limited information about the model and an index number.
12-CHARACTER SERIAL NUMBERS
12-character serial numbers were introduced to allow better integration of the loggers with LogTag Online, as an included verification code prevents loggers to be incorrectly registered.

They were used particularly with our WiFi model, but have now transitioned to most loggers. The serial number has 3 distinctive sections.
4-character identification code
This consists of alpha-numeric characters and contains information about the model.
6-digit index number
2-character verification code
These two alpha-numeric characters represent a checksum and are required for LogTag Online to verify the preceding 10 characters have been entered correctly.
The actual serial number is still only a 10-character number; in fact, the logger electronically only stores the 10 characters and calculates the verification code when needed.
To make this more obvious, we will successively introduce a slight variation of this label that clearly identifies the verification code.
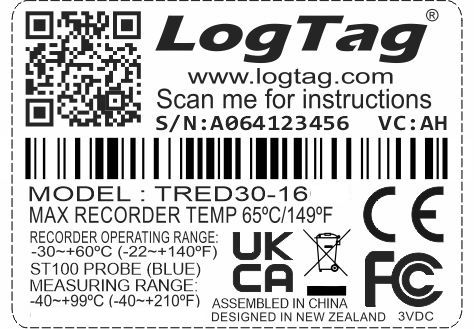
Note that the verification code is always present in the barcode.
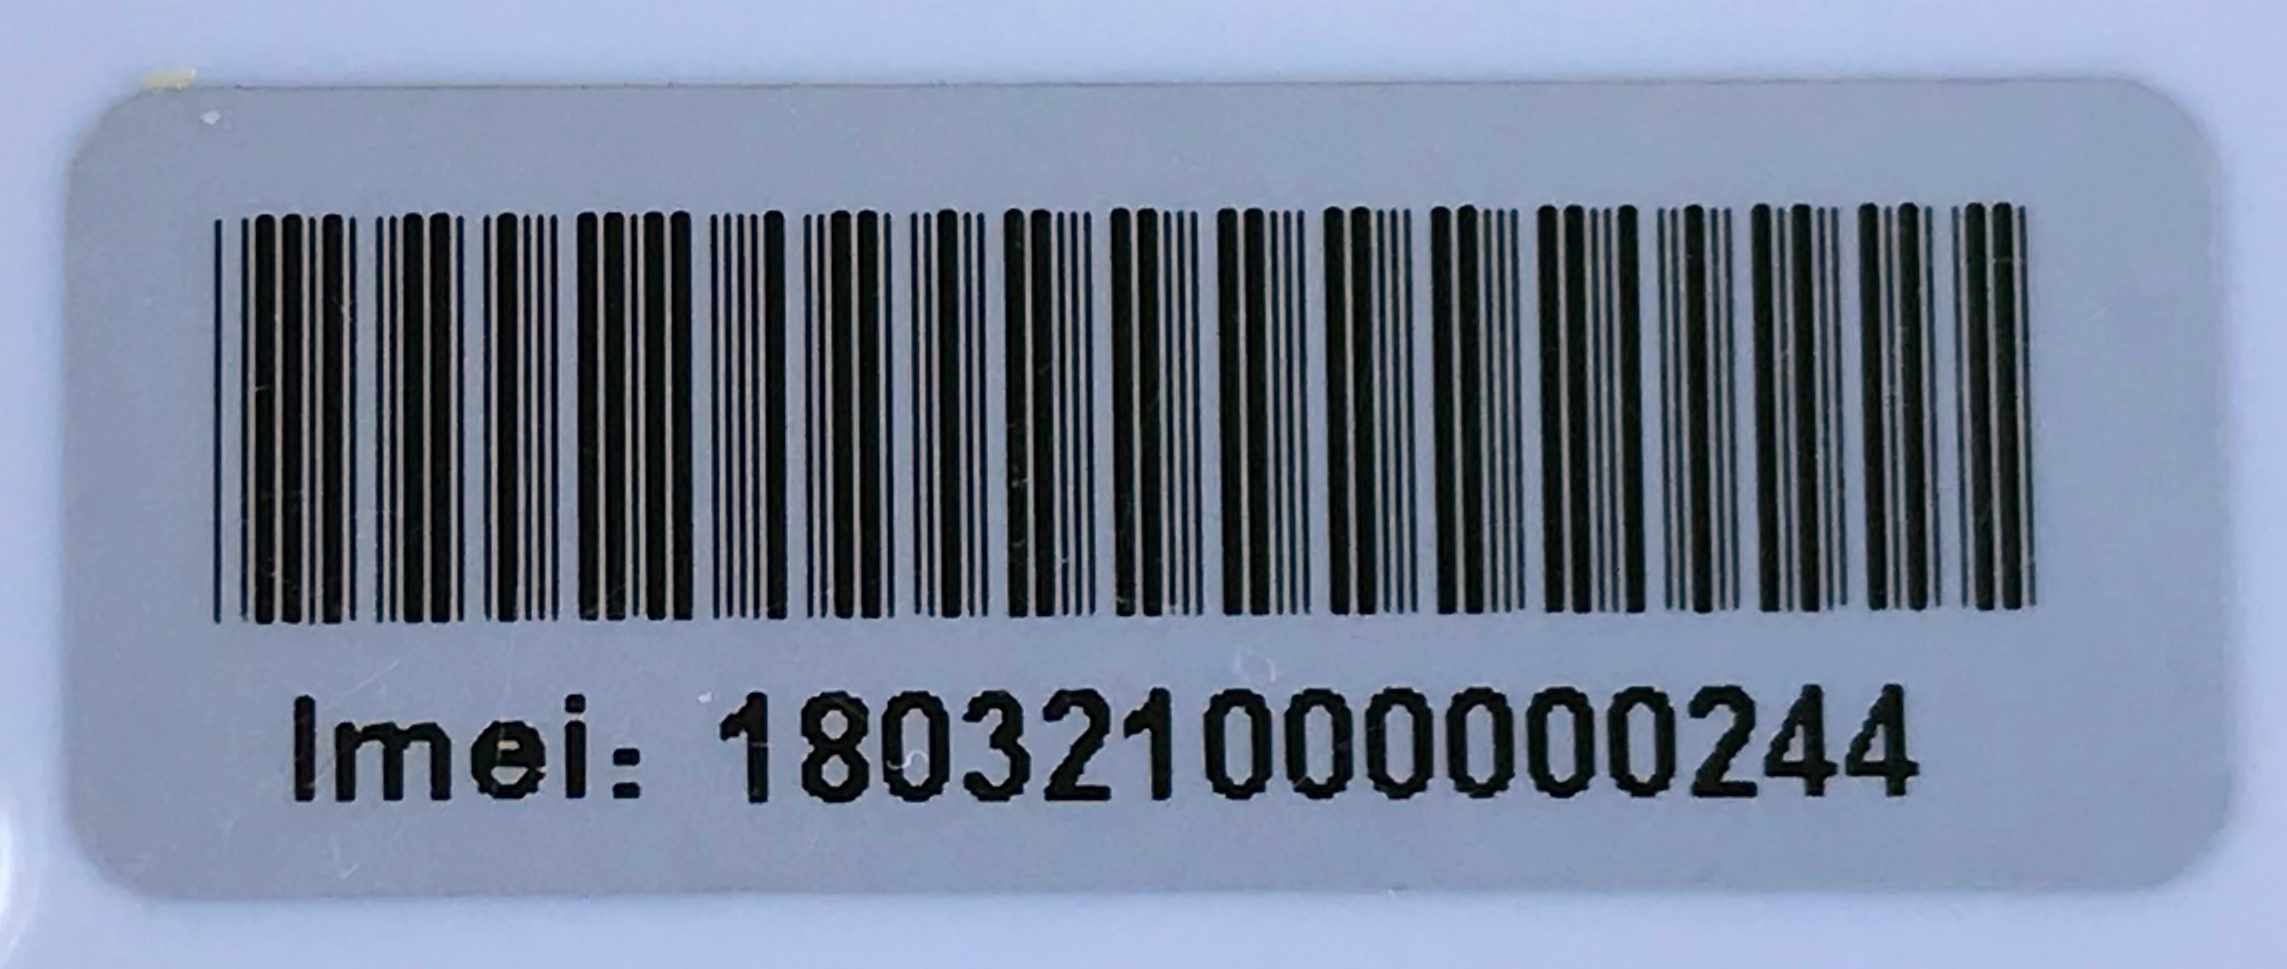
15-DIGIT SERIAL NUMBERS
15 digit serial numbers are used on the EV4-GEO exclusively, and represent the device's IMEI (International Mobile Equipment Identity) number.
Smart Probes are a new type of external probe developed by LogTag®.
Each Smart Probe contains its own electronics for measuring temperature. Calibrated temperature data are then transmitted to the logger to which the probe is connected. The logger acts only as a display and storage device. This means, the Smart Probe can be calibrated independent of the logger it is used with, and the logger itself requires no additional calibration.
You recognize the Smart Probe by its small case that holds the electronics conditioning and communication circuit:
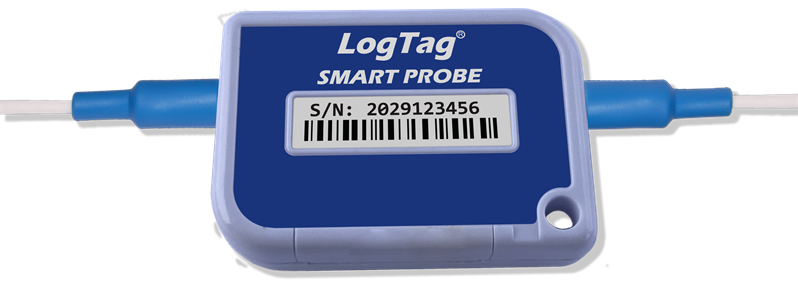
The latest dual-channel loggers UTRED30-16 and UTRED30-WiFi are compatible with this probe, and also have hot-swap capability:
The logger will display warning messages if the battery of the Smart Probe is low and requires replacement. This will be done by our distributor network at the same time a calibration is performed.
If you use an analogue probe, the logger's internal calibration is used. Smart Probes do not use the logger's calibration, instead, they each use their own calibration data.
For more information, please refer to the LogTag Analyzer User guide and the respective product manuals, available from the LogTag® Website.
Where can I find the certificates for the LT5GEO data logger and LogTag Online (LTO)?
All certificates are available for download on our website: LogTag - Support and Downloads
When should the logger be started?
The logger is first fully charged using a USB-C cable (until the green LED is constantly lit) and then configured in LogTag Online and started via the start button.
How long can the single-use logger be in transit?
The logger can be in transit for 90 days under normal use (30 minutes of logging, upload every 60 minutes).
Can the data logger store readings while charging?
No! The data logger does not record any data during the charging process.
Where is the best place to put the logger during transport?
To ensure the best possible reception, we recommend placing the LT5GEO in an open location with a clear view of the sky, such as on the roof of a shipment, rather than inside a metal container. This placement makes it more likely to get a GPS connection, so the logger can collect more accurate location data throughout the trip. Make sure that the data logger is not covered by the goods. If the light sensor is blocked, it cannot detect changes in light and cannot register corresponding alarms.
Can the data logger be used for location monitoring?
No, the data logger was produced exclusively for transport.
In which countries can the logger be used?
The data logger can be used worldwide thanks to the SIM card it uses. The cost of the SIM card is inclusive in the price.
Are there any limitations with LogTag Online regarding the number of files, transfers, alerts, etc.?
LogTag Online only has limitations for free accounts. Detailed information can be found under the Data Plans tab on our LogTag Online software page.
Why isn't my data logger receiving or transmitting GPS data inside the steel container?
Due to the strong shielding provided by the metal housing, GPS reception and data transmission are not possible. The logger continues to reliably record the measurements and store them internally. As soon as the device is back outdoors and can establish a connection, the temporarily stored GPS and sensor data will be automatically transferred to the cloud.
Please note: While the logger is inside the container, real-time transmissions and alarm notifications are not possible because there is no radio connection. This information will only be synchronized later once network coverage is restored.
Can a location be created for the LT5GEO?
No! Currently, a location (as a fixed location) cannot display much of the information transmitted by the LT5GEO, such as mapping information, light levels, and shock events.
In addition, the LT5GEO can only record and transmit while on battery power and requires regular recharging, preventing it from recording information continuously (i.e., monitoring a fixed location).
Therefore, the transit logger is not supported for monitoring fixed locations.
What happens to the cloud license if a logger breaks down in the second year after the license has already been paid for?
Our service will check whether this is a warranty case. If LogTag Online (LTO) is not used, there are no costs, so the license can be suspended or extended until the logger is replaced.
What calibrations are possible?
Light and shock are calibrated once at the factory; only temperature and humidity can be calibrated subsequently.
Why are my shipments not displayed in LogTag Online?
Procedure:
How is the alarm profile of the data logger structured?
Primary and secondary coordinators are immediately notified by email and text message. If there is no confirmation after 20 minutes, the coordinators are notified again by email and text message. After another 20 minutes, coordinators and emergency contacts are notified by email.
After another 20 minutes, coordinators and emergency contacts are notified by SMS. Delays in further notifications double each time until a maximum of 8 hours is reached.
After that, all contacts (coordinators + emergency contact) will be notified at staggered intervals of 40, 80, and 120 minutes via email and SMS until the event is confirmed or a total of 22 notifications have been sent.
LogTag Analyzer System Requirements
This article gives the system requirements for the LogTag Analyzer software. For information about Downloading the LogTag software check that article.
To ensure that the Analyzer software will work on your computer following minimum specifications are required:
The recommended specifications are:
If you are unsure of your computer's specifications, please refer to your operating system's documentation or help function.
MAC
If you are working on an Intel-based Mac you can use LogTag Analyzer versions 2.0r17 and later, however you must use a virtual machine software such as VirtualBox, VMWare Fusion, Parallel Desktop or similar. You can find a summary of the steps in the document about “Installing LogTag® Analyzer on an Apple Mac" using VirtualBox, which you can download from here.
Unfortunately, there is no recommended solution for Apple M1 Macs.
LINUX
Unfortunately, we cannot recommend installing the LogTag Analyzer software on the Linux operating system. Some users have reported success with installation via WINE, but this is experimental and LogTag Recorders can only offer limited support. We will continue to monitor the suitability of WINE for LogTag® Analyzer and publish new information as necessary.
Alternatively, you can use a Windows-based virtual machine via VirtualBox.
CITRIX
You can use LogTag Analyzer in a Citrix environment, however there are certain restrictions. For more information, have a look at this document.
CHROME
Our software isn't compatible with the Chrome OS (Operating System). Chromebooks do not actually have a Windows OS, they only work with web applications, any actual applications have to be specifically written for Chrome OS in order to run on a Chromebook.
USB 3.0
At this stage all major computer manufacturers provide USB 3.0 ports mainly to support storage devices such as external hard drives with higher speed requirements. On some computers driver incompatibilities between some of the controlling hardware and the LogTag Interface Cradle drivers could exist, which is unfortunately outside LogTag Recorders control.
Although we have tested LogTag Interface Cradles on USB 3.0 ports of different computer manufacturers without issues we would still advise using USB 2.0 ports where available. There is no advantage of using LogTag Interface Cradles on a USB 3.0 port.
There are two types of LogTag Analyzer 3 releases, a major update that contains important changes that would affect a large number of users, and a minor update that affects on a niche set of users or is non critical.
We only inform users via the software notification system of Major releases (e.g, Version 3.1.7), not minor ones (e.g. Version 3.1.8) as most users don't want to upgrade. We try and stick to one major update per year if we can.
Note: We don't make this distinction on our website, as it could create confusion for some users. Please visit the https://www.logtag-recorders.com/en/support/ page for the latest LogTag Analyzer 3 version.
Our software can be downloaded via the support page on our website. You can find instructions here, how to get started.
LogTag Analyzer is free to use, however, some of the features connected top the software such as the ability to upload data to LogTag Online may require a subscription.
You need to agree to the license terms set out in the user guide, including the LogTag Recorders privacy policy.
System Requirements
LogTag Analyzer is designed to run on Windows computers. Check out the LogTag Analyzer System Requirements and supported operating systems.
Uninstalling LogTag Analyzer
Open “Control Panel" – “Add/Remove Programs", or “Control Panel" – “Programs and Features"; highlight “LogTag Analyzer" and select “remove".
If you are removing version 2.3 or higher, you also need to remove the USB drivers: highlight “USB Interface Cradle Drivers" and select “remove"
On some occasions this may not remove every single file from your computer. In that case please delete following files also:
Note:
Occasionally we receive reports of antivirus software blocking LogTag software updates. We advise customers who see this, to please disable their antivirus while installing the LogTag software.
If you aren’t able to open an exe file on your computer (due to security restrictions) you will also find an alternative download link for a zip file, which you need to unpack before you can run the installer.
The existing cradle drivers are compatible with the updated software.
You are able to find the version number of LogTag Analyzer by opening LogTag Analyzer. At the top left corner of your window, your version number will be shown.
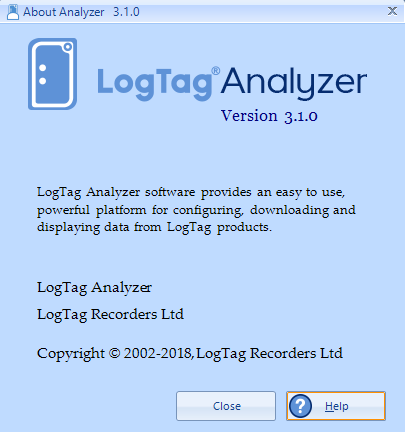
Otherwise you can also go to "Help" and click on "About Analyzer". The following screen (with software version number) will appear.
Connect the Logger to you computer via the interface cradle or USB. In order to start using your Logger, you need to configure it in LogTag Analyzer via the 'LogTag Wizard'. This can be accessed by pressing 'F2' on your keyboard or by clicking the 'Wizard' icon.
By clicking on 'Configure', your Logger will be configured and any previously stored data will be deleted from the Logger.
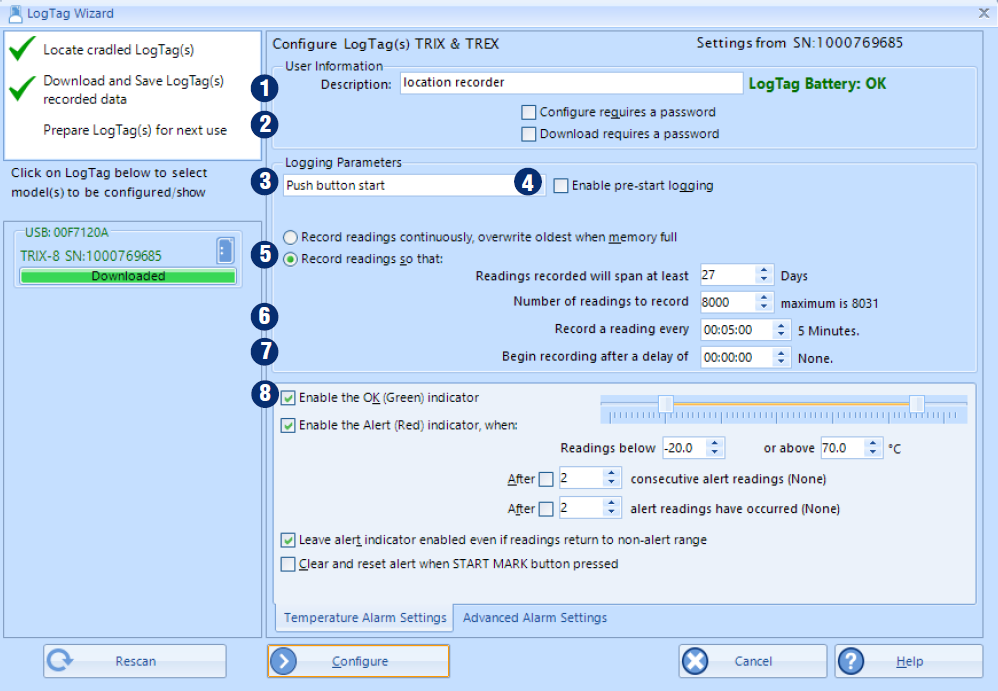
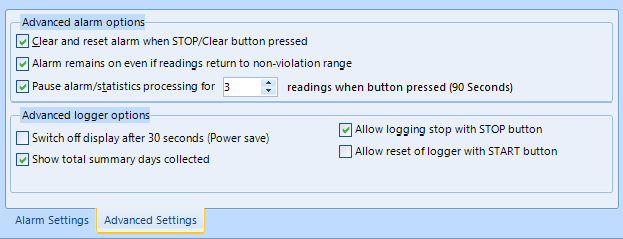
During configuration of loggers with a display you can set the option to ignore up to 15 readings for alarm- and statistics calculations after either button is pressed. The readings are still shown on the graph and in the data listing, but they are labelled as paused, and their value is ignored when determining alarm trigger conditions, minimum/maximum values and other statistical calculations. This function is useful when you wish to review readings during the logger's operation (or clear an alarm), but you do not wish to trigger an alarm due to your handling the product. It also allows the logger to acclimatize to the environmental conditions again, before further readings are processed.
After a button press the display shows the word PAUSED.
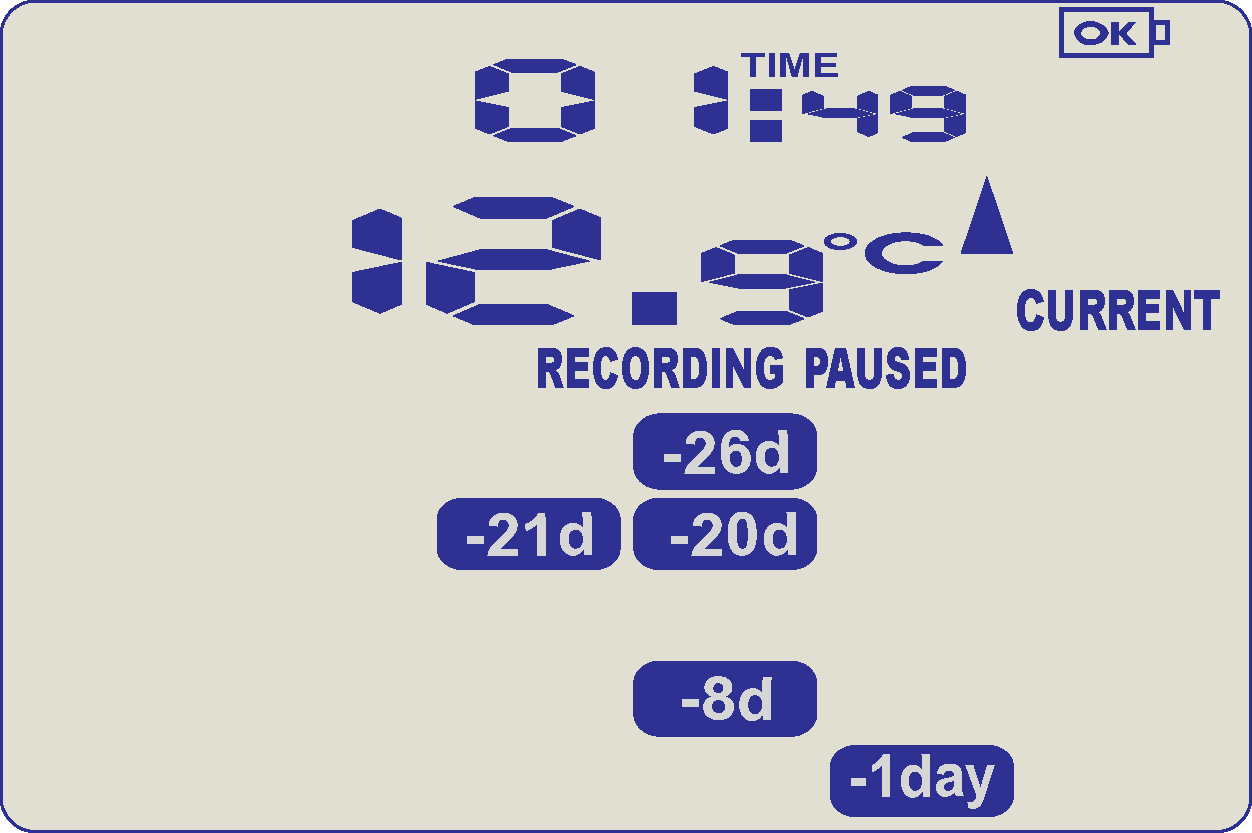
Paused readings are specially marked in the graph and data listings.
PAUSED will turn off as soon as the last ignored reading has been recorded. It will show longer, if your last button press was just after the logger took a temperature reading, but will be displayed for a shorter period if you pressed the button just before a reading is taken.
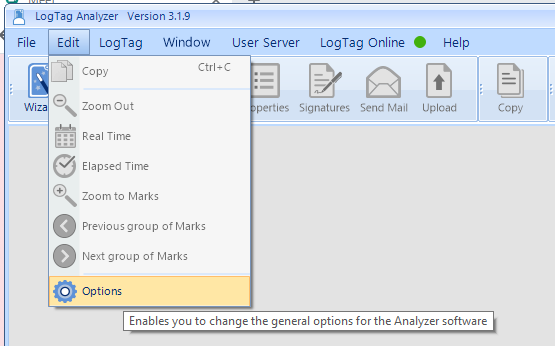
If you wish to change the temperature units used to display reports and charts in LogTag Analyzer, click Edit – Options, click on the General Settings tab and select the desired temperature unit in Show temperatures in. Select from Celsius, Fahrenheit or Kelvin.
Confirm the new settings by clicking OK at the bottom of the window.
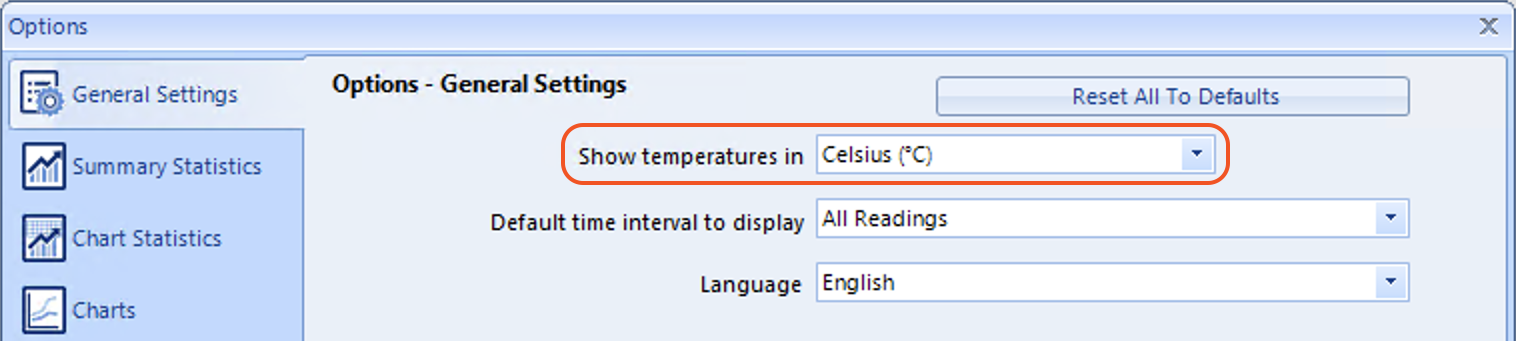
Note: This does not change the temperature unit used on the display of a logger, or on the PDF generated directly by a USB logger.
See here how to change the temperature unit for those.
If you have changed the language (by accident). Take the following steps to change it to the original language:
Exit the LogTag Analyzer software and delete the file “User Profile.dat" from C:\Documents and Settings\#USER#\Application Data\LogTag. In VISTA and Windows 7, this file is located in C:\Users\#USER#\AppData\Roaming\LogTag.
You may need to change the display settings in Windows Explorer to be able to navigate to this file (Note: The Windows search feature will likely not find this file, however you can quickly navigate to the profile location by typing “%APPDATA% into the Windows Explorer Address Bar). Please refer to the Windows Operating System’s online help.
Once this file is deleted, the software menus will be displayed in the language set in the Regional Options of the operating system (if LogTag® Analyzer software supports this language, otherwise in English). Please note, that other settings you may have made like Communication port settings or default chart parameters will be lost.
From time to time LogTag Recorders will add new functionality to USB Loggers or enhance existing features. When a new version of LogTag Analyzer is released, we make these available to you – where possible – via a special upgrade function or download the latest version via our software page.
Although you may not always require the new functionality, or may not wish to spend the time necessary during configuration, we still recommend upgrading, as you can be sure you are always working with the most up-to-date product.
If you're using multiple units, it's possible to upgrade them at the same time, as long as they have the same model number.
You can use Google’s SMTP server to send automated e-mail through your Gmail account. This requires special settings, which are slightly different than typically found with other email clients.
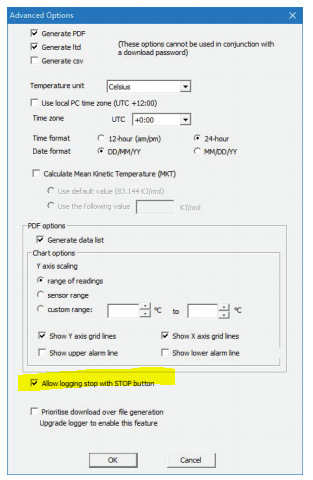
If necessary, the "STOP" button can be disabled during configuration. This prevents someone pressing the "STOP' button while on a trip.
During configuration, click on advanced options for additional configuration settings. These settings decide which files -if any- are generated at the trip and also determine the appearance and contents of generated files.
DEW POINT CALCULATION AND DISPLAY
From LogTag Analyzer version 3.1.9 it is possible to enable dew point calculation and display for LogTag humidity loggers (UHADO-16, HAXO-8, HASO-8). When enabled the dew point is calculated using the temperature and humidity for each logged reading, and displayed on the report, chart and data list.
ENABLING DEW POINT IN LOGTAG ANALYZER
DEW POINT DISPLAY
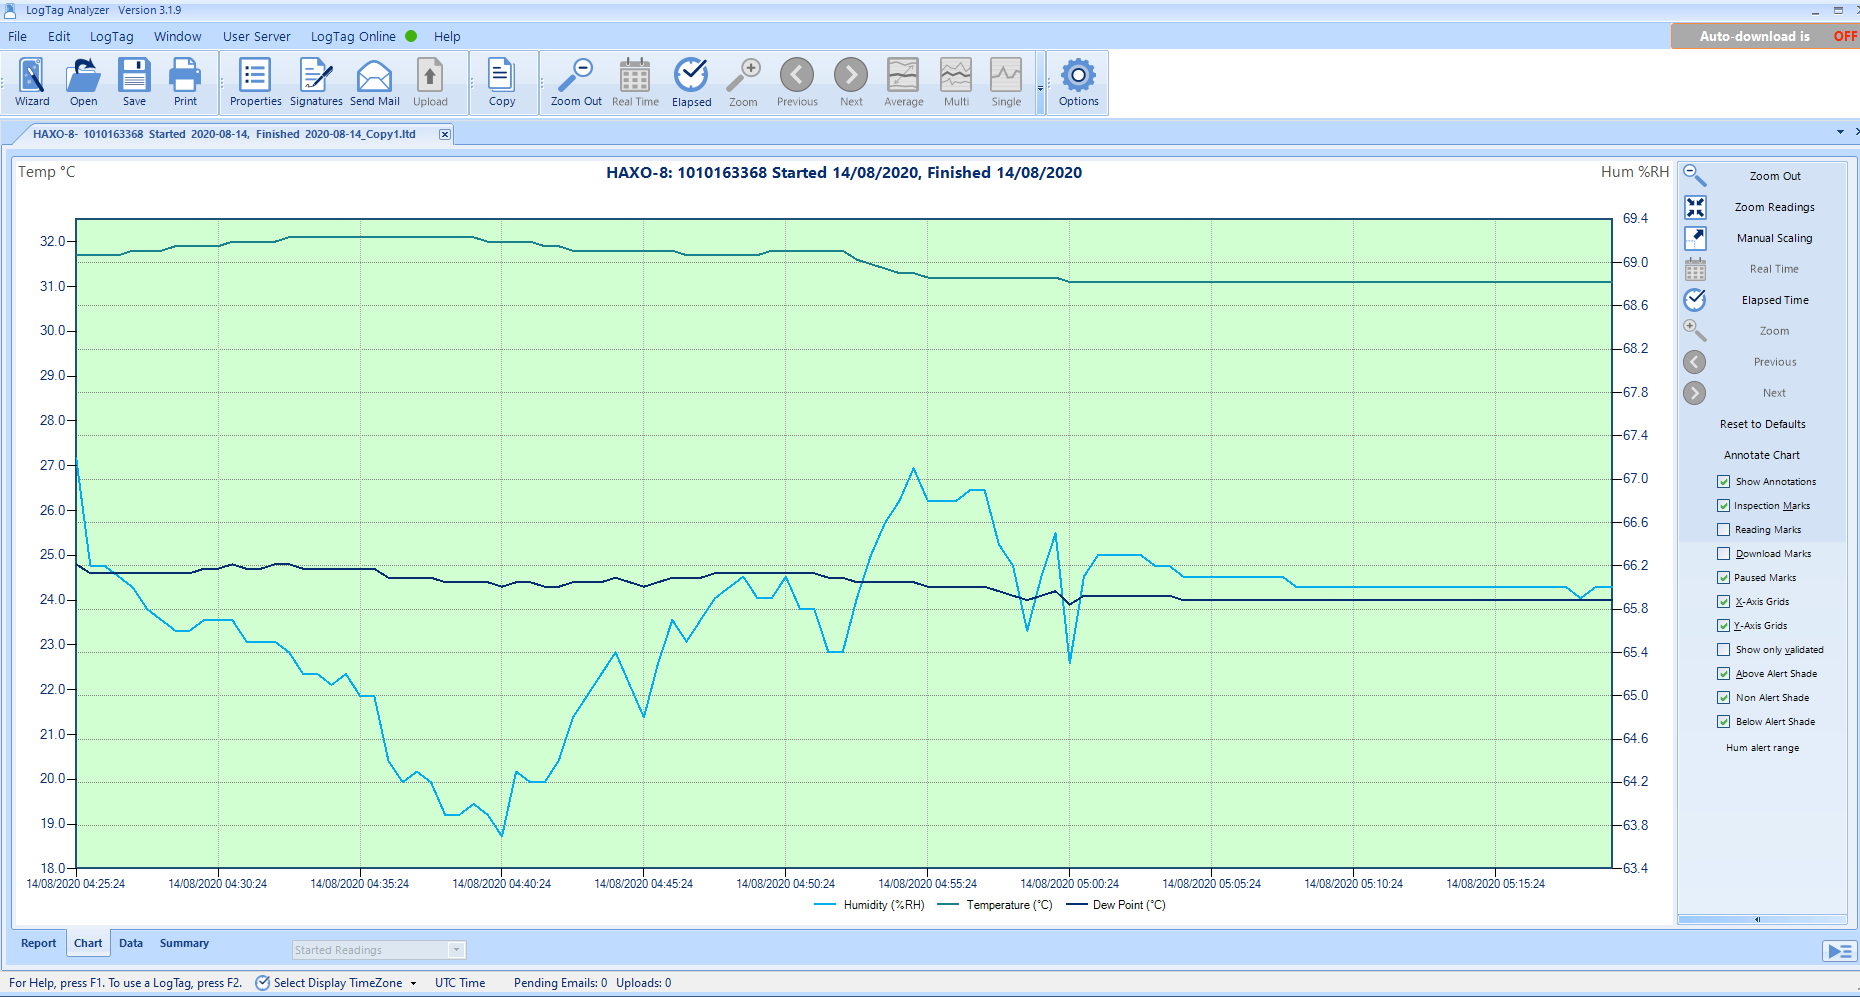
LogTag Analyzer showing Dew point temperature series on the Chart.
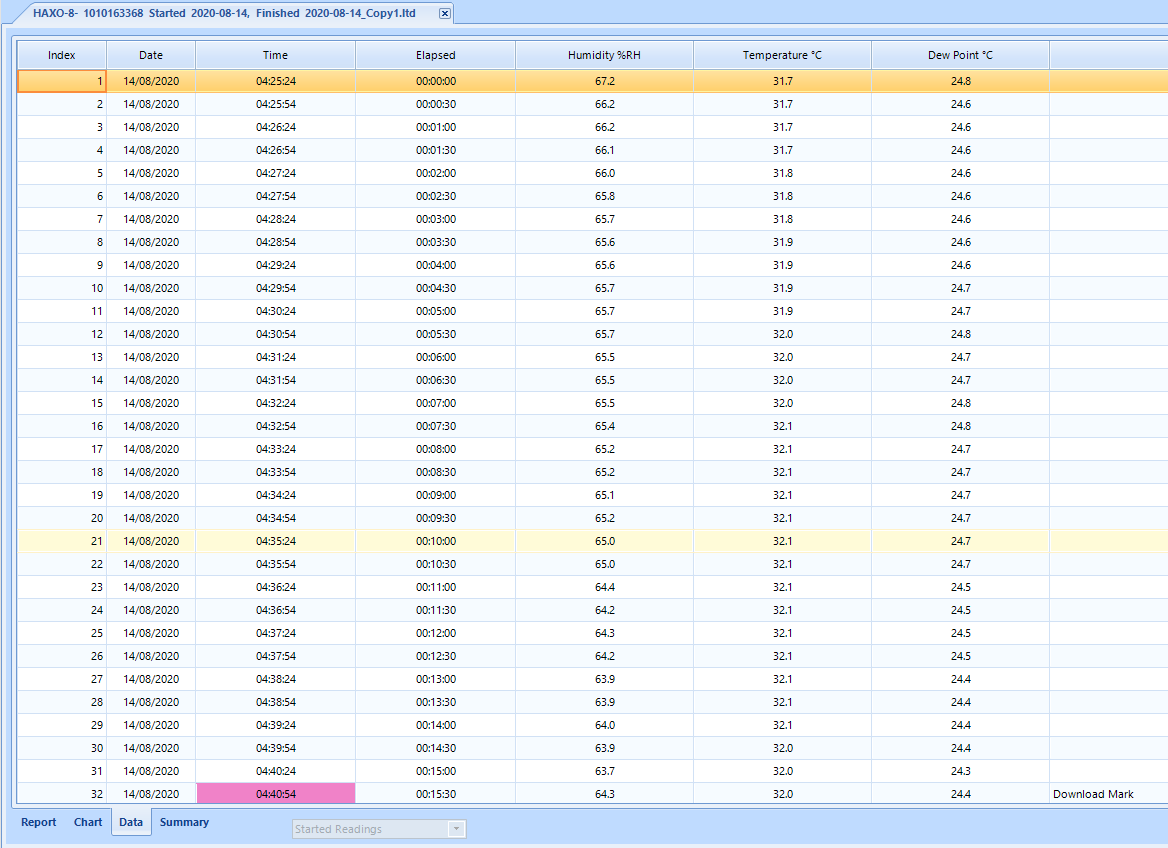
LogTag Analyzer showing Dew point temperature series on the Data list.
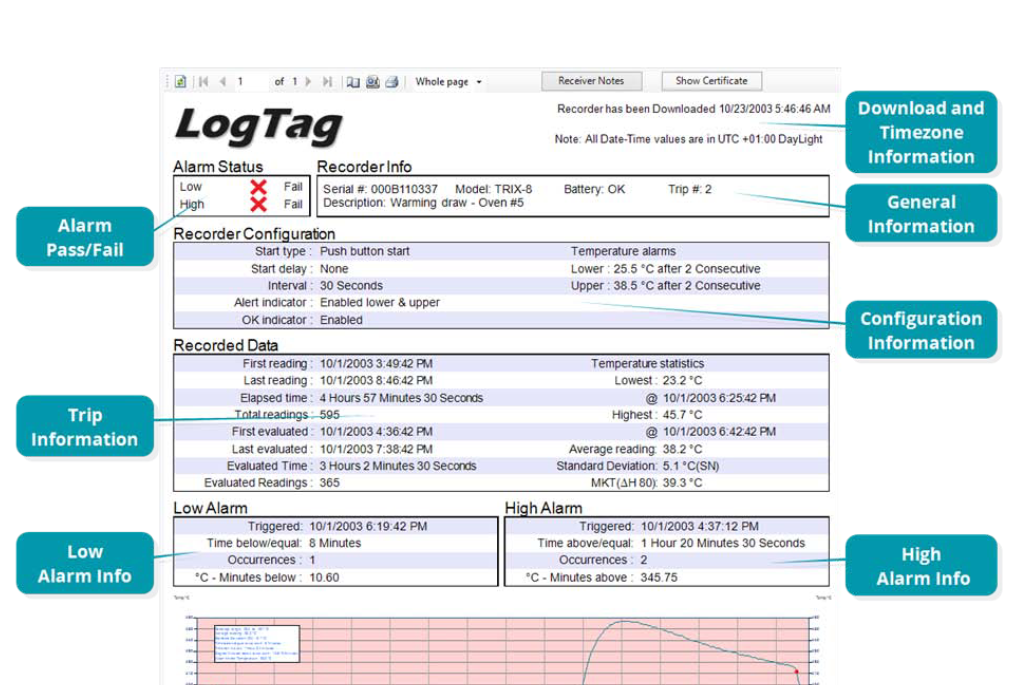
"Evaluated readings" as shown in the Trip information of the LogTag Analyzer Report, are temperature or humidity readings that are used in the statistics calculations. They are data points that are used to calculate the Min, Max or Average readings.
In some cases, if the chart has been zoomed in and a subset of data was inspected, the report will also only show those readings. The zoomed reading time range will also be labelled "Evaluated readings".
Total readings are the total number of sample intervals, or readings taken by the logger. In the case of Humidity loggers, a reading is a Temperature and Humidity value pair where this counts as one reading or one sample.
If the "Pause alarm/statistics process' option is enabled in a data logger, pressing either button on the LogTag® while recording excludes the next reading from the alarm and statistics calculations and PAUSED will be shown on the display. Readings that are recorded while the logger is PAUSED do not count as evaluated readings, but still count towards the Total Readings displayed in the logger reports.

For USB loggers, they are unable to take accurate temperature or humidity readings whilst connected to USB power. Loggers that are still recording in this state will not record a reading, but mark it as USB PAUSED in the readings log. These readings will not count as "Evaluated readings" but will count towards "Total readings" in the report.
Downloaded data are stored in a LogTag Data file (*.ltdx), which is a proprietary secure format that is tamper-proof. This is a requirement in many applications and standards (such as the FDA 21 CFR Part 11 in the US).
*.ltdx files can only be accessed and viewed by LogTag Analyzer software, so if another person wishes to view the data on different computer then either they need to install LogTag Analyzer (which is free for download and use) or the data needs to be exported to another format.
LogTag Analyzer stores data in a folder which can be set in the Options, where you can also choose to automatically store data upon downloaded. LogTag Analyzer can export data either manually or automatically to formats capable of being imported by other applications such as MS Excel, however, data exported this way are no longer secure/tamper proof.
If you download your readings and notice a big difference in measurements, it's highly likely that the battery is getting to the end of it's life and has caused a corruption within the Logger.
The impact of often downloading the data is quite significant on battery life and can be reduced by turning off (hibernating) the Logger between uses.
You can check the average battery life of your Logger on our products page, by selecting your model number. On average this is between 2-3 years.
If your Logger is relatively new and you still have the same problem, please send us a diagnostics file.
-40 DEGREES CELSIUS READINGS
If your Logger only records temperatures of -40 degrees Celsius this could be a connection problem with the probe.
All of our data loggers automatically insert error detection codes into the log memory while they record. When these detection codes for a block of recordings fail the integrity validation, the relevant readings are marked as non validated readings. On your data list, non validated readings are displayed differently to validated readings by default, to indicate that they have failed this integrity test. For the chart, this option can be enabled in the option settings. These error detection codes are saved with the file so any attempts to manipulate data in a saved file are also detected.
There are several reasons why data can be marked as non validated:
Only in very rare cases is this a result of a memory fault in the logger itself.
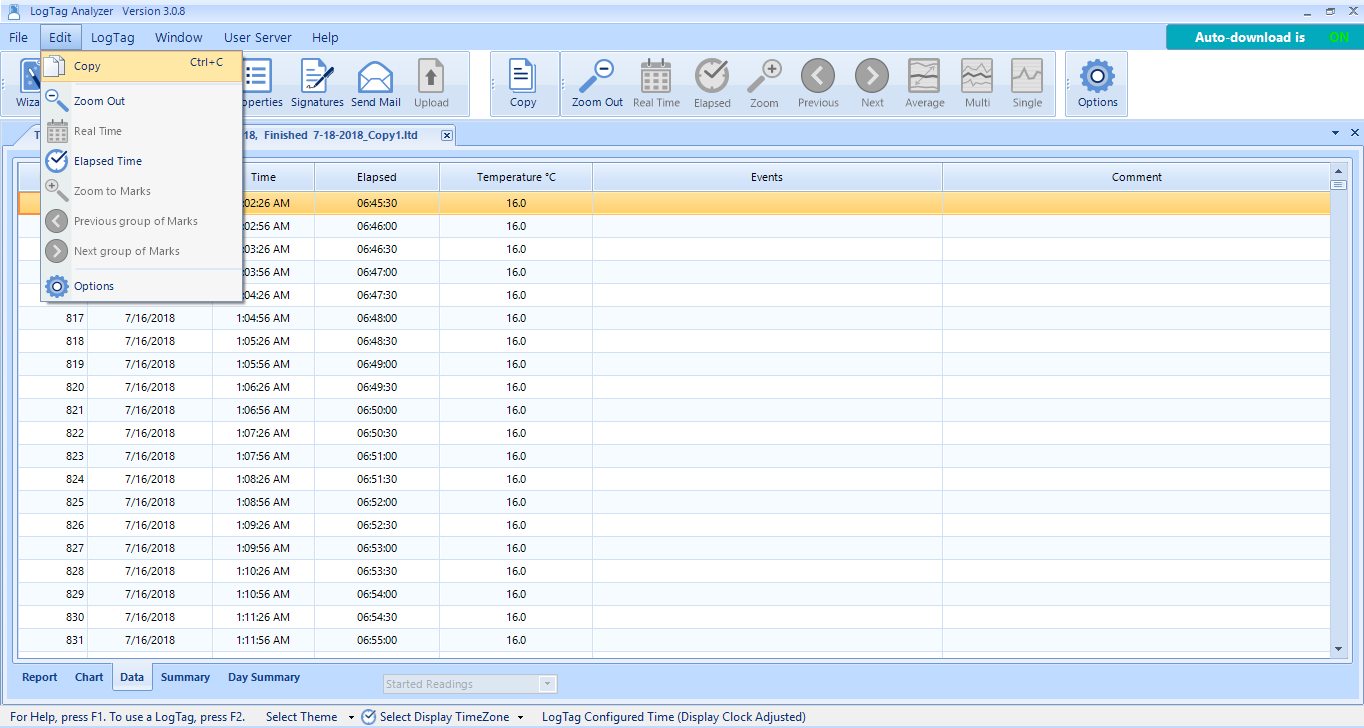
It is not possible to only download the usable data, however you can do the following:
Or if you want a specific set of data, you can left-click and drag to select the specific data you are interested in.
In all of these above cases, the Report, Data and Summary are updated to reflect only the data selected.
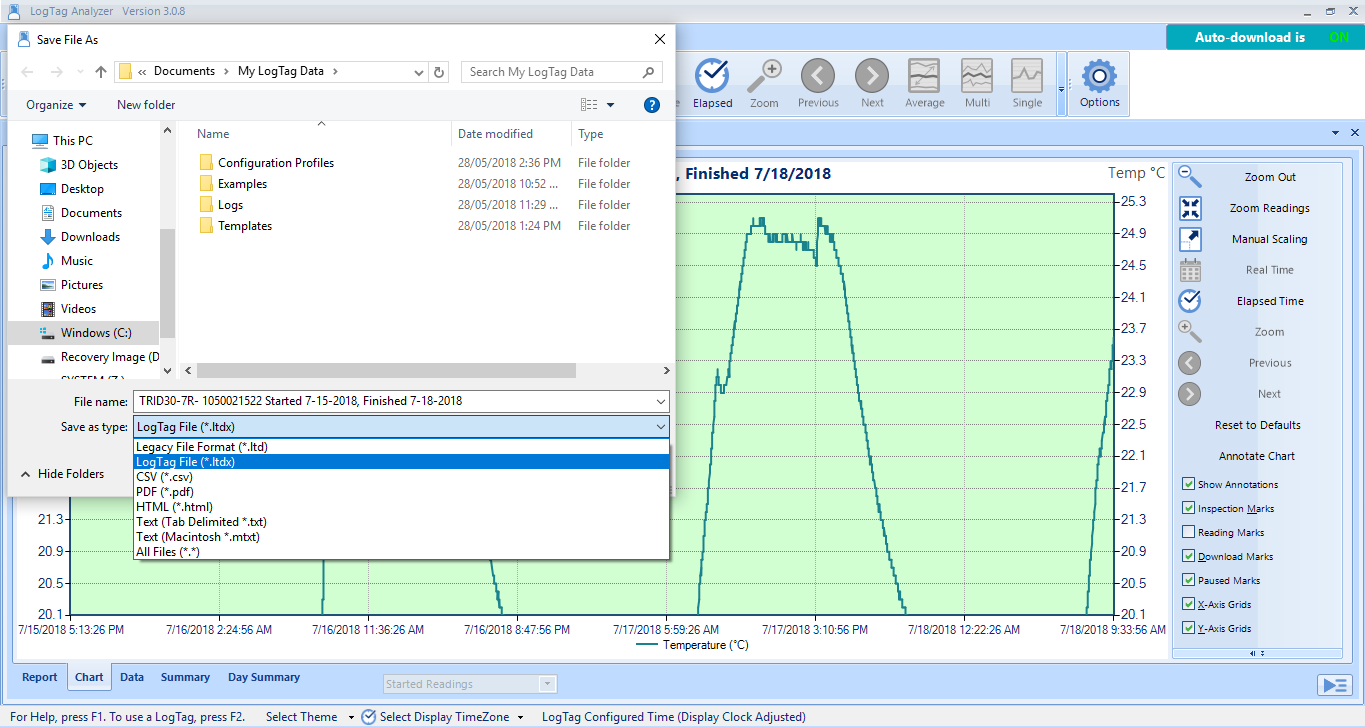
You can Copy/Paste the chart or data etc….as described above, or you can click File-Save As and select "LogTag File (*.ltdx)" – to save the data you selected.

In order for you to export data to excel, go to the Data tab, then click Edit-Copy.
Then open Excel and Paste.
Similarly, if you are on the Summary tab, if you click Edit -> Copy – you can then paste the summary information into Excel.
If you are on the Report or Chart tabs, If you click Edit-Copy, you can then paste the report or chart into Excel, Word or PowerPoint etc.
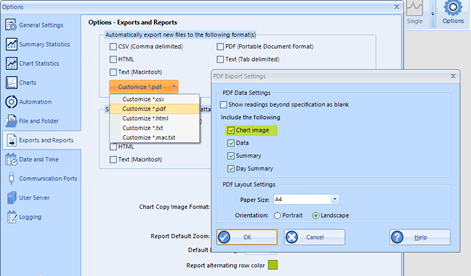
When you save a PDF you can choose to include information from any of the displayed tabs, this is set in the Menu Edit -> Options -> Export and Reports -> Customize PDF, which allows you to include the information from extra tabs, such as the data tab and summary tab into the exported PDF.
When printing, you are printing what you see on the screen, since the tabs are displayed separately (you can only see the content of one tab at a time,) you would have to print each tab order to get physical copies of the data.
All data in LogTag Analyzer is displayed from a downloaded file, not directly from a Logger. The data is automatically downloaded to the following folder: C:\Users\User\Documents\My LogTag Data, unless the folder location has been changed by the user to their preferred folder location.
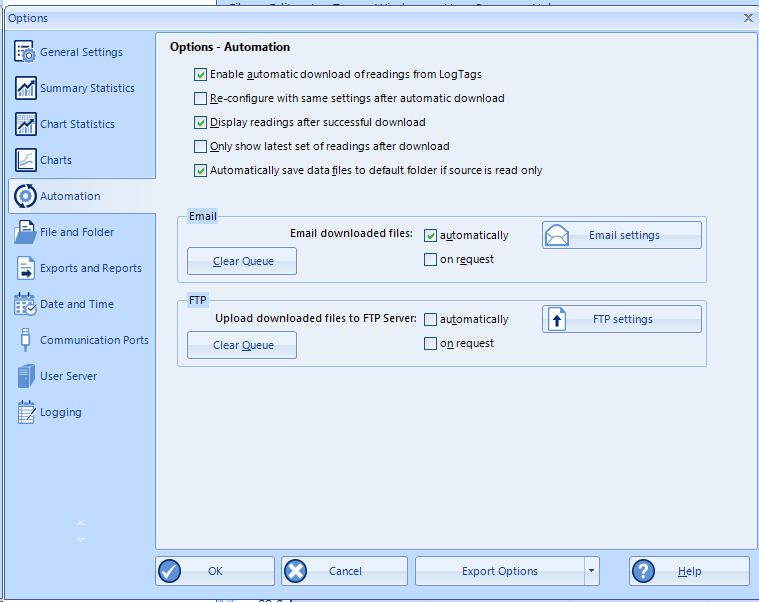
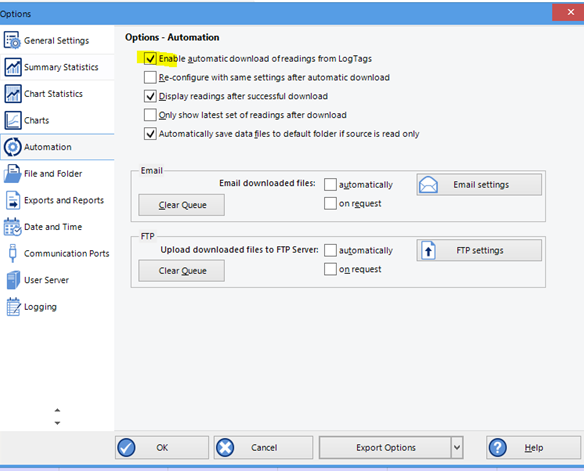
Has the Logger been reconfigured and used to record temperatures again since the period you're missing data from? If yes, then the old file is likely to have been overwritten and is not recoverable. To avoid losing your data if you accidentally reconfigure before downloading - please check your automation settings. Click Edit-Options-Automation. Check that the option highlighted in yellow below is selected - so data will download automatically when you cradle the Logger.
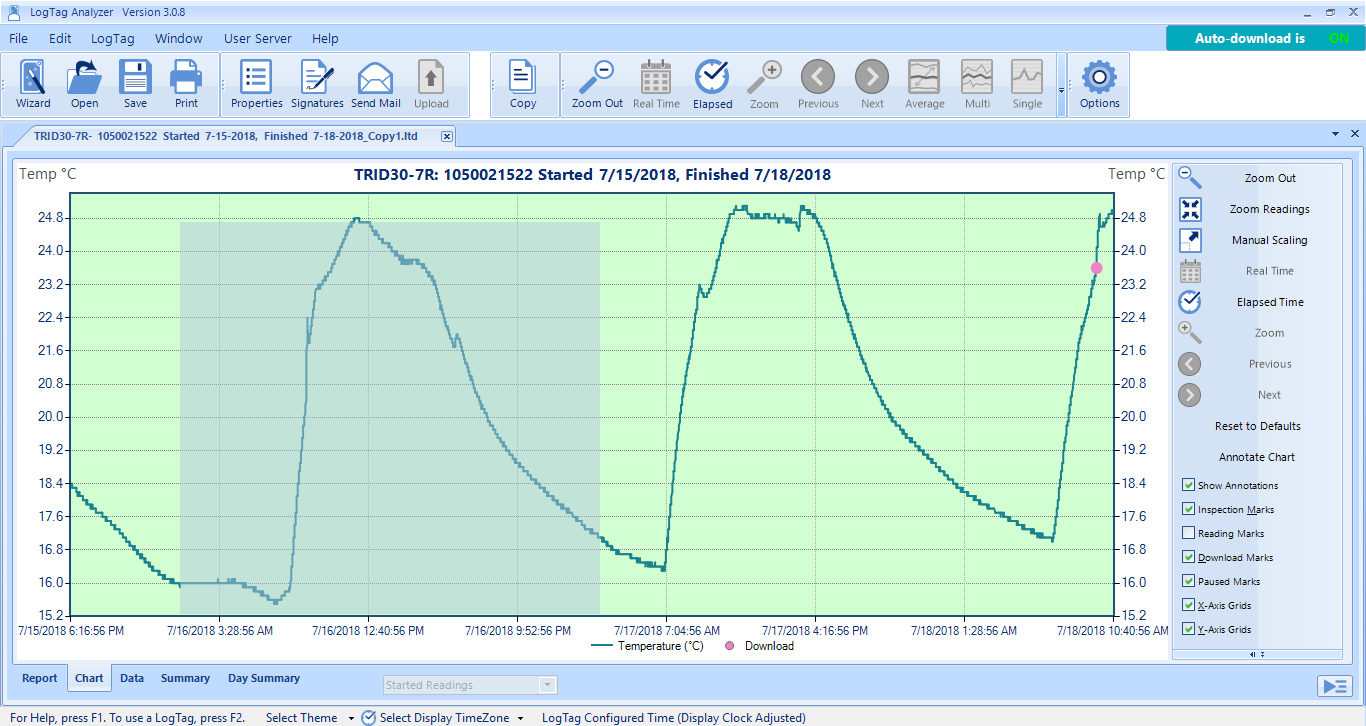
To save data for just a specific period into a report eg for a monthly or weekly report:
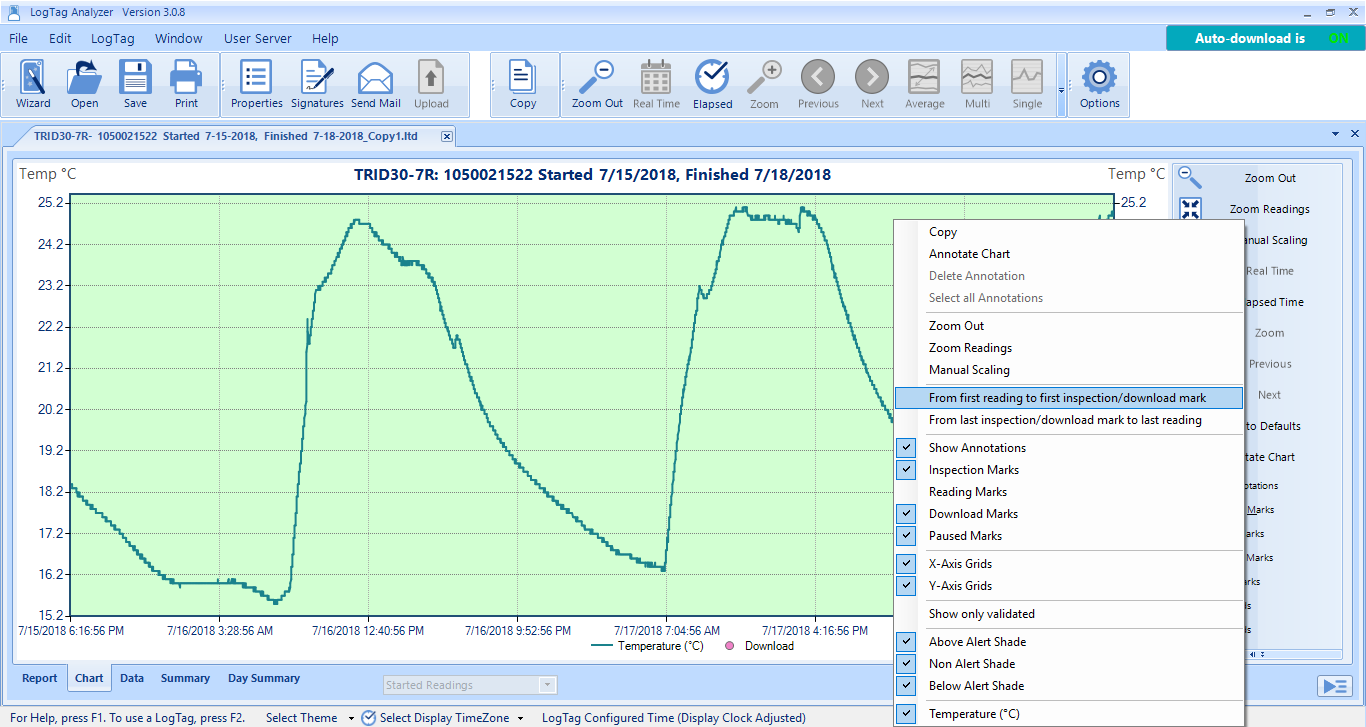
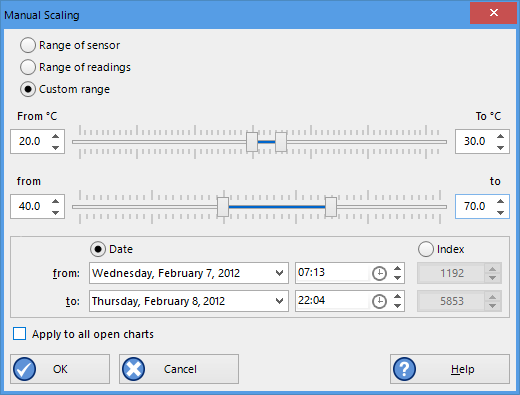
Right-click on the chart and click on Manual Scaling.
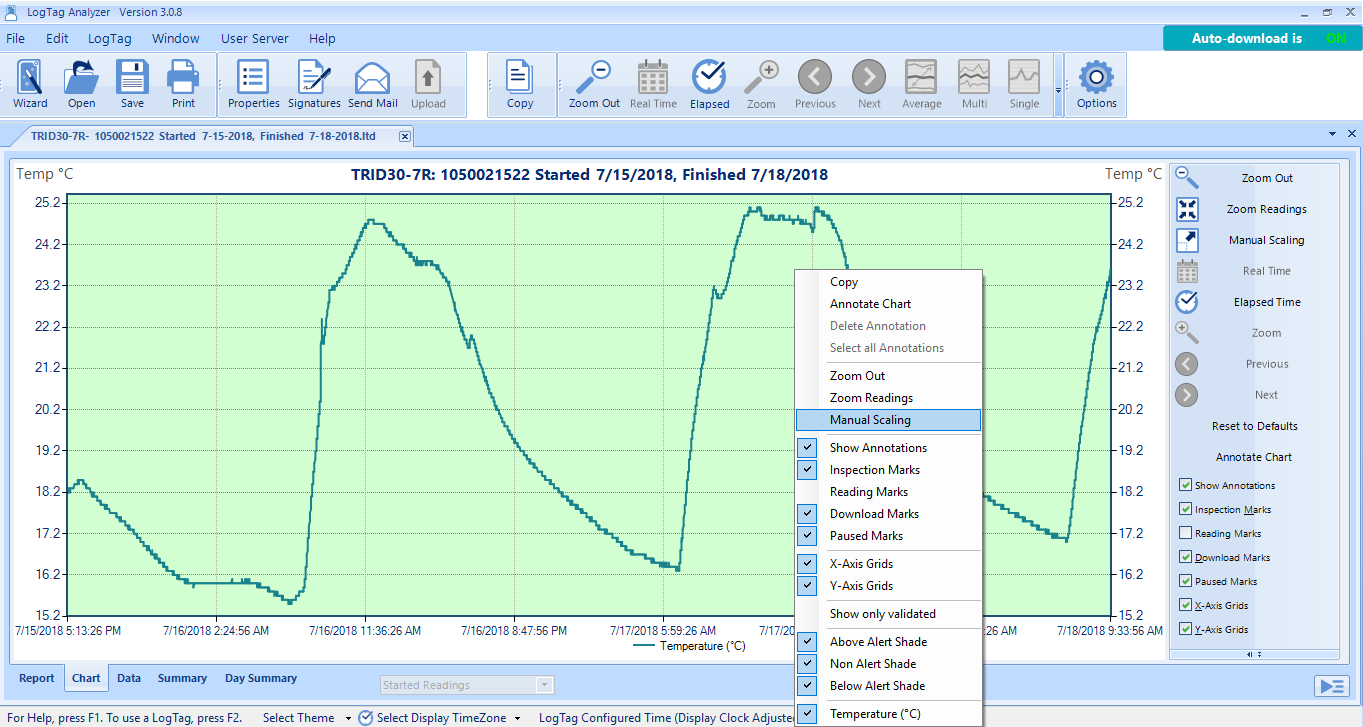
Select Manual and enter in the dates and times between which you want to report on e.g. 01/11/2017 12:00 to 30/11/2017 11:59, and click OK.
Then click on File-Save As and select "LogTag File" (*.ltdx). This will update the Report, Data and Summary tabs to only show information for the specified period.
If you are having problems downloading data from your Logger, it could be related to the following:
If you want us to do further research, please send us a diagonistics file.
When Loggers are showing extreme temperature differences (-40°C or -199.9°C), these out of range readings are usually caused by;
In LogTag Analyzer, when configuring the Logger, click on 'Advanced Options' and check the 'Pause alarm/statistics processing for X minutes'. For a 10-minute logging interval, pausing for 2 readings will give you 20 minutes to remove, download and replace the Logger.
Please make sure to press "REVIEW/MARK" when taking it from the monitoring environment to ensure Pause is activated.
LogTag Analyzer printing has been optimized to work with high-resolution monitors. This is a resource intensive task and the application may get stuck or crash on processing files, especially if trying to "Print All" multiple open documents.
If high DPI monitors are not being used, support for them can be turned off in Analyzer. This will allow to free resources and print multiple files faster:
Note: The configuration file will need to be replaced again after updating LogTag Analyzer to a newer version.
Currently, when a UTRED30-WiFi, UTRED30-16, UTREL30-WiFi or UTREL30-16 unit triggers an alarm, both the buzzer and LED operate, but only until the measured temperature returns to the acceptable band. The expected behaviour is that the LED and buzzer both continue until the Alarm is cleared.
Both the cross and day markers on the LCD and the alarm processing via LogTag Online are not impacted and work as expected.
There is no current work-around for this issue.
We will issue a firmware update to resolve this problem as soon as it becomes available.
en/faq/logtag-analyzer/led-buzzer-behaviour-utred30-utrel30/
On rare occasions, you may receive a message during configuration that a logger has a damaged calibration.
We are aware of an issue that affects a small number of TRED30-16R, TREL30-16 and TRID30-7 loggers when used with an LTI-HID interface.
If you encounter this issue, please contact us via email to info@cik-solutions.com
Close LogTag Analyzer. Download the tool, extract, and start it.
Cradle the LogTag logger with the damaged calibration and click on the "Start repair" button. Once the repair is completed, the text "LogTag repaired" will be displayed.
If you encounter any issues during the repair, please email software@logtagrecorders.com for further support.
en/faq/logtag-analyzer/damaged-calibration-after-configuration/
In the very unlikely scenario that a UTRED30-WiFi records only pre-start readings, and these readings wrap, the resulting file shows a small gap at the time the buffer has wrapped. No readings are lost. This will be corrected in the next release.
LogTag customers using LogTag Analyzer 2.6 (and possibly earlier versions) are reporting error messages when attempting to download loggers.
The current versions of LogTag Analyzer, 3.1.2 and 2.9 r8, have been tested and do not have the issues seen with LogTag Analyzer 2.6.
We are recommending customers currently using any version of LogTag Analyzer 2.6 update to 3.1.2 or 2.9 r8 and then try downloading the logger again.
The latest versions of our LogTag Analyzer software are available for download from our Software page.
Errors may occur when trying to configure or download USB loggers (UTRIX / UTRID / USRIC) with LogTag Analyzer 3.1.0.
This is what the error looks like when you're configuring your Logger:
and this happens when you are trying to download data or try to open LTD files (data files):
Please update your software to the latest version. This will resolve the issue.
There is a known issue with opening LogTag Analyzer 3 data files. When you double click the data files, it's possible you will get an installer pop-up instead of LogTag Analyzer 3 actually opening the data files.
Please update your software to the latest version of LogTag Analyzer 3. This will resolve the issue.
Have you received an error message? Make sure you always use the latest version of LogTag Analyzer. This will solve in most cases the errors you have, including the "$1 internal error". This error occurs when the software is trying to communicate with a model that is newer than your current version of LogTag Analyzer supports.
Update your software via LogTag Analyzer by going to "Help" and "Check internet for updates". Or visit our website to download the latest software version. If you’re currently running an older version, the software will automatically update your version.
An error message can also be the cause of a low battery. Check your battery life to be sure.
ERRORS “CANNOT CONNECT TO LOGTAG…” OR “$4:USB.0012345” OR “FAILED TO RESPOND [20]”
Have you received any of these error message; “Cannot connect to Logtag…” or “$4:USB.0012345” or “failed to respond [20]” or simply error [20]?
These are very general error messages which simply mean that LogTag Analyzer found an interface and detected the presence of a Logger inside the interface but was unable to establish communication. The letters and numbers after $4 represent type and serial number of the interface.
Often this error will disappear by simply repeating the action you were performing when the error occurred, but sometimes it can be a bit more difficult to locate the cause. Here are some scenarios in which these errors could occur and what to do to rectify the issue:
If the progress bar stalls, LogTag Analyzer may be trying to communicate with a Bluetooth COM port that has no interface attached. Please disable all unused COM ports. If you exclusively use USB interfaces, you can select “Disable all serial interfaces" from the Edit – Options – Communication Ports dialogue.
This will speed up communication, as LogTag Analyzer will not need to check for connected serial Interface Cradles.
Each time you configure or download a Logger via the menu, all available communication ports are checked for Interface Cradles with Loggers. LogTag Analyzer restricts this search to ports that can physically have an Interface Cradle attached, and are also enabled in the communication options.
If you cannot see any interfaces in the access screen, and the progress bar stalls at 0% you should check the following:
en/faq/logtag-analyzer/interface-cradle-not_showing-in-access-window/
This error means that LogTag Analyzer can't find an attached interface or Logger. In the following example:
en/faq/logtag-analyzer/receiving-the-notification-com1-com2-com3-com4-not-found-already-in-use/
If you receive the following error message "Not all settings are supported" when configuring, please update your software. This should solve this error message.
If you’re currently running LogTag Analyzer 2, this software will automatically update your version.
If you still see an error after updating the software, please send us your diagnostics.
If the LogTag Analyzer freezes during the download of your data, it's highly likely that the battery is getting to the end of it's life and has caused a corruption within the Logger. The impact of often downloading the data is quite significant on battery life and can be reduced by turning off (hibernating) the Logger between uses.
You can check the average battery life of your Logger on our products page, by selecting your model number. On average this is between 2-3 years.
If your Logger is relatively new and you still have the same problem, please send us a diagnostics file.
LogTag Analyzer sets the Loggers internal real time clock to the configuration PC’s time.
When your PDF report or display doesn't show the right time compared with the time of your PC, you may not have set the correct Time zone during configuration.
To show the correct time on the display, re-configure the logger in LogTag Analyzer via the 'LogTag Wizard'. This can be accessed by pressing 'F2' on your keyboard or by clicking the 'Wizard' button.
Press ‘Configure’, click the ‘File Settings’ tab then enable ‘Use local PC time zone’.
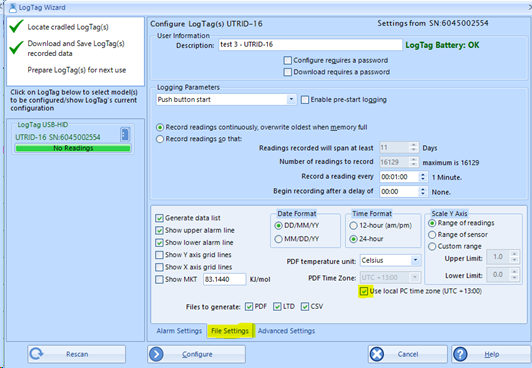
Press ‘Configure’ again, and then click ‘Close’. Disconnect the logger from your computer, the time on the display screen is updated.
DIFFERENT TIME ZONES
With LogTag Analyzer, you can set the PDF time zone to a pre-defined time zone. The time zone for a USB Logger’s PDF time must be set in the advanced dialogue during configuration only and cannot be changed once a PDF report is generated.
LogTag Analyzer has the ability to display the data using a range of different time zones, depending on the settings you make in the 'Display Time Zone' entry in the 'Date and Time' window from the Edit – Options menu.
Please follow the above instructions to show the right time.
The lock symbol appears if the logger is a single-use logger which has already completed a trip. Single-use loggers, such as SRIC-4, SRIL-8 and USRIC 4/8/16, cannot be reconfigured for another trip. However the data stored on the logger can be downloaded as many times as you need to.
Our products page gives you an overview of all our Loggers.
When you have inserted the Logger into the interface cradle, are trying to download (re-configure) the Logger but you see the following error message on the screen;
You may also see the message 'Error [23]'.
It means that the Logger interface cradle is working correctly but the communication between the interface cradle and Logger is not working.
Ensure that the Logger is inserted correctly, with the metal contacts on the Logger, mating with the protruding contacts inside the cradle.
If you are still having issues here are some suggestions that might resolve the issue;
Dirty contacts
Clean contacts

If you can’t find an answer in our knowledge base and your LogTag Recorder please submit a support ticket with some additional information about your issue.
Please send us a diagnostics file;
An email will open with attached files, including a partial memory download of the Logger.
In the message field, enter any additional information about the problem you are experiencing (for example: screenshots of error messages), which model you are using and the serial number of your Logger .
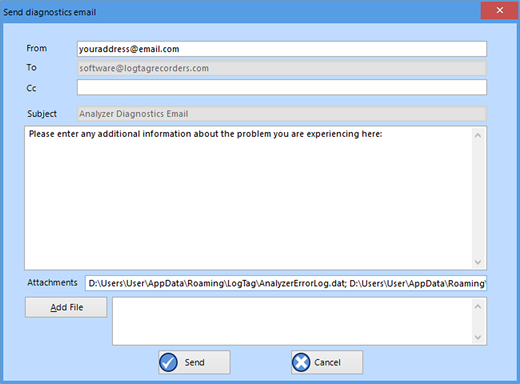
If you work on a PC not connected to the internet you can still send us the files. Open Windows File Explorer and navigate to the folder you see listed in "Attachments" (this is your "Roaming" folder on your PC). Transfer all files listed in "Attachments" to a different PC and use your regular email client to send them to software@logtagrecorders.com.
Activation Codes give you access to location subscriptions, notification units, shipment units, or a combination of those.
Each location subscription typically expires after 12 months (some run for 2 years), after which you will have to enter a new activation code, to renew the subscription. One subscription is required for each location you wish to renew.
You will receive a notification to the team's main email address when your subscription is about to expire, no later than 7 days before the expiry date (in some cases you will be notified even earlier, up to a month).
Customers outside the US and those who did not purchase the code directly from one of these distributors cannot purchase subscriptions online, instead, they need to purchase Activation Codes and add them to their account. These are available from most LogTag resellers and are typically sent to you via email within a short time after you have placed your order.
Contact your reseller to find out more about pricing, how to obtain these codes and any other information relating to the codes.
WHY DO I NEED AN ACTIVATION CODE?
If you wish to make full use of your LogTag Online account you need to purchase Activation Codes and add them to your account. Some of LogTag Online's features are only available with a paid subscription, which you can access by adding Activation Codes.
Activation codes give the user access to all the features on LogTag online for the number of locations they buy. Purchasing a single location activation code doesn't add an additional location to your free account, it upgrades the existing free location to have premium features.
One or more location subscriptions
Notification Units
A subscription for a location is typically valid for one single location, for one year, but you can also purchase subscriptions for multiple years, and multiple locations. Subscriptions entitle you to upload & store more files and to use the SMS and WhatsApp notification systems, rather than just email. You will also be able to add multiple locations to your team.
To monitor multiple locations (using multiple loggers) you will require as many subscriptions as you have locations. Each location can hold data for one logger. Note that the first subscription will upgrade your initial location to the paid features.
For a comparison of features between the free version and a paid subscription please see the Account Structure page on our website here or our support article here.
Notification Units
Shipment Units
One or more location subscriptions
Shipment Units are required to create and track shipments, and Notification Units are required to send notifications about shipment deliveries. Subscriptions for locations can be used in the same way as in the Fixed Site Monitoring, if you wish to track stationary equipment, however they are not needed for monitoring of shipments. For the features of the paid subscription please see the Account Structure page on our website here or our support article here.
HOW TO BUY ACTIVATION CODES
Currently, new subscriptions are only available from your reseller. Please discuss your requirements with them.
Customers residing in the United States of America can purchase subscription renewals and additional subscriptions online, provided they have entered at least one initial activation code purchased from their reseller.
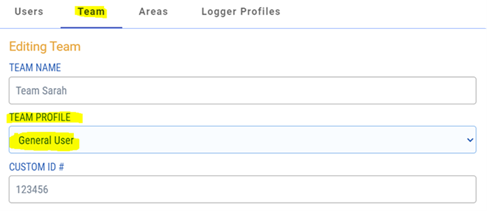
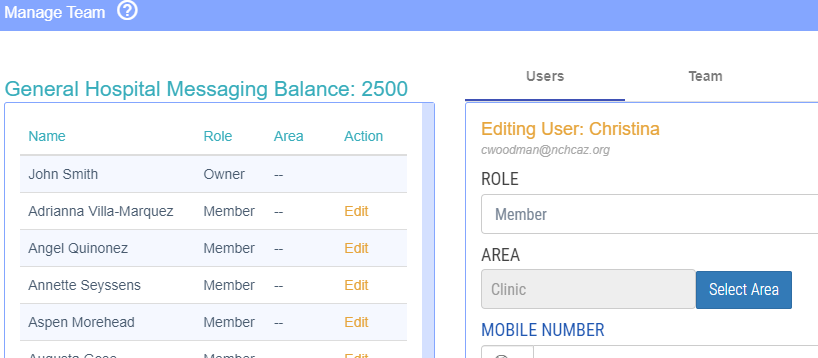
To edit your team settings, go to the top right corner, click on your account name and select “Manage Team”. You will see the following screen:
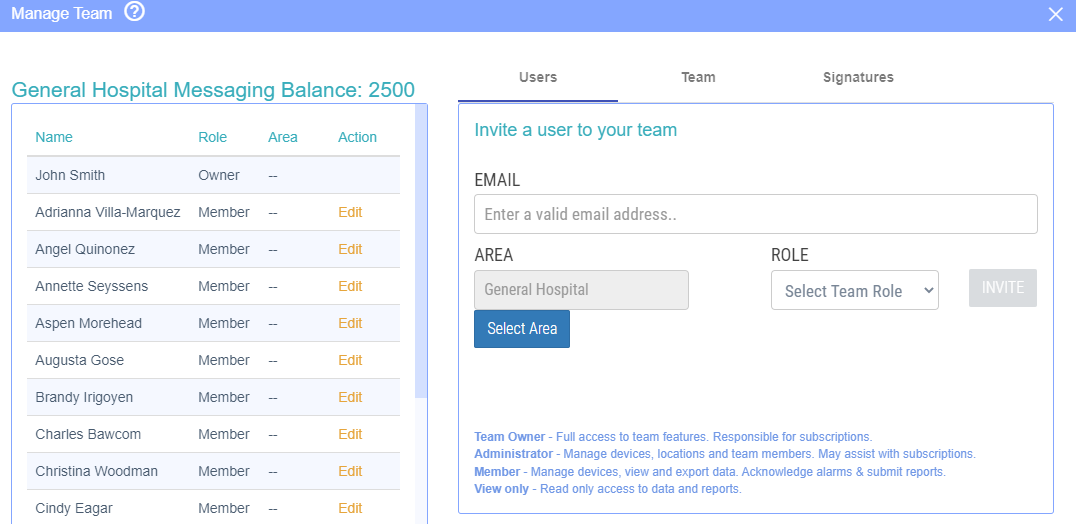
You can invite other users to your team by adding their email address and selecting their team role. The user that has created the team is the owner. Other users can be either an ‘Admin’, a ‘Member’ or 'View only' :
Fill in their email address and click on “invite”. The user that has been invited receives an email invitation to LogTag Online. They need to click the link in the email and login with their own account or create a new account. Once the user has signed up, you are able to find the user in your team details.
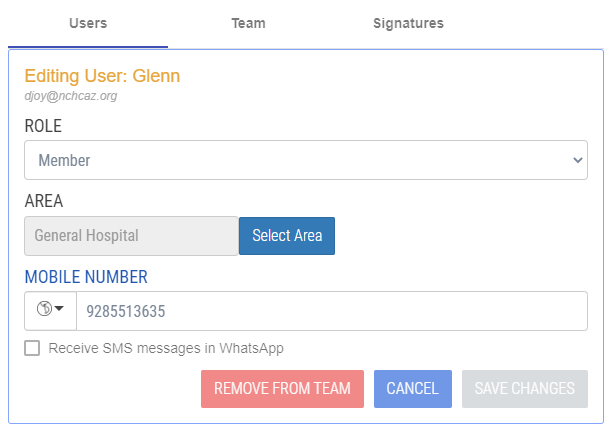
Edit team member(s)
Once a new user has signed up you are able to change their role (switch between admin/member), delete a team member, move them into an Area (if available) and edit their messaging settings. You can make these changes by going to “manage team” and then select “edit” next to the user you want to make the changes to.
Edit Team
When you click on “Edit Team” you are able to change the team name, profile and various other settings.
To get started with LogTag Online, you first need to establish a WiFi connection with your
LogTag WiFi device:
Connecting to LogTag Online:
Getting Started and Downloading results:
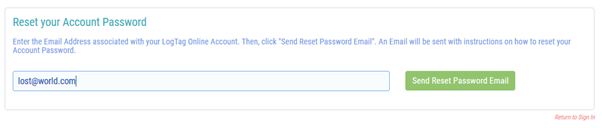
To reset your password and gain access to LogTag Online, please click the 'Forgot your Password?' link from the logon page and follow the on-screen instructions.
Alternatively, if you have an existing account but have forgotten your details, you can also reset your password by clicking this link below:
https://logtagonline.com/emailpassreset
You will then be prompted to enter your email address. Once you have entered your email address, click the green 'Send Reset Password Email' button.
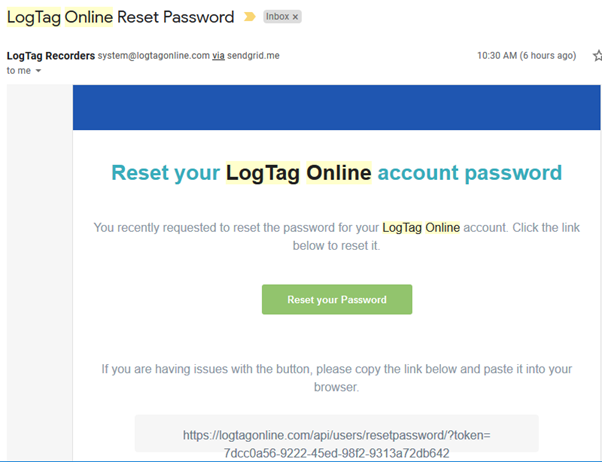
Check your email. You should have received an email from LogTag Online with details on how to reset your password. If you don’t see this email, it could be taking a few minutes to reach you, or it could be in your spam email folder so check there too.
Once you’ve got the email, follow the instructions in the email.
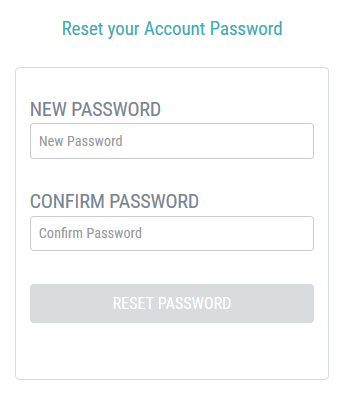
You can then reset your password to something you know.
At any time, you can edit your LogTag Online account details and also change your password.
Click your account name (top right of the screen) and select “My Account”. You will see the following:
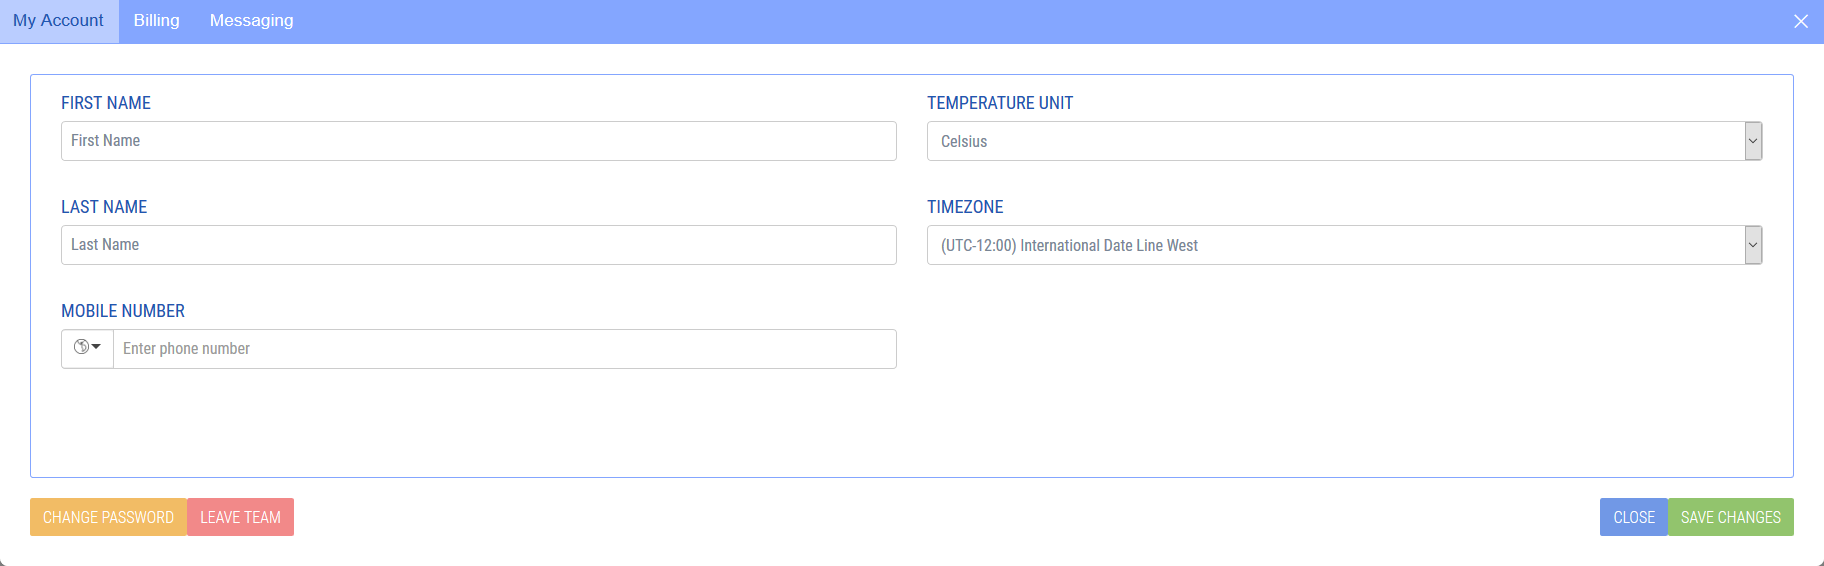
Edit the fields as required, such as first and last name, mobile number, time zone and temperature unit. Click SAVE CHANGES when you have finished editing, or CLOSE to cancel the changes.
Note: Your email address also serves as your login and account identification, and can therefore not be changed.
To change your password, click CHANGE PASSWORD. Enter your current password, then the new password and confirm the new password. Click SAVE CHANGES to enable the new password.

To use LogTag Online, you will need an active account. To create an account, navigate to the LogTag Online website and click 'Create An Account'. This will show the following sign-up form:
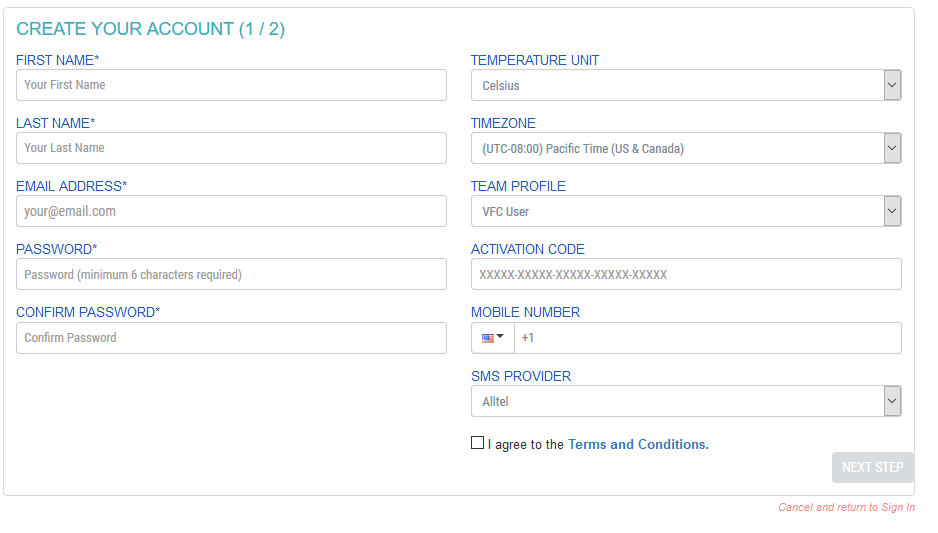
All fields marked with an asterisk are mandatory and include first name, last name, email and password. For your password, please select between 8 and 20 characters, and use at least one lower case, one upper case, one digit and one special character.
Note: Your email address is your unique identifier, and you must have access to your email account during setup. Also note that the email address cannot be changed once your account has been created!
Temperature unit
Select Celsius or Fahrenheit. This option can be changed at a later stage in “Account Details”.
Time zone
Select your time zone. If you don't change this now, the default "UTC – 08:00 (Pacific Time, US & Canada) will be used. This option can be changed at a later stage in “Account Details”.
Activation code
If you already have an activation code, please enter it here, otherwise click 'Next Step'.
Error text in red just like this will tell you if you have missed a mandatory field, or provided incorrect information.
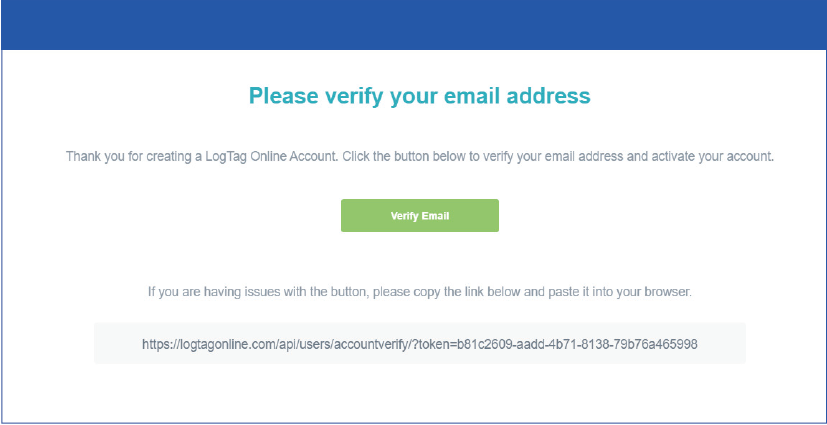
To ensure you are the legitimate owner of the email address you provided, you are now requested to confirm this address. Open your email client, look for the email from system@logtagonline.com and click Verify Email.
Once you have completed this step, sign in using the email address and password you provided.
On December 9th, a critical RCE vulnerability known as log4j - CVE-2021-44228 was announced by the New Zealand Computer Emergency Response Team (CERT).
LogTag is currently actively monitoring this situation and is seeking advice from Microsoft regarding the effects of this vulnerability on LogTag Online and its dependent services.
Currently, Microsoft is not aware of any impact, outside of the initial disclosure involving "Minecraft: Java Edition", to the security of its enterprise services used to host and run LogTag Online and has not experienced any degradation in availability of those services as a result of this vulnerability.
The vulnerability also does not affect our mobile apps. In iOS, the underlying technology used to generate the app does not contain the vulnerable modules. In Android, the particular functionality required to exploit the vulnerability has been removed from the Android versions required to run the app.
LogTag's on-PC installations are not affected by this vulnerability, as they do not use Java or the log4j library.
We will update this article as soon as more information comes to light.
en/faq/logtag-online/log4j-critical-rce-vulnerability-cve-2021-44228/
Logger Transit Data, accessible from the login page, provides the ability for an end user to view data from select loggers without the need to create a LogTag Online account.

The logger must be:
You must know the logger's serial number, as you cannot browse for unregistered loggers. If you already have a LogTag Online account, you must be logged out to use this feature.
Following logger models are supported in Logger Transit Data:
en/faq/logtag-online/which-loggers-are-supported-in-logger-transit-data/
Starting with version 1.2r2 you can connect LogTag Xpress directly to LogTag® Online, the LogTag cloud storage and monitoring system. LogTag Xpress is the perfect companion if you wish to simply and easily upload data from your loggers and share them with others in the cloud.
Once installed, LogTag Xpress runs silently in the background and scans USB ports for connected loggers. As soon as a logger is plugged in, LogTag Xpress extracts the data from the logger and uploads it to LogTag Online.
To access the data, log into your account and register the device. You can then add others to your team, and give them secure access to the logger's data.
Sharing is even easier when using this feature with single-trip loggers. You won't even need an account to access the data. Anyone who you wish to share a logger's data with can simply enter the serial number in Logger Transit Data (available from the LogTag Online sign-in page) to view a chart or download a PDF. No account is required.

For more information about LogTag® Online please refer to the information published on the LogTag North America website at https://logtagrecorders.com/online/ . If you want to know more about LogTag Xpress, please go to /en/support/
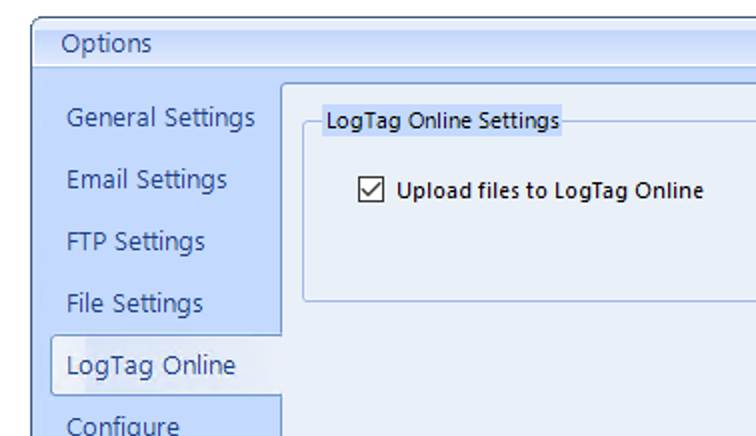
Tip: To check if this feature is enabled, please click the LogTag Xpress logo in the notification area, click Options and click the "LogTag Online" tab.
en/faq/logtag-online/using-logtag-express-with-logtag-online/
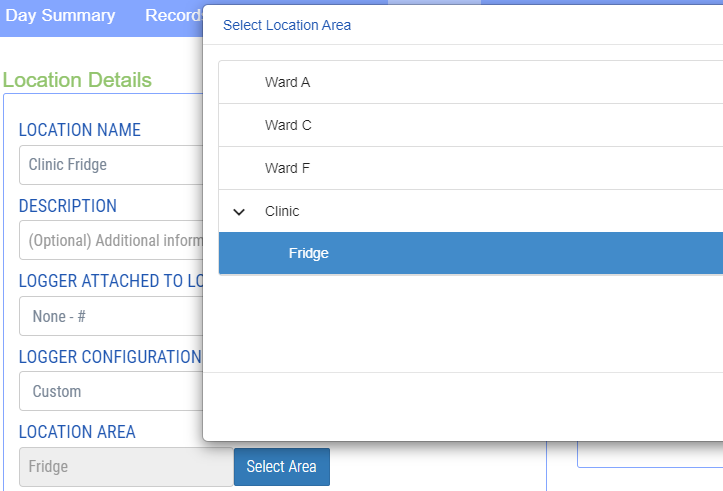
Areas are a hierarchal feature to manage a team with a large number of members and Locations. They Allow Team owners or administrators to easily manage and control who can & can't see specific Location information.
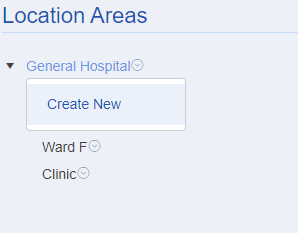
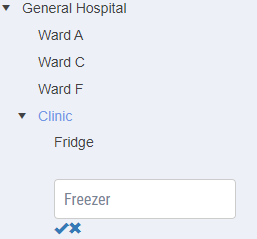
The top level area is always the name of your team. Clicking on the symbols next to the area will allow you to create a new Areas. Once created, an Area will become a selectable option when browsing the Area side menu or as an option when inviting a new member to your team and also when creating a new
Location.
Once a User is placed in an Area they can only see Locations which are in their Area or any Areas under their Area. For example if a User was Assigned to the Clinic above they could see Location in The Clinic and Also Locations in The Fridge and Freezer Sub Areas.
To transfer a logger to a new team, remove the logger as described in this article. You can then register the logger again for a new team as if it were a new logger.
To activate more features on LogTag Online, you will need to purchase one or more Activation Codes from your LogTag distributor (-> How to buy an activation code).
LOGTAG ONLINE ACCOUNT TYPE(S)
| Free account | No Activation Code(s) required |
| Standard (Paid) account | Activation Code(s) required to use more features |
Standad (Paid) Accounts are valid for 12 or 24 months, the features you can access for each account type are outlined in the tables below
| Feature | Basic (Free) Account (No Activation Code) |
Standard (Paid) Account (Activation Code required) |
| Number of Locations | 1 Limited Location |
1 Full Location per purchased Activation Code1 (Valid for 12 or 24 months) |
| Location History | 3 Months | 10 Years |
| Notifications2 | Email Only | Email + SMS or WhatsApp2 |
| SMS (USA) | None | Unlimited3 |
| SMS (Outside USA) | None | Up to 25 messages per month (dependent on amount purchased via Activation Code) |
| Maximum number of files4 | 30 | 1000 (dependent on amount of Location purchased via Activation Code) |
| File Storage | 1 Year | 10 Year |
| Number of registered devices | Unlimited | Unlimited |
| Maximum Number of users | 2 | Unlimited |
1 One Location can only have one data logger (such as the TRED30-16 or UTRED30-WiFi Real-Time). Purchasing Location activation codes allows
multi-team members and provides Notification units.
2 Messaging capabilities are not activated until Location and/or Notification activation codes are purchased. Alert notification that are sent through WhatsApp are not free and use notification units.
3 Only for mobile service providers that support the Email-to-Text service. Other providers will depend on the purchased activation code. Carrier fair use policies apply.
4 Can upload unlimited number of files to LogTag Drive. Free account gets to view the last 30. Increased capacity of Drive requires purchasing Location activation code at 1000 per Location.
| Feature | Basic (Free) Account (No Activation Code) |
Standard (Paid) Account (Activation Code required) |
| Number of Shipments | Unlimited5 |
Unlimited5 (dependent on amount purchased via Activation Code) |
| Viewing history | 10 Years | 10 Years |
| Notifications2 | Email Only | Email + SMS or WhatsApp2 |
| SMS (USA) | None | Unlimited3 |
| SMS (Outside USA) | None | Up to 25 per month with Activation Code, additional messages can be purchased |
| Maximum number of files4 | 30 | 30 (Dependent on amount of Locations purchased via Activation Codes) |
| File Storage | 1 Year | 10 Year |
| Number of registered devices | Unlimited | Unlimited |
| Maximum Number of users | 2 | Unlimited |
1 One Location can only have one data logger (such as the TRED30-16 or UTRED30-WiFi Real-Time). Purchasing Location activation codes allows
multi-team members and provides Notification units.
2 Messaging capabilities are not activated until Location and/or Notification activation codes are purchased. Alert notification that are sent through WhatsApp are not free and use notification units.
3 Only for mobile service providers that support the Email-to-Text service. Other providers will depend on the purchased activation code. Carrier fair use policies apply.
4 Can upload unlimited number of files to LogTag Drive. Free account gets to view the last 30. Increased capacity of Drive requires purchasing Location activation code at 1000 per Location.
5 Can create unlimited Shipments. Free account gets 10 Shipment units which allows up to 10 data uploads only from any data loggers in any shipment. Purchasing Shipment unit activation codes allows additional data upload (1 Shipment unit is for 1 data upload from any logger, be it the same or from different data loggers) as well as multi-team members.
If you would like to find out more about SMS Text notifications and how they work, please refer to the LTO structure overview chart here.
en/faq/logtag-online/logtag-online-account-types-and-features/
If you wish data from a logger to be uploaded to a different team automatically, you must first remove it from your own account. Your team will retain any data recorded before the logger was deleted. Any new data uploaded to LogTag Online will appear in the new owner's account.
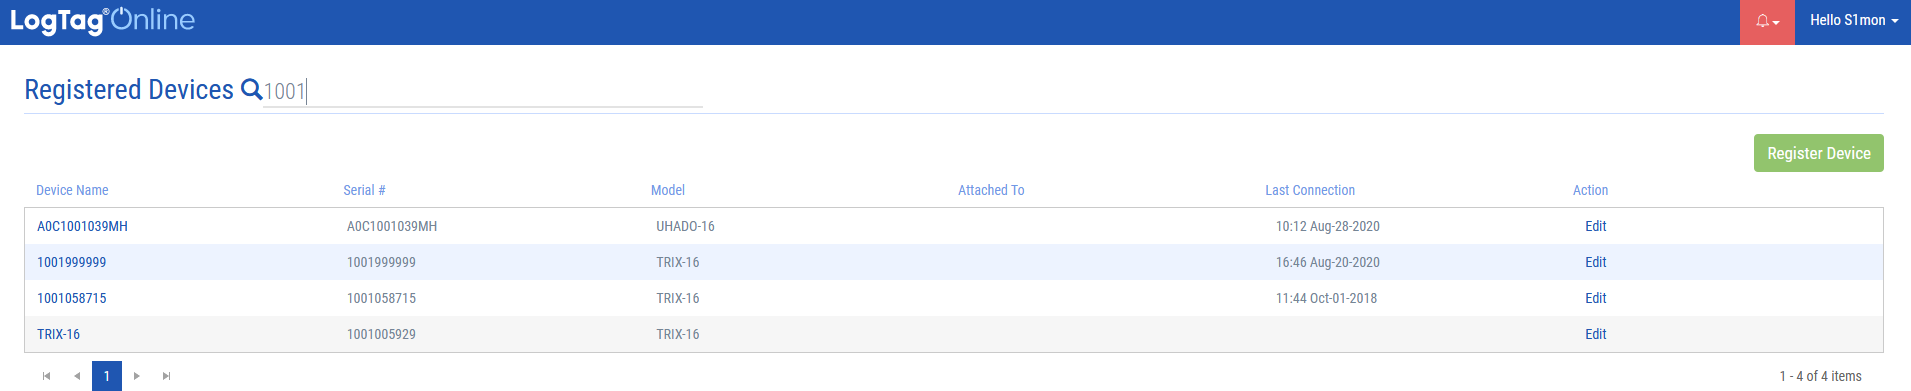
To remove a logger from your account, click the devices tab and locate the line containing the device's serial number. You can browse using the arrows in the bottom left corner of the windows, or enter the serial; number in the search field.
Click Edit in this line to open the Edit Device window:
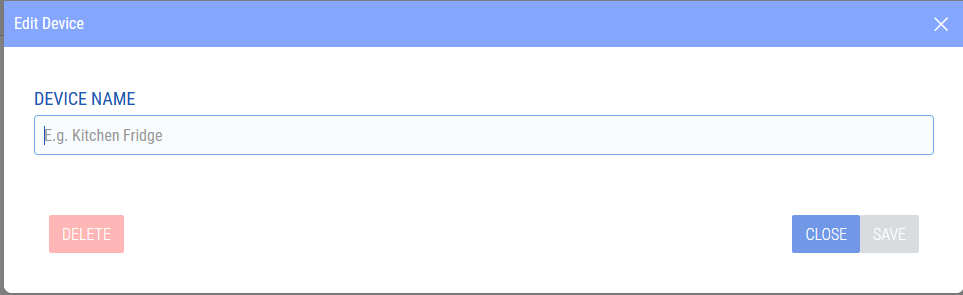
Click 'Delete' to remove the device from your team. It can now be registered by another team.
en/faq/logtag-online/removing-a-data-logger-from-logtag-online-account/
If you experience a 'Connection Timeout' event from your logger(s) that is attached to a Location, please read below to follow the right course-of-action:
There are a few scenarios where this connection lost event occurs:
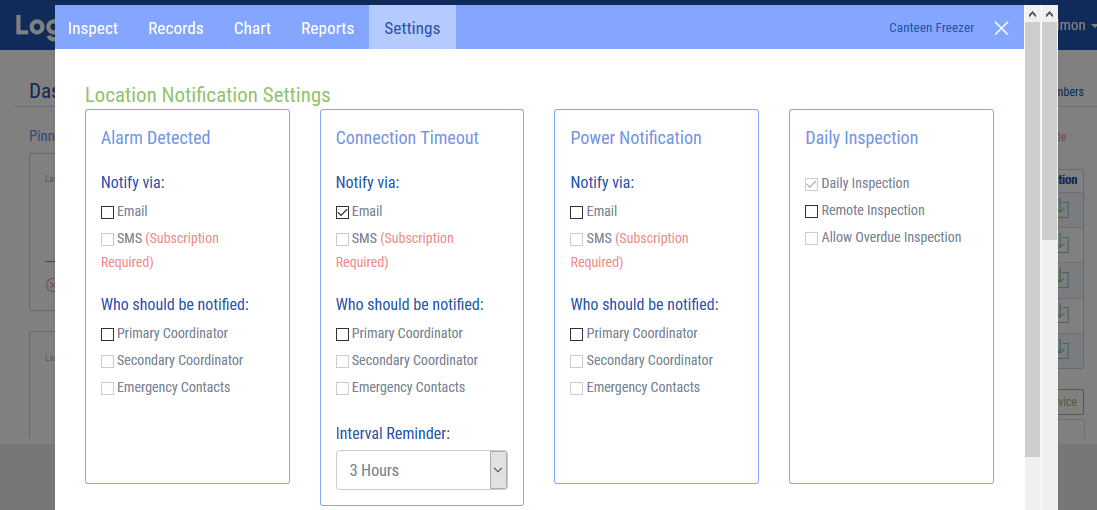
A) The LogTag Online cloud platform is looking for a connection from the location, in this example: UTRED30-WIFI device every X period. If the UTRED30-WiFi does not check in with the server, within that period, it is deemed M.I.A. and a 'Lost connection' event occurs. The Period 'X' is set by the user for each Location they setup. From the Location ->Settings->Edit Notifications screen they can set the Interval Reminder, which is this period 'X'. In the screenshot below the user will receive an email if the UTRED30-WiFi at the Location in this example: Canteen Freezer, does not connect within 3 hours.
Note: The UTRED30-WiFi has two different connection modes while logging, one when it is on USB power, and a different one when it is on AAA power.
On USB power it will try and connect to the Cloud server every time it has a new temperature, to a maximum rate of every 5 minutes.
On AAA battery power it will try and connect to the Cloud server every 1 hour, to preserve battery.
If the Interval Reminder is set to less than 1 hour when the device is running on AAA batteries, it will frequently send the WiFi disconnect message.
If the device is not logging and is in Ready or Stopped mode it will only communicate with the server every 4 hours.
B) Lost WiFi Connection notifications can occur due to the following reasons:
To find the solution to the disconnections, here are some of the steps you could try:
On the dashboard, if you select the "devices" tab at the bottom of your screen, you are able to see your registered devices (if you have any). If you are using a WiFi logger (e.g. UTRED30-WiFi) you only have to register the Logger. If you’re using the LTI-WiFi Interface Cradle together with a non-WiFi Logger, it’s important to register both devices (the Interface Cradle and the Logger) in order to track your data via LogTag Online.
Register a device
In order to register a device click on the "register device" button on the dashboard or register your device by going to the "devices" tab. When you click register device you will see the following screen:
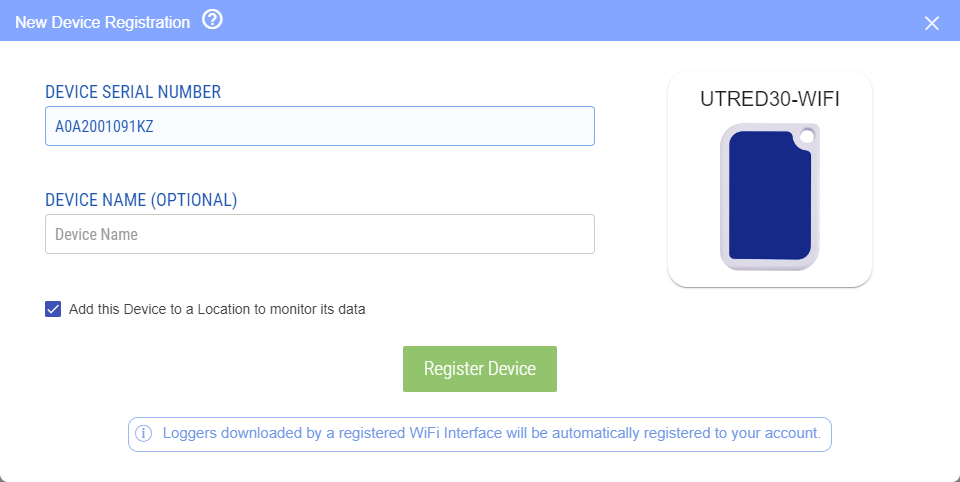
If you selected "Add this Device to a Location to monitor its data" you will now be given the opportunity to add an activation code as well as configure the location name and logger alarm profile.
Note: You don’t receive any data if you haven’t set up your WiFi Interface Cradle or WiFi Logger with a WiFi connection. You can do this through our WiFi Configuration Wizard .
Edit/delete device
Click on “Edit” and you are able to edit the name. If you click on “deregister” you will delete your device. You can also edit your device in the dashboard by clicking your device. You will see the same pop-up screen that will allow you to change the name of your device or the option to “deregister” (delete) your device.
In order to pin a location to the dashboard, go to “Locations” by clicking the button at the bottom of the screen. You will notice either in the Top Right corner of the Location, or next to “Inspect” and “Edit” you will see a “pin” or “unpin” icon with tooltips .
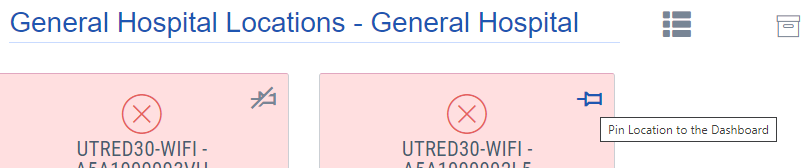

LogTag Drive is an online cloud storage for your files. Similar to many online file storage
services, you have the ability to view, manage and export your files.
The LogTag Drive is used for Loggers that haven't been attached to a Location.
Upload data to LTO via LogTag Analyzer
If you are uploading data from a logger via the latest version of LogTag Analyzer, the uploaded
logger file will show on the main dashboard in the 'Recently Uploaded Files' section or as a file
in LogTag Drive. Please refer to the LogTag Analyzer User Guide for more information.
From the Dashboard of the LogTag Drive page you can download the file in either LTD format (for use with Analyzer) or CSV format by clicking on the Action on the far right side. On the LogTag Drive page you have additional options like editing the Files name, adding labels for searching and deleting the file as well as the option to share the file with a public download link.
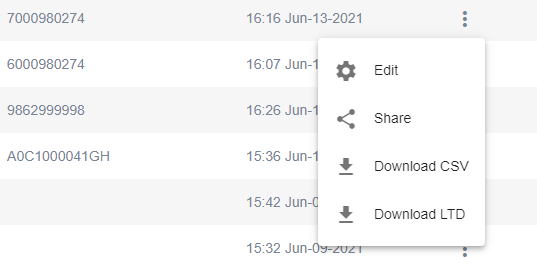
From the Dashboard or the LogTag Drive page you can click on the uploaded File Name to open that file to view and export the information contained in the file.
The file will initially open in the Chart tab allowing you to visually view the recorded data.
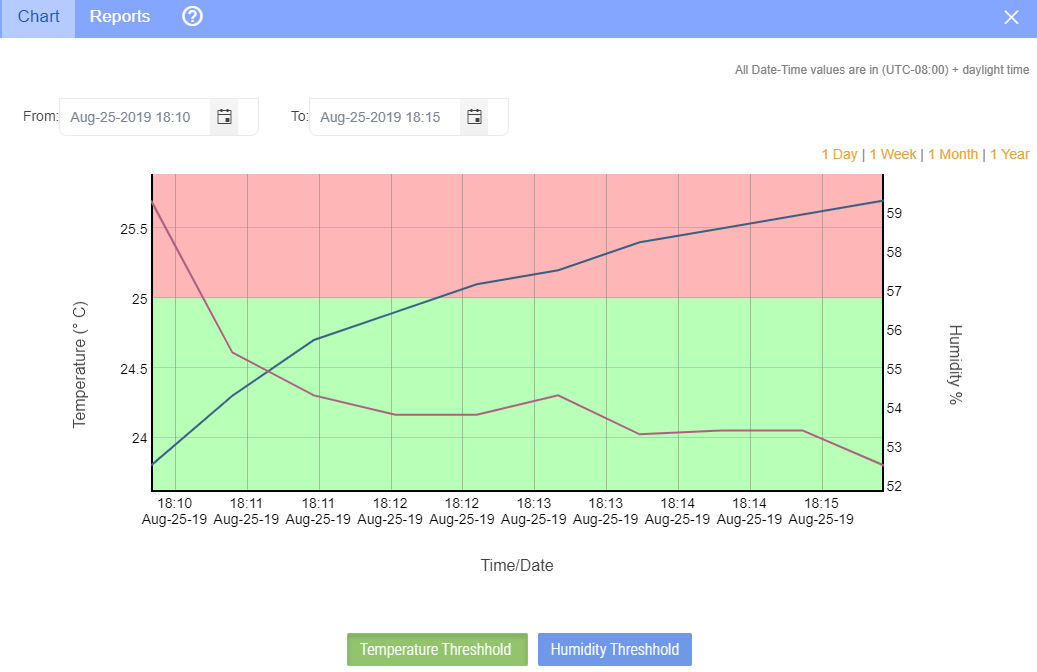
Going to the Report tab will allow you to view the recorded readings and also view and download a PDF report containing information about the data recorded in the file.
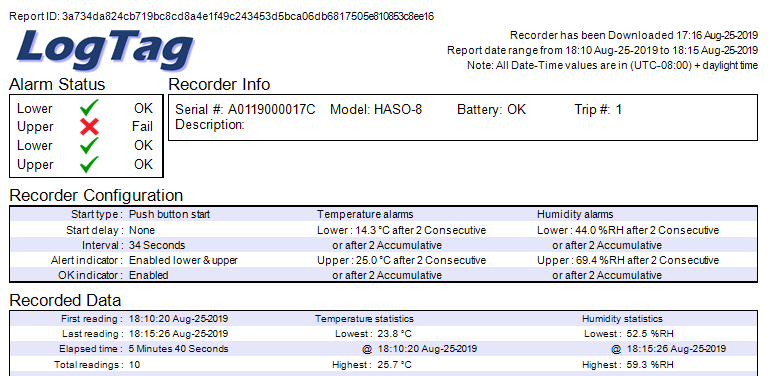
Data in LogTag online can be viewed visually in your Location or Shipment, or from a LogTag Drive file.
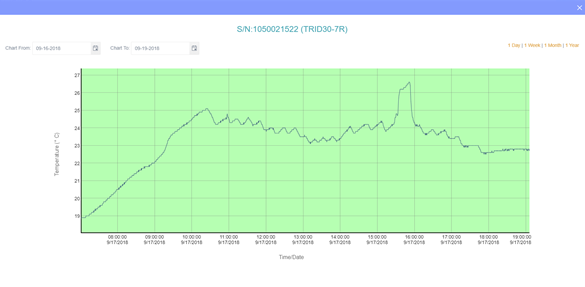
When you click and drag your mouse over a part of the data you are able to zoom in to your data. You are also able to select a data range or show 1 day, 1 week, 1 month or 1 year of data from the current date (Free accounts are limited to showing the last 3 months worth of data in locations).
You can also use the Date Pickers to adjust the readings being displayed.
If you’re using a logger with humidity such as a HAXO-8, humidity readings will also be displayed in the chart.
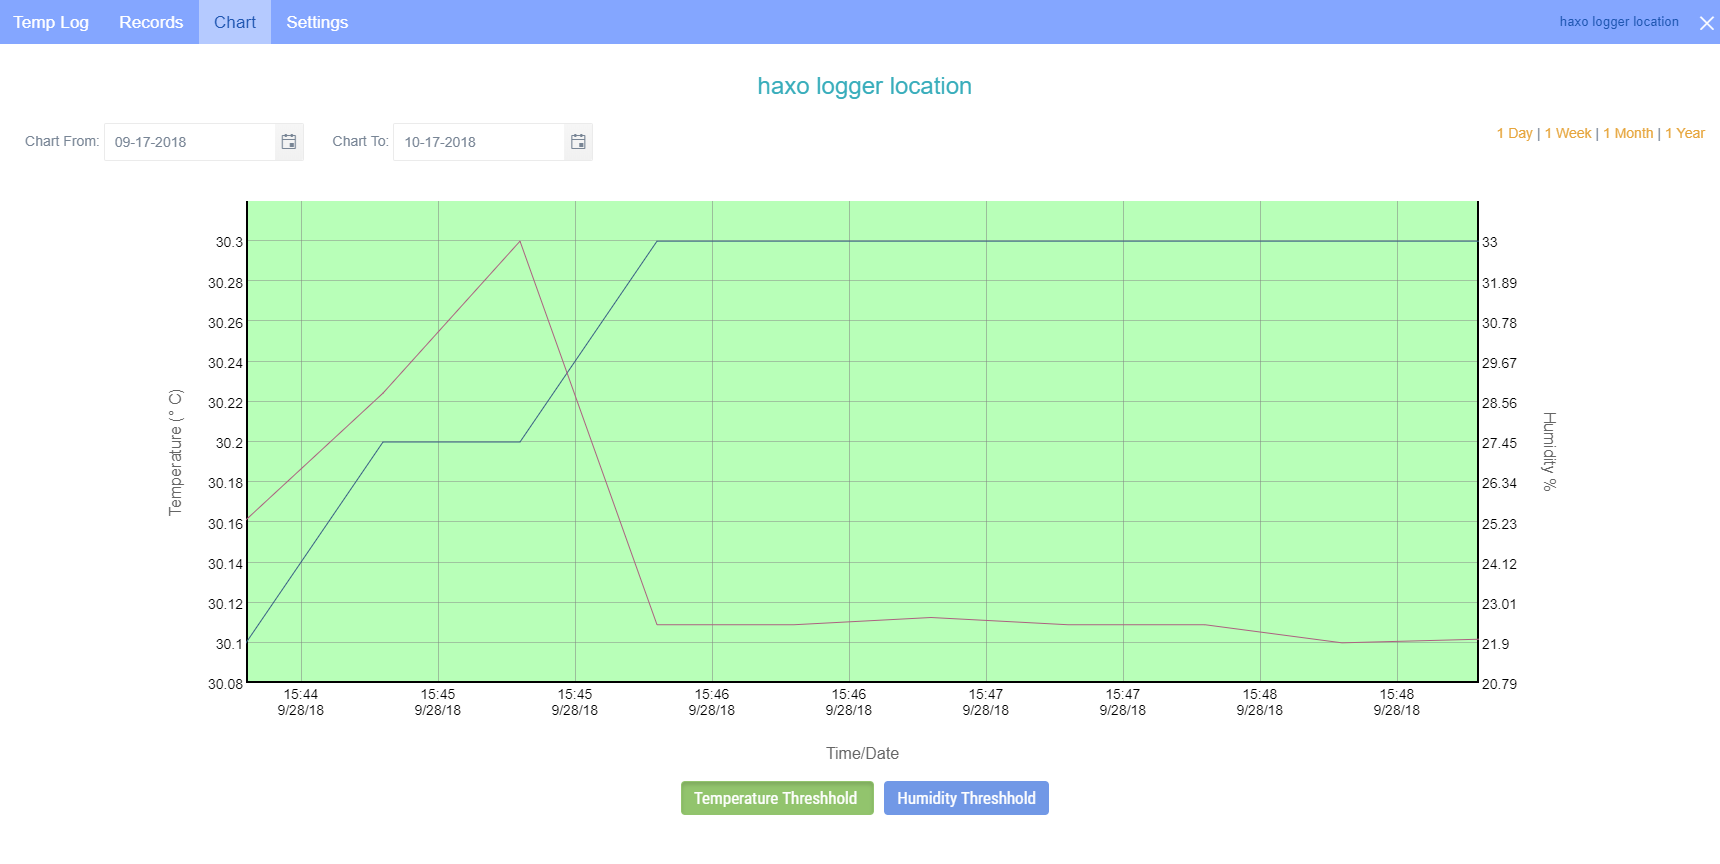
When an alarm has been detected, you will be notified via email/SMS (depending on your notification settings) and you will see the notification at the top right corner of your screen turn red (see image below). If you do not Acknowledge the Alarm on LogTag online, further reminder emails and/or SMS will be sent.
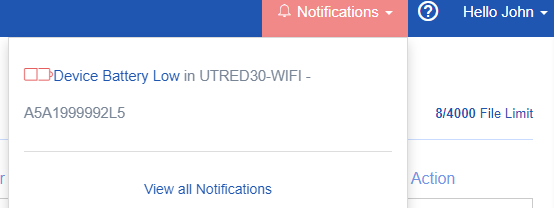
Click on the notification text, in this case “Upper Alarm detected in Fridge LogTag HQ”. The temperature log will pop-up on the date when the alarm has been detected.
You can acknowledge the alarm by clicking the button “acknowledge event”. You will also have the option to click the option “create record”. This will create a Vaccine Storage – Troubleshooting Record form.
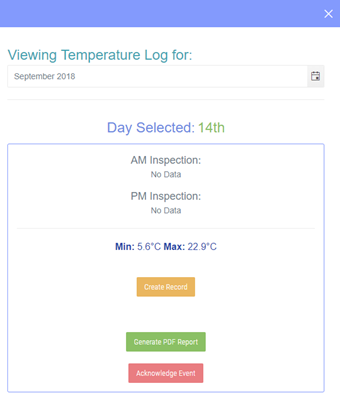
The Location will continue to send Alarm notifications (SMS and Emails) until all Alarms on the device have been Acknowledged.
If the temperature environment then returns to the acceptable or normal temperature range, and then subsequently goes out of range and the temperatures are in breach of alarm thresholds, a new Alarm will be generated. This new Alarm must be Acknowledged as before to stop any further notifications from being sent.
You can set up Locations, so you can record your Logger's readings to a certain Location.
The number of locations you can create is limited to 1 or to the number of locations you have paid for in your subscription. Once you have used all your Locations you will be unable to create any more new locations until you have deleted one of your previous locations.
The Dashboard displays the number of locations you currently have, and the number you can create, see the example images below.
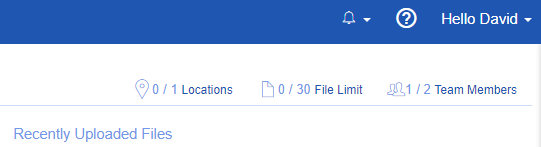
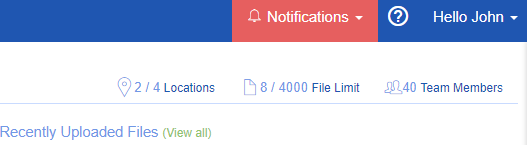
You can create a new Location from the dashboard, or by clicking at the bottom of the screen on ‘Locations’ and then ‘Add a Location’.
The following screen will pop up.
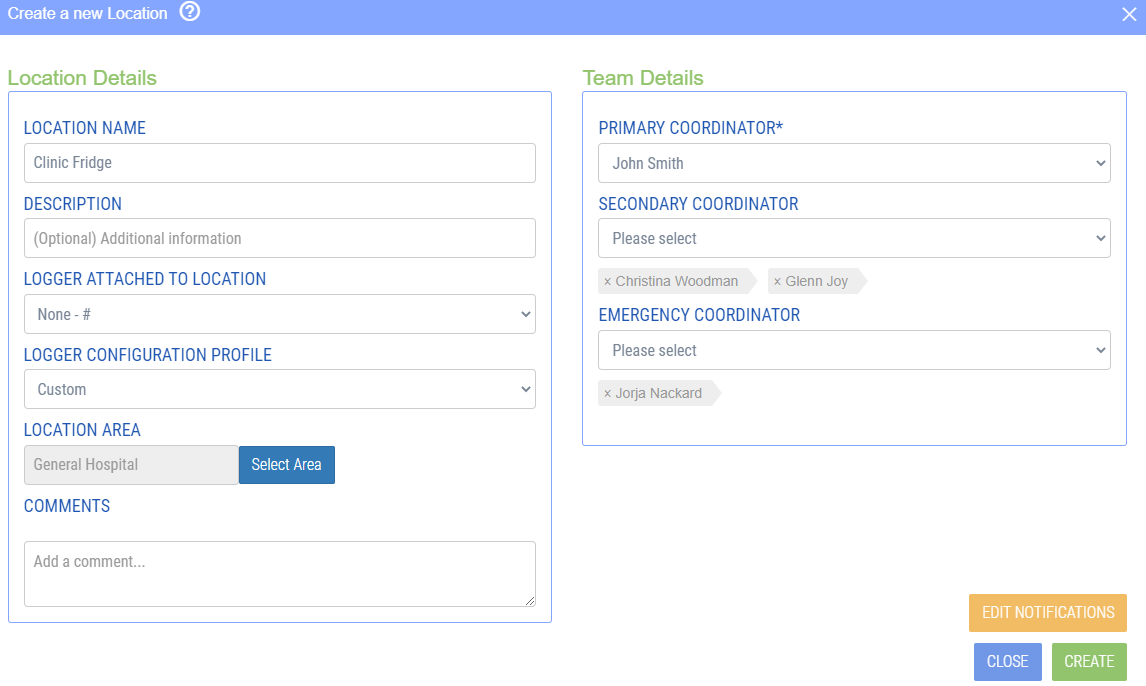
Location name
Give your location an easy recognizable name, e.g. refrigerator 3, 2nd floor.
Description
Fill in any additional information in here, if applicable.
Logger attached to location
Link your logger with the location. All your registered devices show up in this list. Choose one Logger that is monitoring this location. Just be aware, that when you save the location without a Logger, no data will be recorded. The loggers data will then appear in this location whenever the data is uploaded to LogTag Online.
Team details
The primary coordinator and optional secondary coordinator(s) are the first people that will receive a notification when the Location has an alarm. The emergency contacts will also receive delayed notifications when an alarm has been detected and has not been dealt with via acknowledging the alarm.
You can only set up team members to be notified when an alarm has been detected. Which means they need to create an account and be part of your team within LogTag Online. Note that free accounts only support a maximum of 2 team members per team.
When you click on edit notifications, you are able to set up who will receive notifications via email and/or text.
| Signal | Sequence | Occurrence |
| Wake-up signal | 4 alternate flashes of green/red LED’s | Displayed after configuration has been successfully applied to the Logger. When a Logger is woken from hibernation state. |
| Start-up signal | 10 alternate flashes of green/red LED’s | Displayed when the Logger starts its recording cycle. The delay time is re-started (followed by delay signal). |
| Logging active, no alert present | Single flash of green LED every 4 seconds | Indicates the Logger is recording. This is not displayed when pre-start is active and the main logging cycle has not yet started. It is also not displayed when the green LED has been turned off in the configuration screen. |
| Logging finished, no alert present | Single flash of green LED every 8 seconds | Indicates Logger has finished recording. This is not displayed when the green LED has been turned off in the configuration screen. Will also be displayed when unit has been woken up from hibernation. |
| Logging finished, alert condition present | Single flash of red LED every 8 seconds | Indicates the Logger has finished recording and an alert condition was present during the trip. |
| Logging active, alert condition present | Single flash of red LED every 4 seconds | Displayed when the Logger has been detected an alert condition and the Alert LED has been activated. If an alert is present you cannot determine if the unit is still logging or has finished its log cycle. If the Alert LED has not been activated during configuration, in essence the visual indicators have been disabled, and the green LED will flash every 4 or 8 seconds as above. |
| Stopping (only applies to USB Loggers) | Sequence of very quick simultaneous flashes of green/red LED’s for 2 seconds | When this LED sequence starts, the STOP button must be released for the recorder to stop. With the exception of the USRIC-4. This Logger can’t be stopped manually, however it’s possible to use the hibernation mode to stop the recording. |
| Hibernation | LED’s are not active | Hibernation reduces the current consumption on Loggers to very low levels. |
SIMULTANEOUS LED BLINKING ON THE HAXO-8
Simultaneous LED’s blinking – this can happen when taking a HAXO out of the plastic wrapper – if there is enough static electricity, the unit will wake up and the LED’s will flash. If it is not configured soon after, it returns to hibernation mode. These is no significant effect on battery life when this happens as the unit goes back into hibernation.
STRANGE LIGHT PATTERNS
If your Logger shows strange light patterns, e.g. the LED light does not always come back on. It's highly likely that the battery is getting to the end of it's life and has caused a corruption within the Logger. The impact of often downloading the data is quite significant on battery life and can be reduced by turning off (hibernating) the Logger between uses.
You can check the average battery life of your Logger on our products page, by selecting your model number. On average this is between 2-3 years.
If your Logger is relatively new and you still have the same problem, please send us your diagnostics.
You can reset a TRED30-16R, if necessary and enabled, to bring it back to it's original "READY" state. Once re-set, recording can be started again.
For this process to work, the recorder must be in "STOPPED" state. Be aware that all recordings need to be saved before resetting the Logger. By resetting the Logger, all files will be deleted and cannot be restored.

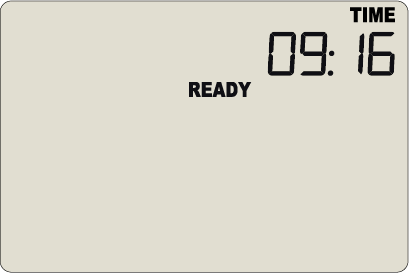
The ability to reset a recorder is enabled or disabled in the advanced options, when configuring the TRED30-16R Logger via LogTag Analyzer.
LogTag Analyzer sets the Loggers internal real time clock to the configuration PC’s time, however the user can manually change the display clock on the TRED30-16R Logger, if required.
Press and hold the ‘start button’ and ‘review button’ together continuously for 8 seconds. During this period the display will flash ‘CLOCK ADJ’.
Release the buttons when the flashing stops to enter ‘clock adjust’ mode. The minutes will flash. Press the ‘start button’ to put in the minutes and press the ‘review button’ to accept the minute changes and to start editing the hours.
The hours will now flash. Press the ‘review button’ to increment the hours and press the ‘start button’ to accept and store the new time. If recording is active, a clock change event will be recorded with the next logged reading, which will be displayed in the downloaded data.
NOTE: If the time/date on your report is different to the time/date on your screen this could be due to loss of power.
During recording, the display of the TRED30-16R / TRID30-7 shows the temperature of the last reading taken, the current time, battery status, a combination of alarm status and history. A reading is taken and the display updated every logging interval, as configured in LogTag Analyzer.
TRED30-16R
Following are some examples:
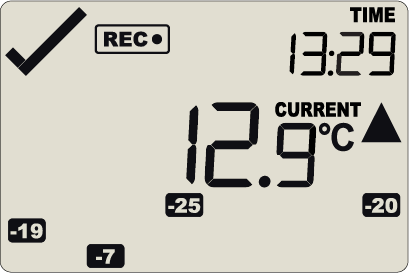
In this example the display shows that alarm events occurred 7, 19, 20 and 25 days ago. The current temperature is over the upper limit (indicated by the arrow pointing up) but has not been over for long enough to trigger an alarm.
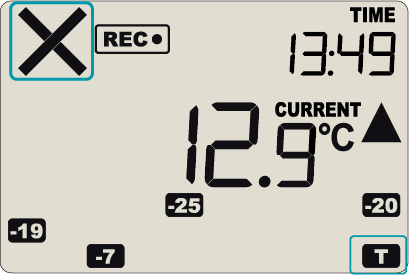
20 minutes later the over temperature has triggered an alarm. The ‘X’ symbol and the ‘T’ marker day alarm are shown.
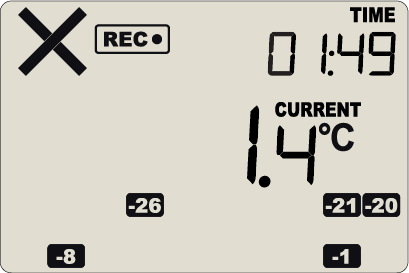
The next day, the temperature has returned to the acceptable range but the alarm remains present. The day summary has shifted by 1 day as the time has gone through midnight.
TRID30-7
Following are some examples:
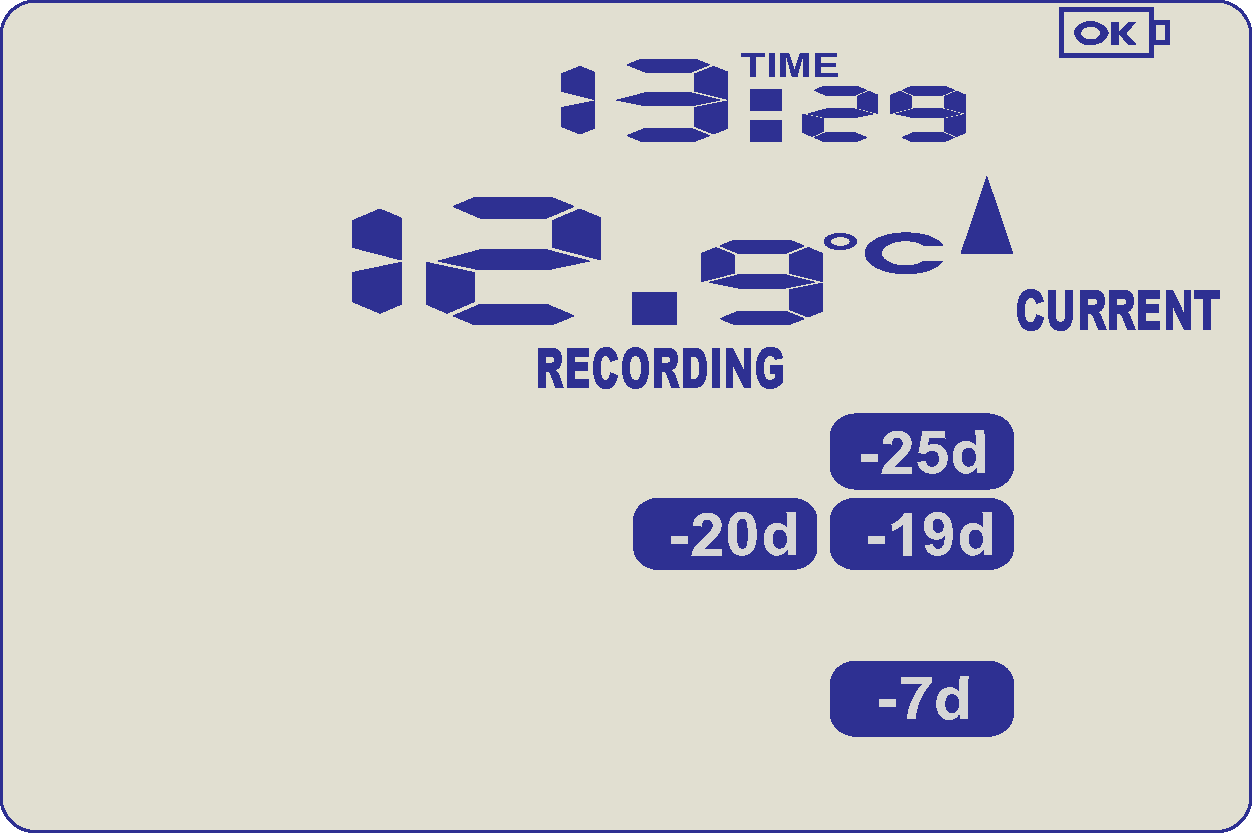
In this example the display shows that alarm events occurred 7, 19, 20 and 25 days ago. These alarms were cleared by an inspector as the display currently shows no “ALARM” symbol. The current temperature is over the upper limit (indicated by the arrow pointing up) but has not been over for long enough to trigger an alarm.
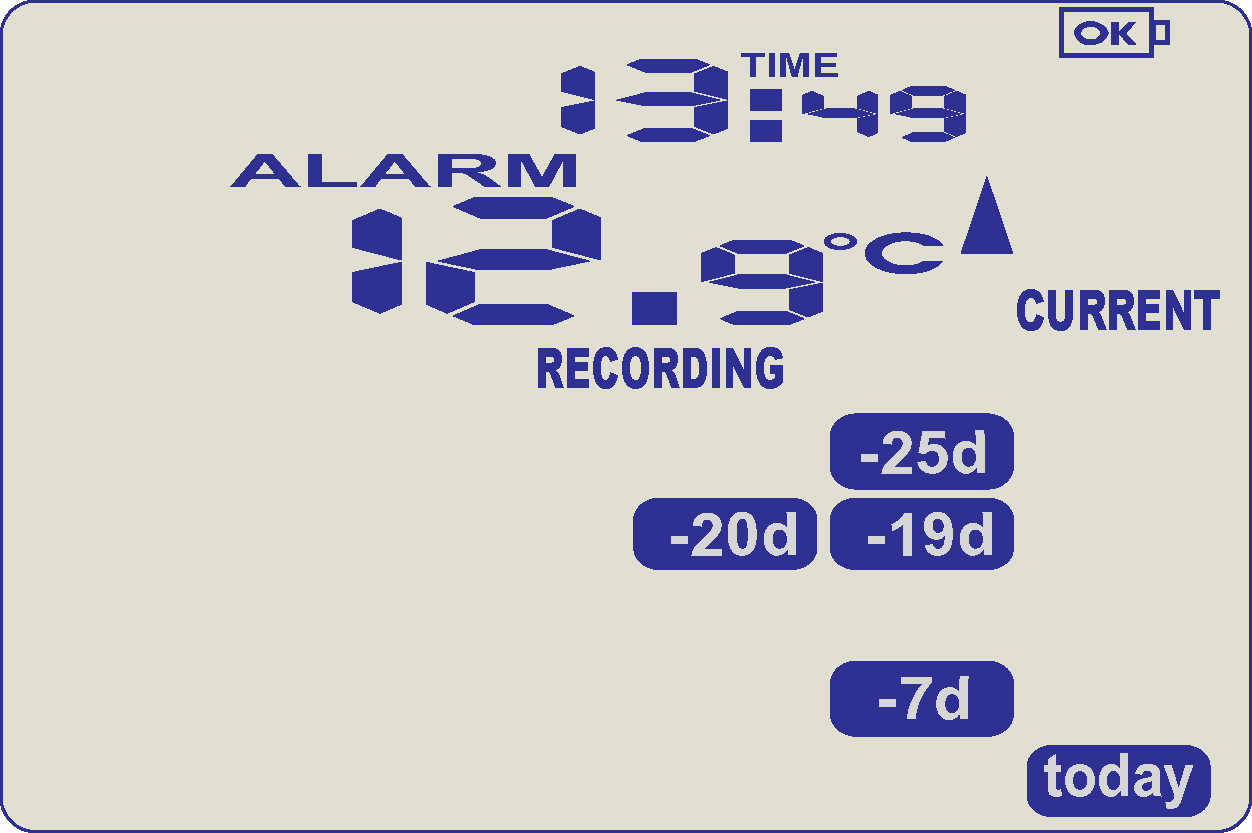
20 minutes later the over temperature has triggered an alarm. The ‘ALARM’ symbol and the ‘TODAY’ marker day alarm are shown.
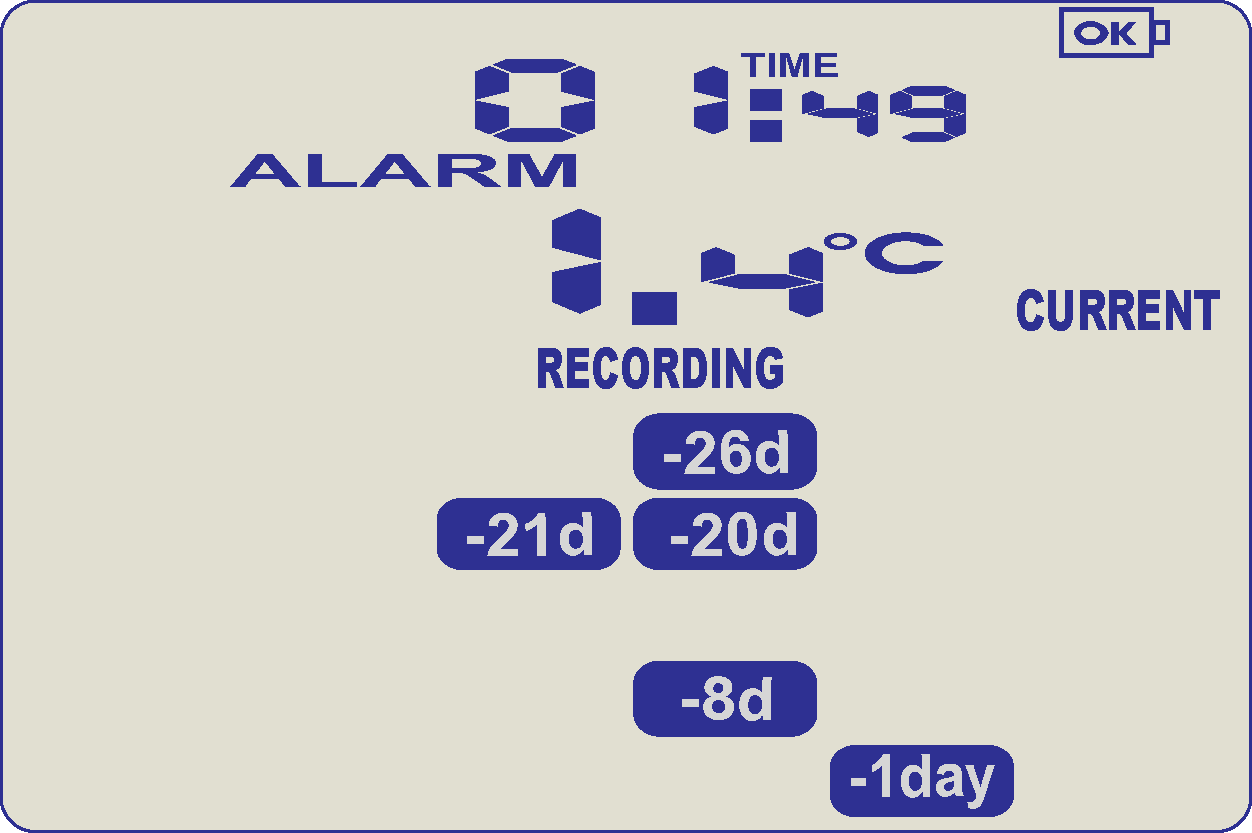
The next day, the temperature has returned to the acceptable range but the alarm remains present. The day summary has shifted by 1 day as the time has gone through midnight.
When your Logger is showing 'not rdy' (not ready) or 'slp' (sleep) on the display, your Logger has been hibernated to preserve its battery before the logger is used.
To remove the logger from hibernate state it must be configured with LogTag Analyzer software.
On the TRID/TRED model loggers, you can press and hold the 2 buttons for 6 seconds. During this time the text “READY” flashes. Release the buttons when the flashing stops. This will re-activate the Logger and get it out of the hibernation state.
You can re-activate a Logger with a low battery, however it is not recommended to commence another trip.
Note: The real-time clock is not running in a hibernated recorder and must be set up if the recorder is manually activated.
When we generally see cases like “136000=9´6” or “óÿ~ðùó” this has generally been caused by either water ingress or exposure to a strong EM field which has damaged random areas of the LogTag's memory and would require a full analysis by someone technical in order to determine whether it could be recovered or not.
When your LogTag Recorder displays any of these codes, please contact your supplier about this.
en/faq/technical-details/logtag-recorder-displays-y-y-y-y-y-or-136000-9-6-or-o-y/
TRED30-16R
The Logger will display up to 30 days of max/min/duration and alarm statistics. If the Logger is configured to record longer than 30 days (or continuously) then the day statistics will contain up to the latest 30 days.
To review the day statistics, press the ‘review button’. Each press of the button will step through the Max and Min temperatures for each day starting with today and moving backwards through the days (displayed day will flash). Any button activity during recording will place an inspection mark in the next reading of logged data which will be displayed when the data is downloaded.
Following are some examples:
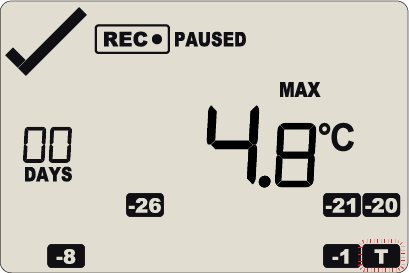
Pressing the 'review button' displays current days ‘MAX’ statistic. The ‘TODAY’ segment flashes and ‘DAY 00’ is shown to indicate the ‘Today’ selection.The selected day (today) does not have any recordings outside the preset limits.
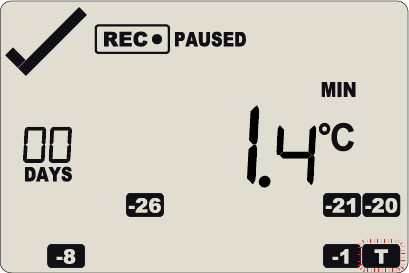
Pressing the ‘review button’ again displays the days ‘MIN’ statistic. The ‘MIN’ statistic is not below the limit and did not trigger an alarm.
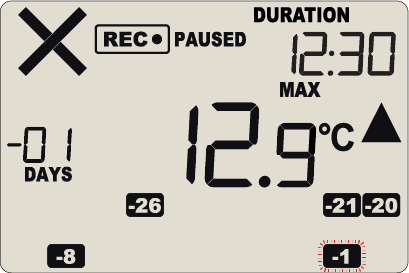
Pressing the ‘review button’ again displays the next previous days ‘MAX’ statistic. There are recordings that are above the upper limit. The ‘MAX’ statistic is above the upper limit (indicated by the arrow pointing up) and the ‘ALARM’ was triggered for a duration of 12 hours and 30 minutes.

Pressing the ‘review button’ again displays the days 'MIN’ statistic. The ‘MIN’ statistic is not below the limit and did not trigger an alarm.
TRID30-7
The Logger will display up to 30 days of max/min/duration and alarm statistics. If the Logger is configured to record longer than 30 days (or continuously) then the day statistics will contain up to the latest 30 days.
To review the day statistics, press the ‘review button’. Each press of the button will step through the Max and Min temperatures for each day starting with today and moving backwards through the days (displayed day will flash). Any button activity during recording will place an inspection mark in the next reading of logged data which will be displayed when the data is downloaded.
Following are some examples:

Pressing the ‘review button’ displays current days ‘MAX’ statistic. The ‘TODAY’ segment flashes and ‘DAY 00’ is shown to indicate the ‘Today’ selection. The selected day (today) does not have any recordings outside the preset limits.
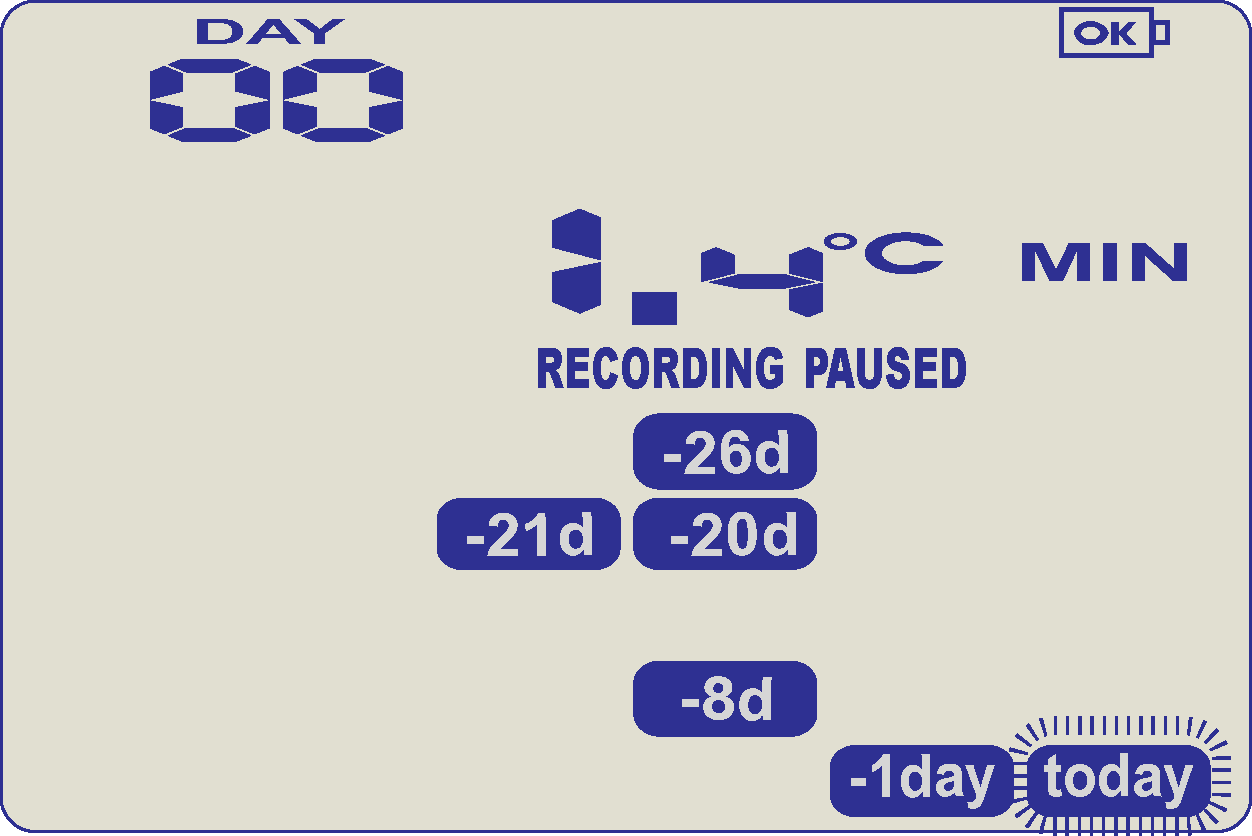
Pressing the ‘review button’ again displays the days ‘MIN’ statistic. The ‘MIN’ statistic is not below the limit and did not trigger an alarm.
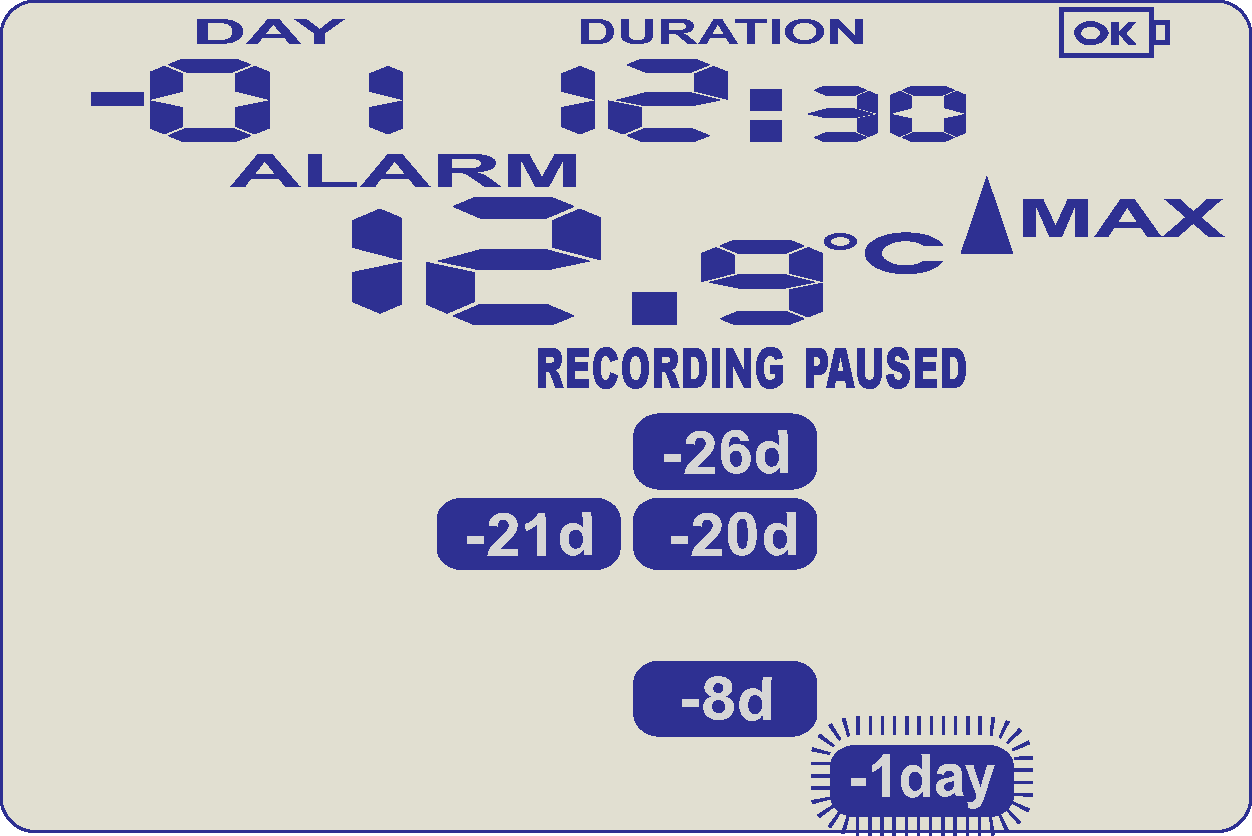
Pressing the ‘review button’ again displays the next previous days ‘MAX’ statistic. The ‘MAX’ in this example is above the upper limit (indicated by the arrow pointing up) and the ‘ALARM’ was triggered for a duration of 12 hours and 30 minutes.
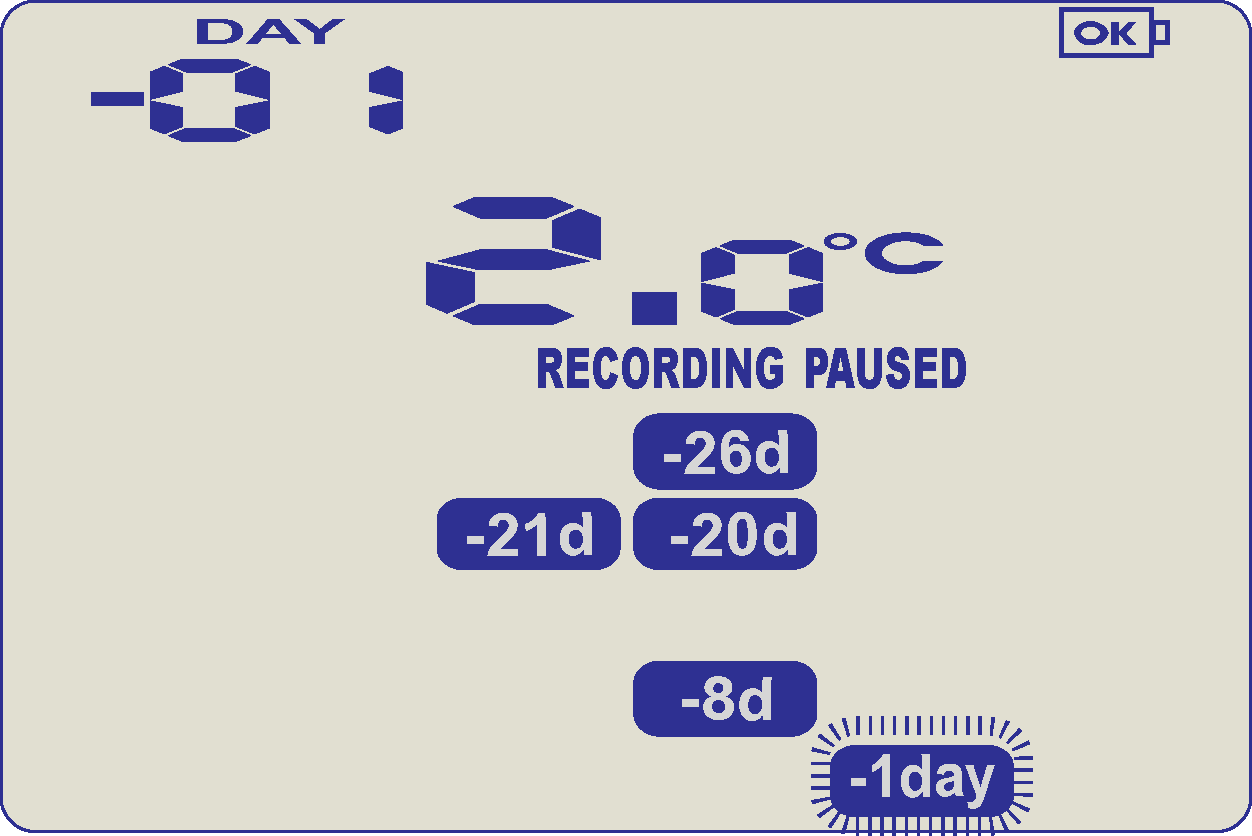
Pressing the ‘review button’ again displays the days ‘MIN’ statistic. The ‘MIN’ statistic is not below the limit and did not trigger an alarm.
If less than 30 days of recordings have been collected, the day marker only advances as far as there is data available. After the last day for which statistics have been collected is displayed, the next press of the ‘start button’ rolls the summary back to the statistic for ‘TODAY’.
When an alarm event has occurred, the ‘X’ symbol is displayed.
To clear the 'X' symbol from the display, press and hold the ‘START/CLEAR/STOP’ button until the ‘X’ symbol stops flashing and the audible alarm stops, then immediately release. Alarm events continue to be displayed in the history area of the display and can be reviewed with the day statistics.
If your audible alarm is not clearing, go to the configuration settings in LogTag Analyzer and go to Advanced Settings. You can select 'Clear and reset alarm' when 'START/CLEAR/STOP’ button pressed.
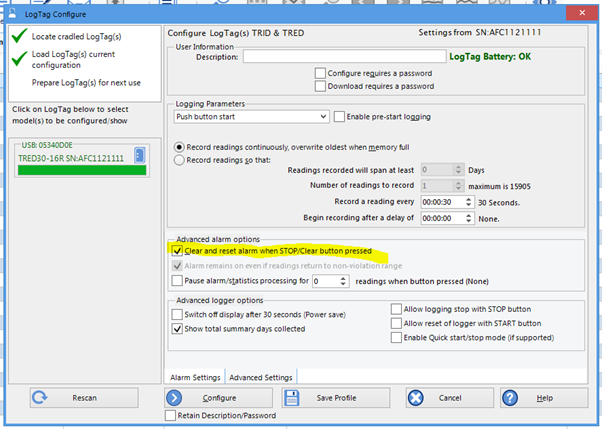
Depending on whether Enable Quick start/stop mode (if supported) - pressing and holding 'START/CLEAR/STOP’ button for 2 seconds (if Quick start/stop is enabled) or 6 seconds (if Quick start/stop is not enabled) will clear the alarm. At the next recording, there will be no alarm unless the temperature is still outside the set alarm levels.
The TRED30-16R Logger has an audible alarm. The alarm is configured on the main configuration screen when configuring the recorder.
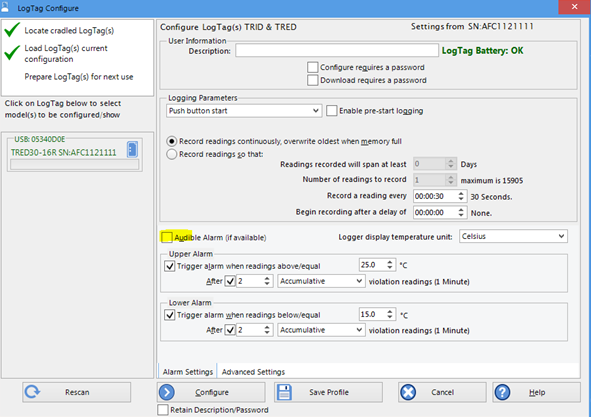
Please note, that continual activation of the audible alarm will reduce the working life of the battery. When an alarm event is triggered, the alarm should be cleared as soon as possible.
The beeper will temporarily turn off when you are reviewing data.
Having trouble clearing your audible alarm? Have a look here.
During configuration you are able to set up your upper and lower alarms.
If you have a TRED30-16R Logger (you can check on the back of your Logger, your model number) you have access to the daily maximum and minimum readings taken.
If enabled, the Logger can be re-activated after hibernation, for re-use by either re-configuring using LogTag Analyzer or by using the following procedure; press the ‘START/CLEAR/STOP’ button. The ‘READY’ text will start flashing on the display. Release the button when the flashing stops.
The Logger will then be ready for a push button start. Data/time start is only possible by
re-configuring with LogTag Analyzer. Be aware that re-activating the Logger will erase all previously recorded readings and statistics!
The option to re-activate the Logger can be disabled during configuration, see advanced options in LogTag Analyzer.
Loggers can be hibernated between uses to prolong battery life.
WHAT IS THE HIBERNATE FEATURE?
Loggers can be hibernated via LogTag Analyzer by selecting Hibernate from the LogTag menu.
When hibernated, all logging functions are suspended, all indicators are turned off and internal components are switched to low power. This reduces the current consumption on Loggers to very low levels. If units are hibernated between uses, for example when the unit is not required for another trip straight away, the battery life can be significantly extended.
Loggers are automatically ‘woken up’ from hibernation if they are placed in an interface and accessed, and do not automatically return to the hibernate state. The green LED will blink every 8 seconds to indicate its ‘awake’ status, any previously recorded data, however, will no longer be accessible.
Note that loggers may wake up from hibernate if static discharges into the contacts of the logger as a result of handling the logger after it has been hibernated.
PUT THE LOGGER IN HIBERNATION MODE
To set a Logger to "Hibernation", in LogTag Analyzer, select Hibernate... from the LogTag menu or pres 'F5'.
Once a Logger has been successfully set to "Hibernation" it should be removed from the Interface Cradle before pressing any other button. As soon as the software communicates with a Logger in "Hibernation", (for example through automatic download it will be returned to normal operation).
The extent to which the Hibernation will prolong the battery life of a Logger may vary between different models and versions of Loggers.
en/faq/technical-details/turning-off-hibernating-the-logger/
The most common industry standard expression for temperature reading stabilization time is the ‘T90’. This is defined as the typical time taken of a given sensor in a given environment (e.g. moving air, still air, liquid etc.) to register 90% of an immediate step change in temperature.
The T90 of TRIX-8 is typically less than 5 minutes in moving air of 1m/s.
As the thermal step response is basically dependent on the latent heat of the two thermal masses involved (the Logger and the surrounding environment) and the rate of thermal transfer between them, the T90 is the same irrespective of the difference of temperatures though at extremes (water freezing and boiling points for example) the environment does not behave homogeneously thereby changing the rates of thermal conduction and therefore changing the resulting T90 value.
For example: in a situation of a 25°C step change say starting at 10°C and moving to 35°C in moving air of 1m/s, the TRIX-8 will typically register 90% of the step after less than 5 minutes – i.e. 0.9×25 = 22.5 -> 10+22.5 = registering 32.5°C within 5mins.
The T90 for a 15°C step in 1 m/s moving air (say 10°C to 25°C) will be the same. 0.9×15 = 13.5°C +10 = registering 23.5°C within 5mins.
T90 is different in slower moving air or still air, though air is never totally ‘still’ when a temperature difference exists as convection will take place.
en/faq/technical-details/how-fast-will-a-trix-8-react-to-change-in-temperature/
A LogTag data logger will record the temperature (and humidity of applicable) directly adjacent to its sensor. The logger has no "radius" or "area of coverage", and we cannot advise how many loggers will be required to cover a certain area.
How representative the measurements are for an area (or air volume) depends greatly on several environmental factors, including, but not limited to, air movement and obstructions in the area a logger is deployed. There is no set rule that can cover this.
If this is critical to your operation, we recommend to get a laboratory to undertake a mapping study, where multiple loggers are put in the area to be monitored.
The number of loggers and the ideal positions for them to be located can be determined on the basis of any variation noted in the mapping study, and how critical temperature or humidity are for the product being monitored. It will also tell you how representative the placement of your logger is for other locations in the area.
If you own multiple loggers, you can undertake a mapping study yourself, however, we recommend to leave this to an expert.
en/faq/technical-details/determining-the-number-of-loggers-for-an-area/
The customer software is LogTag Analyzer.
This is the standard software for reading and configuring Loggers and runs on computers that are reading, displaying and storing recorded data.
The server software is LogTag User Server needs to be set up with the help of your IT manager. With the User Server software users can provide a digital signature on their reports.
User Server typically runs on a server station in a networked computer system but can also operate on the same computer as LogTag Analyzer provided security issues are observed.
More information about our User Server software (including download links) can be found here
and use the User Guide for more extensive information.
en/faq/other-topics/using-user-server-software-only-for-networks/
WHY ARE TEMPERATURE BUFFERS USED?
When selecting a data logger/external probe combination you would typically try to find a combination with a fast response time to temperature changes, so you always record the most accurate environmental condition. This is, however, not always desired if you want to understand what the temperature profile inside a closed container or vial looks like. Air temperature inside a fridge or freezer can change quite rapidly, for example when the fridge door is opened, or goods are added to the fridge that are not at fridge temperature, but such a change does not mean a container with a liquid inside would also instantly change to this temperature.
Ideally, you would add the external probe directly into the sample, but it is not always practical to do so. For this reason, a temperature buffer, also known as a thermal buffer, is recommended for particular applications in the pharmaceutical and medical industry.
These buffers are designed to mimic the thermal behavior of goods by providing additional thermal mass to the sensing element of an external temperature probe. As a result, the probe reacts slower to external temperature changes, just as a vaccine vial would that was exposed to this change.
WHAT WE OFFER!
Some manufacturers of data loggers provide metal discs for this purpose, or special clamps that bonds the probe thermally to a sample vial.
We at LogTag North America offer special Glycol buffer bottles for our range of external probes. You can fill these buffers with Glycol for use in temperatures down to around -40 ºC (-40 ºF), or with Silica sand for temperatures below -40 ºC (-40 ºF).
They come in two different volumes, with two different caps on offer to suit the different diameter of our probes. Each bottle also comes with a spill-proof seal, and an optional stand that prevents tipping in the fridge or freezer, but does not include a probe, you will have to purchase that separately.
A Glycol bottle should not be used without a medium inside (Glycol or sand). If it were used without a medium, this would potentially introduce an unacceptably high thermal lag, as the bottle itself will form a micro-climate. The medium in the bottle, be it glycol or sand, is added so there is a temperature equilibrium of the bottle with the environment, which is transferred to the probe. The medium has better heat transfer capability than air.
You can, of course, use all our external probes without any buffer if you need them to be more responsive to environmental changes, or for example, if governing bodies do not recommend the use of a buffer.