Activation Codes give you access to location subscriptions, notification units, shipment units, or a combination of those.
Each location subscription typically expires after 12 months (some run for 2 years), after which you will have to enter a new activation code, to renew the subscription. One subscription is required for each location you wish to renew.
You will receive a notification to the team's main email address when your subscription is about to expire, no later than 7 days before the expiry date (in some cases you will be notified even earlier, up to a month).
Customers outside the US and those who did not purchase the code directly from one of these distributors cannot purchase subscriptions online, instead, they need to purchase Activation Codes and add them to their account. These are available from most LogTag resellers and are typically sent to you via email within a short time after you have placed your order.
Contact your reseller to find out more about pricing, how to obtain these codes and any other information relating to the codes.
WHY DO I NEED AN ACTIVATION CODE?
If you wish to make full use of your LogTag Online account you need to purchase Activation Codes and add them to your account. Some of LogTag Online's features are only available with a paid subscription, which you can access by adding Activation Codes.
Activation codes give the user access to all the features on LogTag online for the number of locations they buy. Purchasing a single location activation code doesn't add an additional location to your free account, it upgrades the existing free location to have premium features.
One or more location subscriptions
Notification Units
A subscription for a location is typically valid for one single location, for one year, but you can also purchase subscriptions for multiple years, and multiple locations. Subscriptions entitle you to upload & store more files and to use the SMS and WhatsApp notification systems, rather than just email. You will also be able to add multiple locations to your team.
To monitor multiple locations (using multiple loggers) you will require as many subscriptions as you have locations. Each location can hold data for one logger. Note that the first subscription will upgrade your initial location to the paid features.
For a comparison of features between the free version and a paid subscription please see the Account Structure page on our website here or our support article here.
Notification Units
Shipment Units
One or more location subscriptions
Shipment Units are required to create and track shipments, and Notification Units are required to send notifications about shipment deliveries. Subscriptions for locations can be used in the same way as in the Fixed Site Monitoring, if you wish to track stationary equipment, however they are not needed for monitoring of shipments. For the features of the paid subscription please see the Account Structure page on our website here or our support article here.
HOW TO BUY ACTIVATION CODES
Currently, new subscriptions are only available from your reseller. Please discuss your requirements with them.
Customers residing in the United States of America can purchase subscription renewals and additional subscriptions online, provided they have entered at least one initial activation code purchased from their reseller.
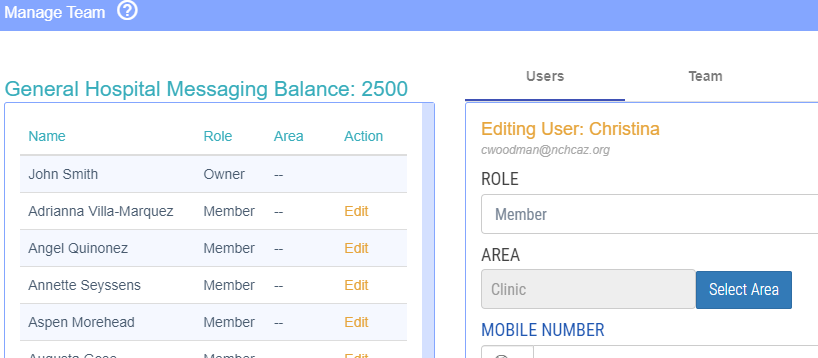
To edit your team settings, go to the top right corner, click on your account name and select “Manage Team”. You will see the following screen:
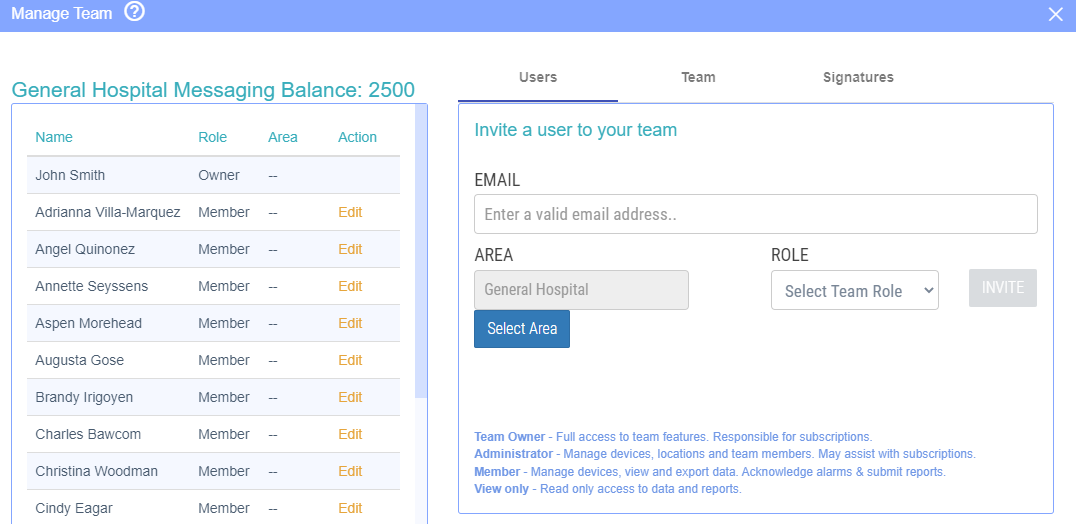
You can invite other users to your team by adding their email address and selecting their team role. The user that has created the team is the owner. Other users can be either an ‘Admin’, a ‘Member’ or 'View only' :
Fill in their email address and click on “invite”. The user that has been invited receives an email invitation to LogTag Online. They need to click the link in the email and login with their own account or create a new account. Once the user has signed up, you are able to find the user in your team details.
Edit team member(s)
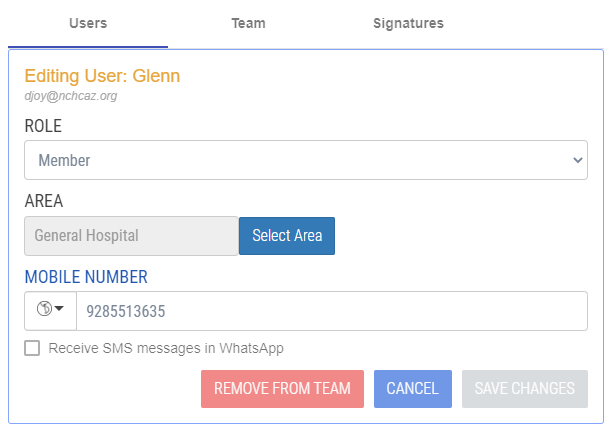
Once a new user has signed up you are able to change their role (switch between admin/member), delete a team member, move them into an Area (if available) and edit their messaging settings. You can make these changes by going to “manage team” and then select “edit” next to the user you want to make the changes to.
Edit Team
When you click on “Edit Team” you are able to change the team name, profile and various other settings.
To get started with LogTag Online, you first need to establish a WiFi connection with your
LogTag WiFi device:
Connecting to LogTag Online:
Getting Started and Downloading results:
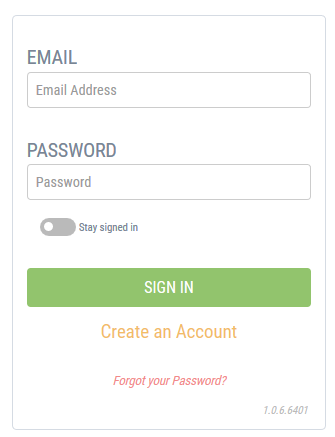
To reset your password and gain access to LogTag Online, please click the 'Forgot your Password?' link from the logon page and follow the on-screen instructions.
Alternatively, if you have an existing account but have forgotten your details, you can also reset your password by clicking this link below:
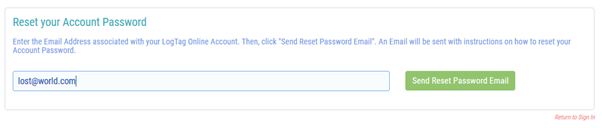
https://logtagonline.com/emailpassreset
You will then be prompted to enter your email address. Once you have entered your email address, click the green 'Send Reset Password Email' button.
Check your email. You should have received an email from LogTag Online with details on how to reset your password. If you don’t see this email, it could be taking a few minutes to reach you, or it could be in your spam email folder so check there too.
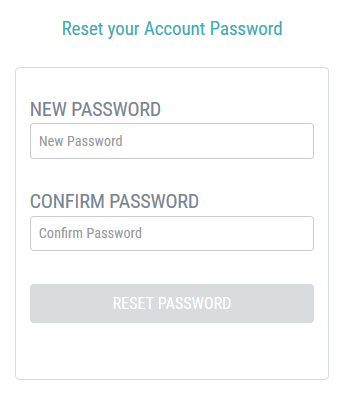
Once you’ve got the email, follow the instructions in the email.
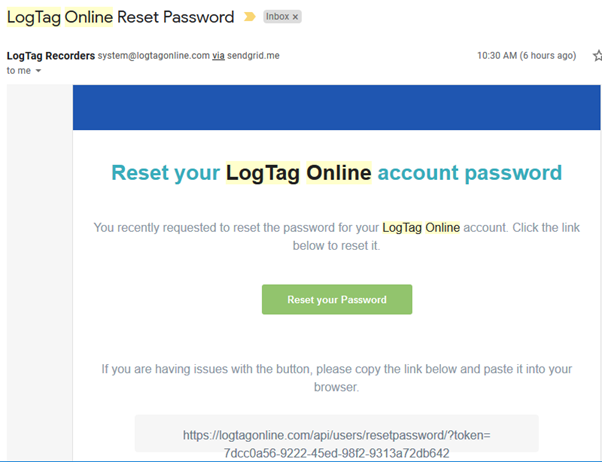
You can then reset your password to something you know.
At any time, you can edit your LogTag Online account details and also change your password.
Click your account name (top right of the screen) and select “My Account”. You will see the following:
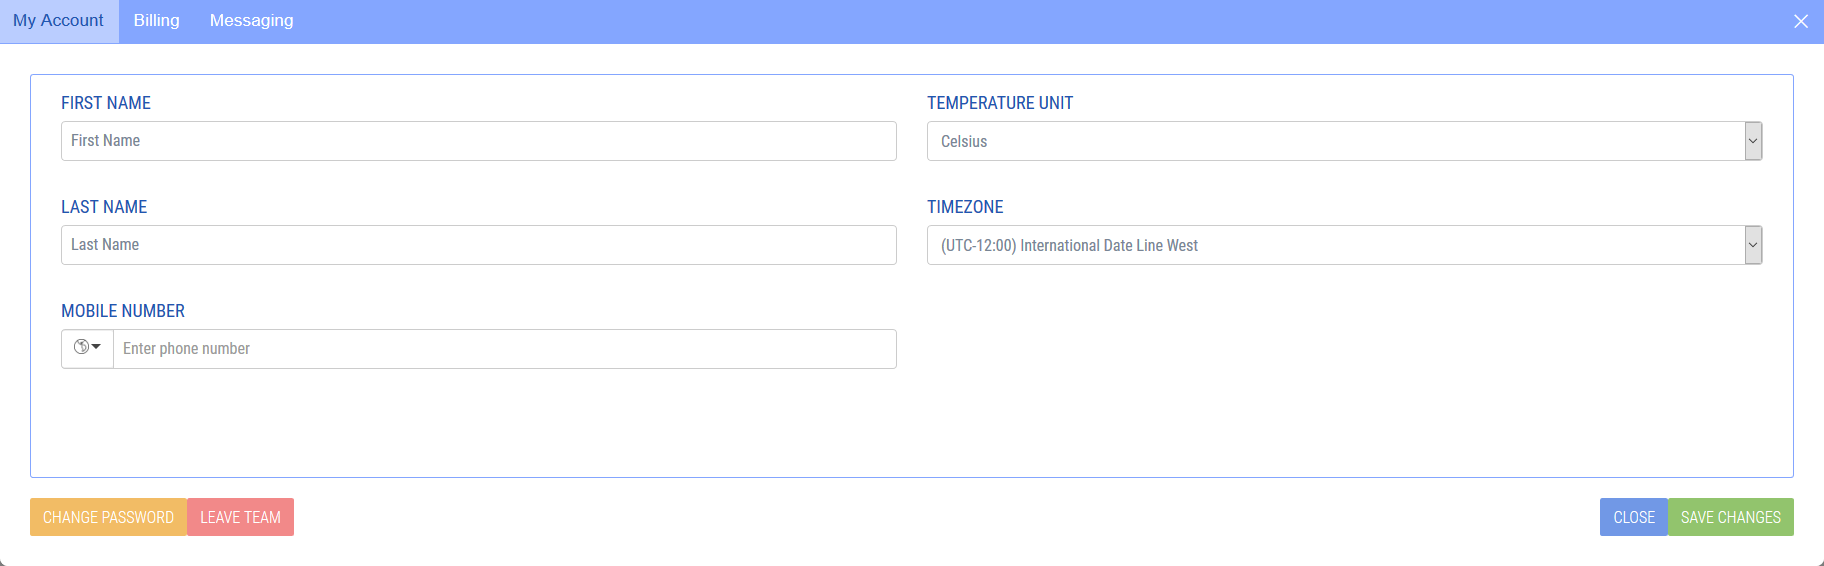
Edit the fields as required, such as first and last name, mobile number, time zone and temperature unit. Click SAVE CHANGES when you have finished editing, or CLOSE to cancel the changes.
Note: Your email address also serves as your login and account identification, and can therefore not be changed.
To change your password, click CHANGE PASSWORD. Enter your current password, then the new password and confirm the new password. Click SAVE CHANGES to enable the new password.

To use LogTag Online, you will need an active account. To create an account, navigate to the LogTag Online website and click 'Create An Account'. This will show the following sign-up form:
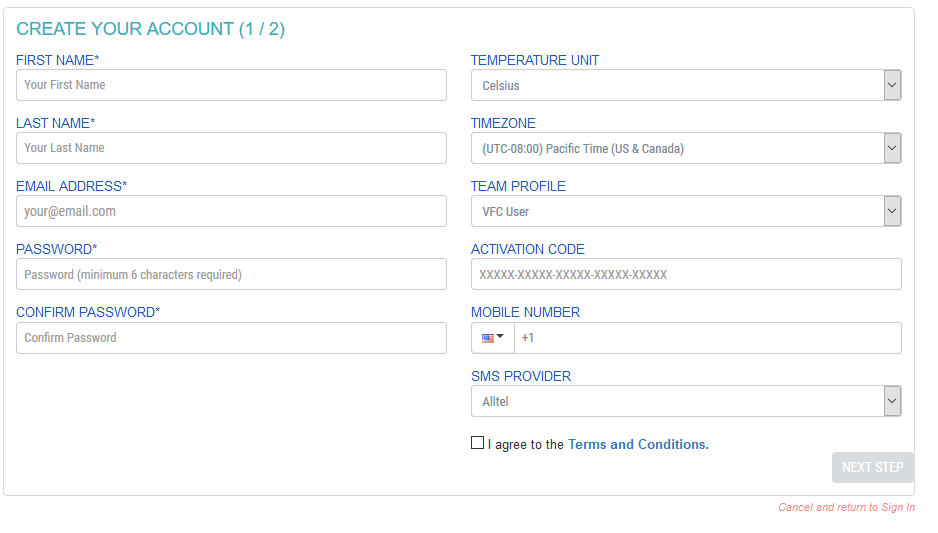
All fields marked with an asterisk are mandatory and include first name, last name, email and password. For your password, please select between 8 and 20 characters, and use at least one lower case, one upper case, one digit and one special character.
Note: Your email address is your unique identifier, and you must have access to your email account during setup. Also note that the email address cannot be changed once your account has been created!
Temperature unit
Select Celsius or Fahrenheit. This option can be changed at a later stage in “Account Details”.
Time zone
Select your time zone. If you don't change this now, the default "UTC – 08:00 (Pacific Time, US & Canada) will be used. This option can be changed at a later stage in “Account Details”.
Activation code
If you already have an activation code, please enter it here, otherwise click 'Next Step'.
Error text in red just like this will tell you if you have missed a mandatory field, or provided incorrect information.
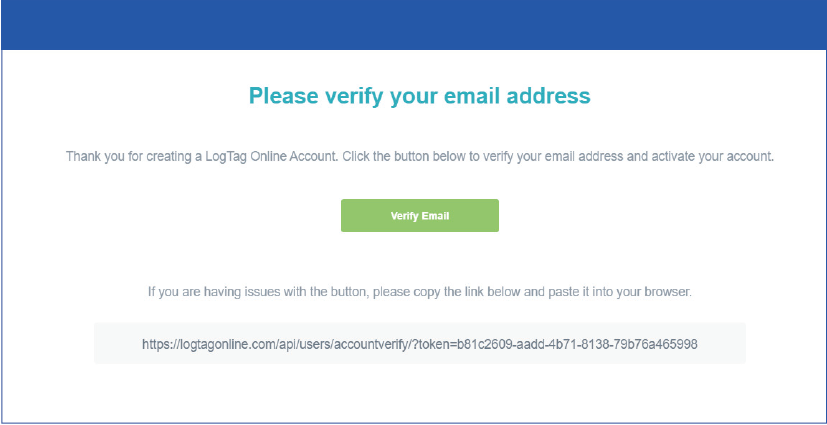
To ensure you are the legitimate owner of the email address you provided, you are now requested to confirm this address. Open your email client, look for the email from system@logtagonline.com and click Verify Email.
Once you have completed this step, sign in using the email address and password you provided.
On December 9th, a critical RCE vulnerability known as log4j - CVE-2021-44228 was announced by the New Zealand Computer Emergency Response Team (CERT).
LogTag is currently actively monitoring this situation and is seeking advice from Microsoft regarding the effects of this vulnerability on LogTag Online and its dependent services.
Currently, Microsoft is not aware of any impact, outside of the initial disclosure involving "Minecraft: Java Edition", to the security of its enterprise services used to host and run LogTag Online and has not experienced any degradation in availability of those services as a result of this vulnerability.
The vulnerability also does not affect our mobile apps. In iOS, the underlying technology used to generate the app does not contain the vulnerable modules. In Android, the particular functionality required to exploit the vulnerability has been removed from the Android versions required to run the app.
LogTag's on-PC installations are not affected by this vulnerability, as they do not use Java or the log4j library.
We will update this article as soon as more information comes to light.
en/faq/logtag-online/log4j-critical-rce-vulnerability-cve-2021-44228/
Logger Transit Data, accessible from the login page, provides the ability for an end user to view data from select loggers without the need to create a LogTag Online account.

The logger must be:
You must know the logger's serial number, as you cannot browse for unregistered loggers. If you already have a LogTag Online account, you must be logged out to use this feature.
Following logger models are supported in Logger Transit Data:
en/faq/logtag-online/which-loggers-are-supported-in-logger-transit-data/
Starting with version 1.2r2 you can connect LogTag Xpress directly to LogTag® Online, the LogTag cloud storage and monitoring system. LogTag Xpress is the perfect companion if you wish to simply and easily upload data from your loggers and share them with others in the cloud.
Once installed, LogTag Xpress runs silently in the background and scans USB ports for connected loggers. As soon as a logger is plugged in, LogTag Xpress extracts the data from the logger and uploads it to LogTag Online.
To access the data, log into your account and register the device. You can then add others to your team, and give them secure access to the logger's data.
Sharing is even easier when using this feature with single-trip loggers. You won't even need an account to access the data. Anyone who you wish to share a logger's data with can simply enter the serial number in Logger Transit Data (available from the LogTag Online sign-in page) to view a chart or download a PDF. No account is required.

For more information about LogTag® Online please refer to the information published on the LogTag North America website at https://logtagrecorders.com/online/ . If you want to know more about LogTag Xpress, please go to /en/support/
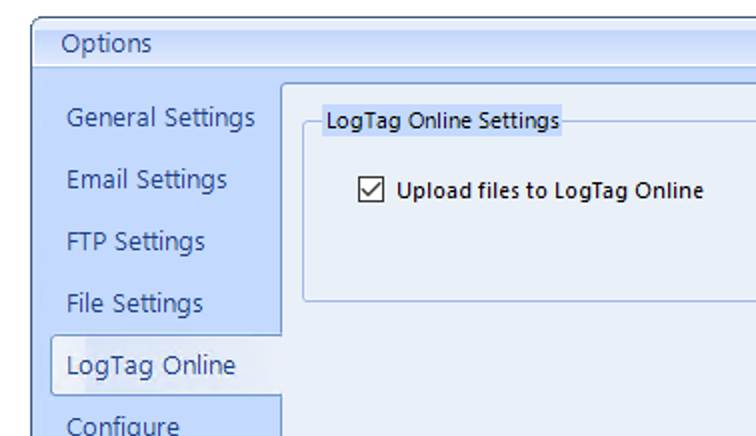
Tip: To check if this feature is enabled, please click the LogTag Xpress logo in the notification area, click Options and click the "LogTag Online" tab.
en/faq/logtag-online/using-logtag-express-with-logtag-online/
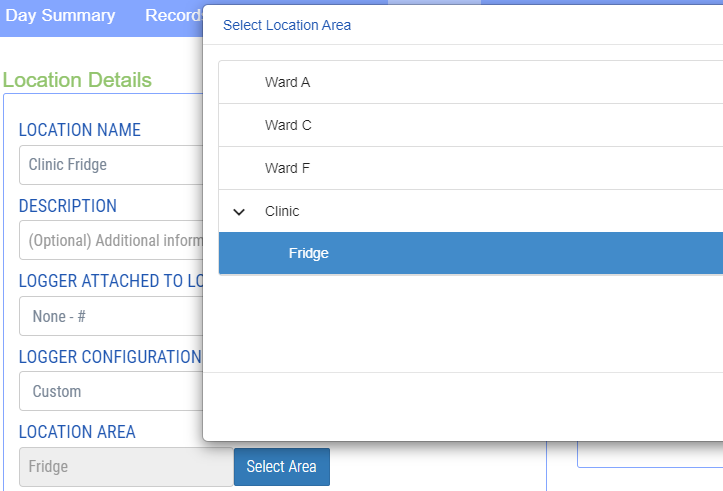
Areas are a hierarchal feature to manage a team with a large number of members and Locations. They Allow Team owners or administrators to easily manage and control who can & can't see specific Location information.
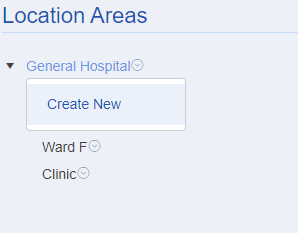
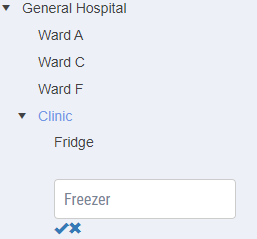
The top level area is always the name of your team. Clicking on the symbols next to the area will allow you to create a new Areas. Once created, an Area will become a selectable option when browsing the Area side menu or as an option when inviting a new member to your team and also when creating a new
Location.
Once a User is placed in an Area they can only see Locations which are in their Area or any Areas under their Area. For example if a User was Assigned to the Clinic above they could see Location in The Clinic and Also Locations in The Fridge and Freezer Sub Areas.
To transfer a logger to a new team, remove the logger as described in this article. You can then register the logger again for a new team as if it were a new logger.
To activate more features on LogTag Online, you will need to purchase one or more Activation Codes from your LogTag distributor (-> How to buy an activation code).
LOGTAG ONLINE ACCOUNT TYPE(S)
| Free account | No Activation Code(s) required |
| Standard (Paid) account | Activation Code(s) required to use more features |
Standad (Paid) Accounts are valid for 12 or 24 months, the features you can access for each account type are outlined in the tables below
| Feature | Basic (Free) Account (No Activation Code) |
Standard (Paid) Account (Activation Code required) |
| Number of Locations | 1 Limited Location |
1 Full Location per purchased Activation Code1 (Valid for 12 or 24 months) |
| Location History | 3 Months | 10 Years |
| Notifications2 | Email Only | Email + SMS or WhatsApp2 |
| SMS (USA) | None | Unlimited3 |
| SMS (Outside USA) | None | Up to 25 messages per month (dependent on amount purchased via Activation Code) |
| Maximum number of files4 | 30 | 1000 (dependent on amount of Location purchased via Activation Code) |
| File Storage | 1 Year | 10 Year |
| Number of registered devices | Unlimited | Unlimited |
| Maximum Number of users | 2 | Unlimited |
1 One Location can only have one data logger (such as the TRED30-16 or UTRED30-WiFi Real-Time). Purchasing Location activation codes allows
multi-team members and provides Notification units.
2 Messaging capabilities are not activated until Location and/or Notification activation codes are purchased. Alert notification that are sent through WhatsApp are not free and use notification units.
3 Only for mobile service providers that support the Email-to-Text service. Other providers will depend on the purchased activation code. Carrier fair use policies apply.
4 Can upload unlimited number of files to LogTag Drive. Free account gets to view the last 30. Increased capacity of Drive requires purchasing Location activation code at 1000 per Location.
| Feature | Basic (Free) Account (No Activation Code) |
Standard (Paid) Account (Activation Code required) |
| Number of Shipments | Unlimited5 |
Unlimited5 (dependent on amount purchased via Activation Code) |
| Viewing history | 10 Years | 10 Years |
| Notifications2 | Email Only | Email + SMS or WhatsApp2 |
| SMS (USA) | None | Unlimited3 |
| SMS (Outside USA) | None | Up to 25 per month with Activation Code, additional messages can be purchased |
| Maximum number of files4 | 30 | 30 (Dependent on amount of Locations purchased via Activation Codes) |
| File Storage | 1 Year | 10 Year |
| Number of registered devices | Unlimited | Unlimited |
| Maximum Number of users | 2 | Unlimited |
1 One Location can only have one data logger (such as the TRED30-16 or UTRED30-WiFi Real-Time). Purchasing Location activation codes allows
multi-team members and provides Notification units.
2 Messaging capabilities are not activated until Location and/or Notification activation codes are purchased. Alert notification that are sent through WhatsApp are not free and use notification units.
3 Only for mobile service providers that support the Email-to-Text service. Other providers will depend on the purchased activation code. Carrier fair use policies apply.
4 Can upload unlimited number of files to LogTag Drive. Free account gets to view the last 30. Increased capacity of Drive requires purchasing Location activation code at 1000 per Location.
5 Can create unlimited Shipments. Free account gets 10 Shipment units which allows up to 10 data uploads only from any data loggers in any shipment. Purchasing Shipment unit activation codes allows additional data upload (1 Shipment unit is for 1 data upload from any logger, be it the same or from different data loggers) as well as multi-team members.
If you would like to find out more about SMS Text notifications and how they work, please refer to the LTO structure overview chart here.
en/faq/logtag-online/logtag-online-account-types-and-features/
If you wish data from a logger to be uploaded to a different team automatically, you must first remove it from your own account. Your team will retain any data recorded before the logger was deleted. Any new data uploaded to LogTag Online will appear in the new owner's account.
To remove a logger from your account, click the devices tab and locate the line containing the device's serial number. You can browse using the arrows in the bottom left corner of the windows, or enter the serial; number in the search field.
Click Edit in this line to open the Edit Device window:
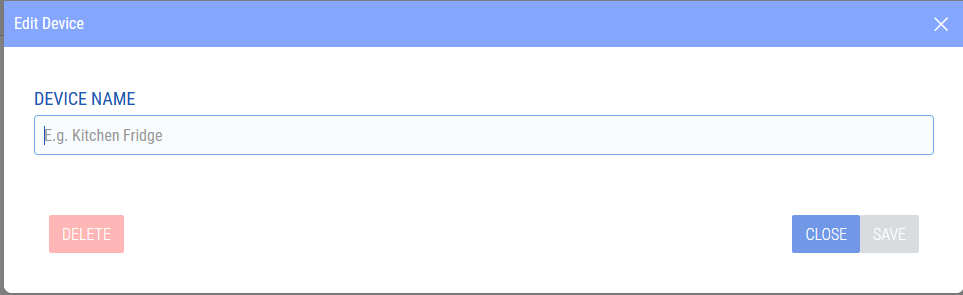
Click 'Delete' to remove the device from your team. It can now be registered by another team.
en/faq/logtag-online/removing-a-data-logger-from-logtag-online-account/
If you experience a 'Connection Timeout' event from your logger(s) that is attached to a Location, please read below to follow the right course-of-action:
There are a few scenarios where this connection lost event occurs:
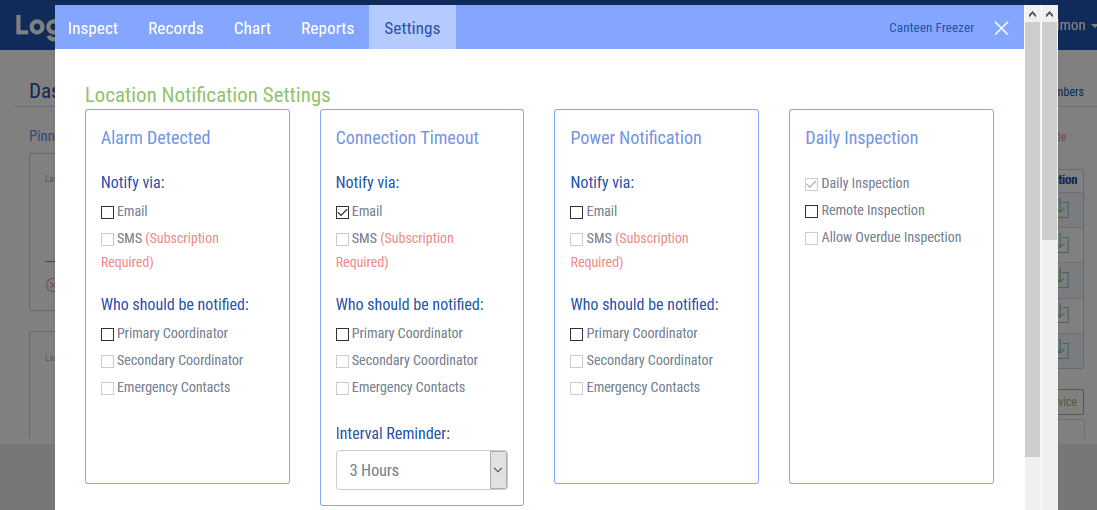
A) The LogTag Online cloud platform is looking for a connection from the location, in this example: UTRED30-WIFI device every X period. If the UTRED30-WiFi does not check in with the server, within that period, it is deemed M.I.A. and a 'Lost connection' event occurs. The Period 'X' is set by the user for each Location they setup. From the Location ->Settings->Edit Notifications screen they can set the Interval Reminder, which is this period 'X'. In the screenshot below the user will receive an email if the UTRED30-WiFi at the Location in this example: Canteen Freezer, does not connect within 3 hours.
Note: The UTRED30-WiFi has two different connection modes while logging, one when it is on USB power, and a different one when it is on AAA power.
On USB power it will try and connect to the Cloud server every time it has a new temperature, to a maximum rate of every 5 minutes.
On AAA battery power it will try and connect to the Cloud server every 1 hour, to preserve battery.
If the Interval Reminder is set to less than 1 hour when the device is running on AAA batteries, it will frequently send the WiFi disconnect message.
If the device is not logging and is in Ready or Stopped mode it will only communicate with the server every 4 hours.
B) Lost WiFi Connection notifications can occur due to the following reasons:
To find the solution to the disconnections, here are some of the steps you could try:
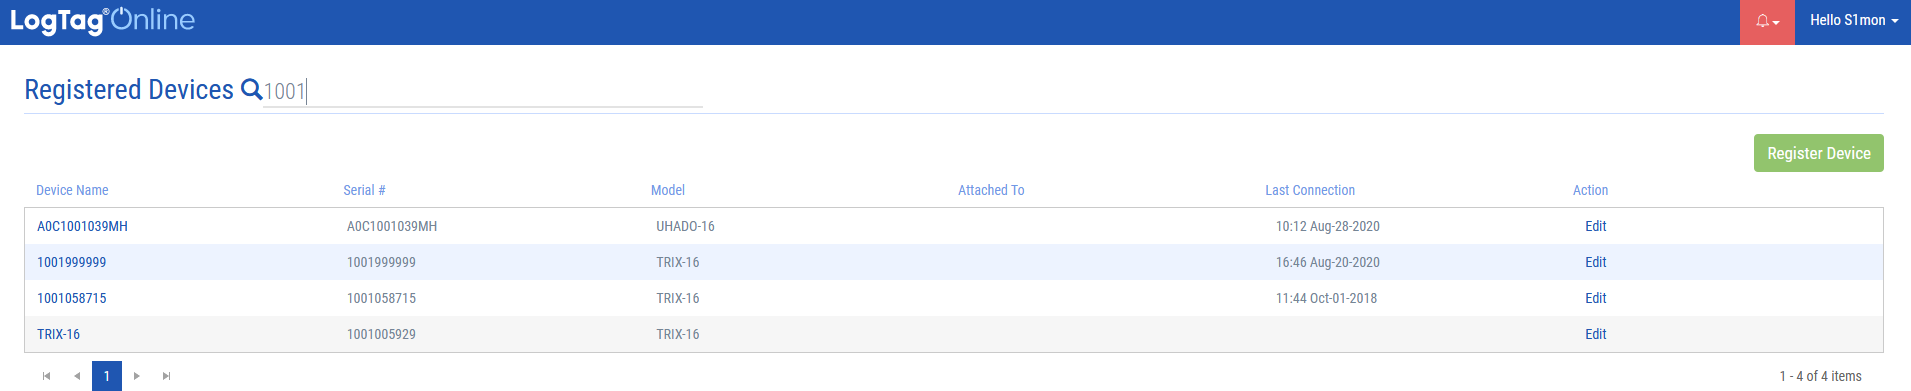
On the dashboard, if you select the "devices" tab at the bottom of your screen, you are able to see your registered devices (if you have any). If you are using a WiFi logger (e.g. UTRED30-WiFi) you only have to register the Logger. If you’re using the LTI-WiFi Interface Cradle together with a non-WiFi Logger, it’s important to register both devices (the Interface Cradle and the Logger) in order to track your data via LogTag Online.
Register a device
In order to register a device click on the "register device" button on the dashboard or register your device by going to the "devices" tab. When you click register device you will see the following screen:
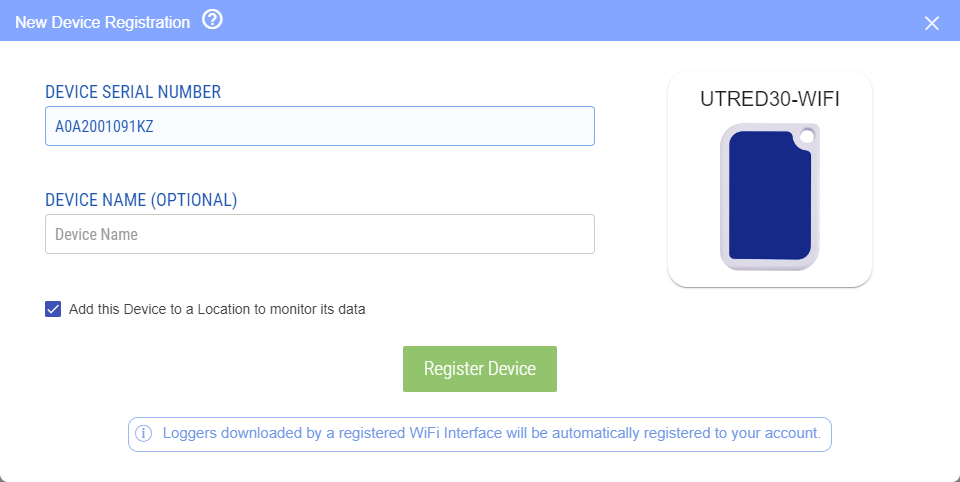
If you selected "Add this Device to a Location to monitor its data" you will now be given the opportunity to add an activation code as well as configure the location name and logger alarm profile.
Note: You don’t receive any data if you haven’t set up your WiFi Interface Cradle or WiFi Logger with a WiFi connection. You can do this through our WiFi Configuration Wizard .
Edit/delete device
Click on “Edit” and you are able to edit the name. If you click on “deregister” you will delete your device. You can also edit your device in the dashboard by clicking your device. You will see the same pop-up screen that will allow you to change the name of your device or the option to “deregister” (delete) your device.
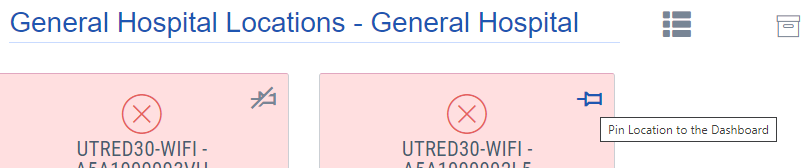
In order to pin a location to the dashboard, go to “Locations” by clicking the button at the bottom of the screen. You will notice either in the Top Right corner of the Location, or next to “Inspect” and “Edit” you will see a “pin” or “unpin” icon with tooltips .

LogTag Drive is an online cloud storage for your files. Similar to many online file storage
services, you have the ability to view, manage and export your files.
The LogTag Drive is used for Loggers that haven't been attached to a Location.
Upload data to LTO via LogTag Analyzer
If you are uploading data from a logger via the latest version of LogTag Analyzer, the uploaded
logger file will show on the main dashboard in the 'Recently Uploaded Files' section or as a file
in LogTag Drive. Please refer to the LogTag Analyzer User Guide for more information.
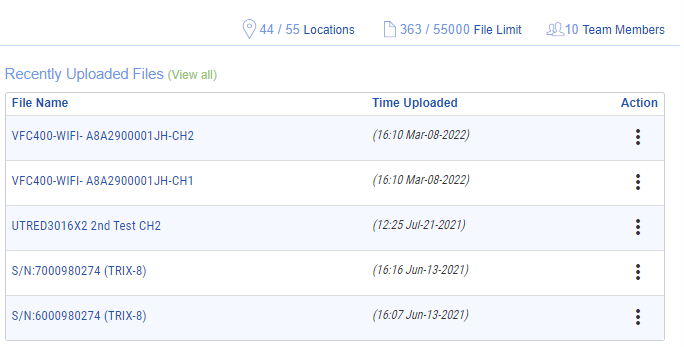
From the Dashboard of the LogTag Drive page you can download the file in either LTD format (for use with Analyzer) or CSV format by clicking on the Action on the far right side. On the LogTag Drive page you have additional options like editing the Files name, adding labels for searching and deleting the file as well as the option to share the file with a public download link.
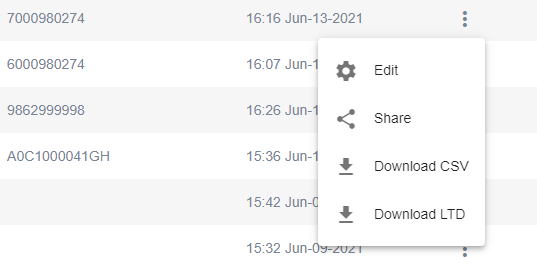
From the Dashboard or the LogTag Drive page you can click on the uploaded File Name to open that file to view and export the information contained in the file.
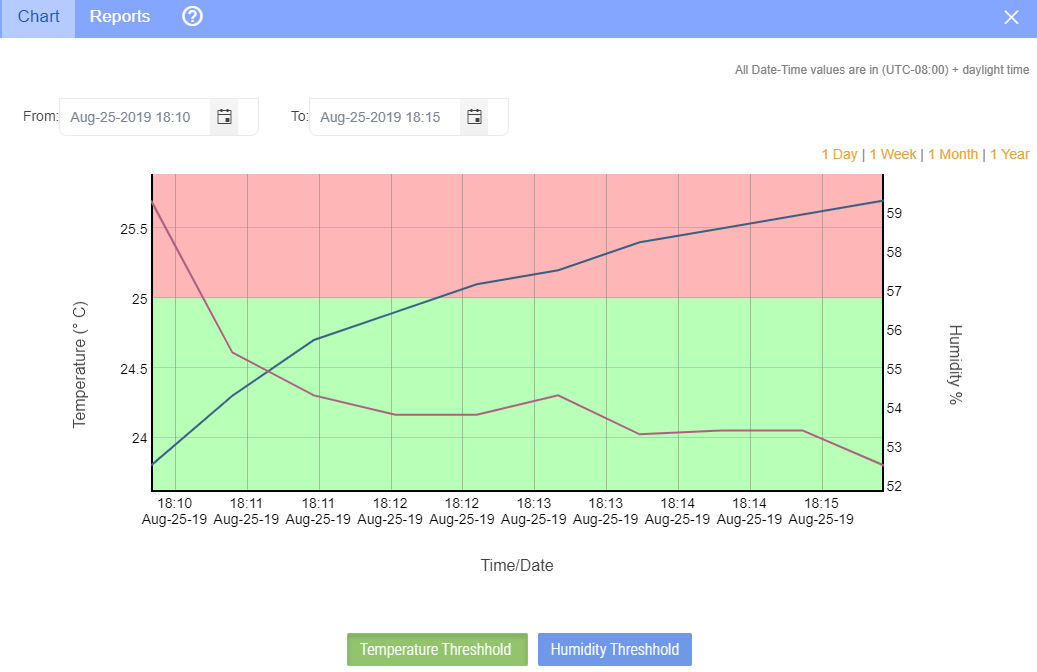
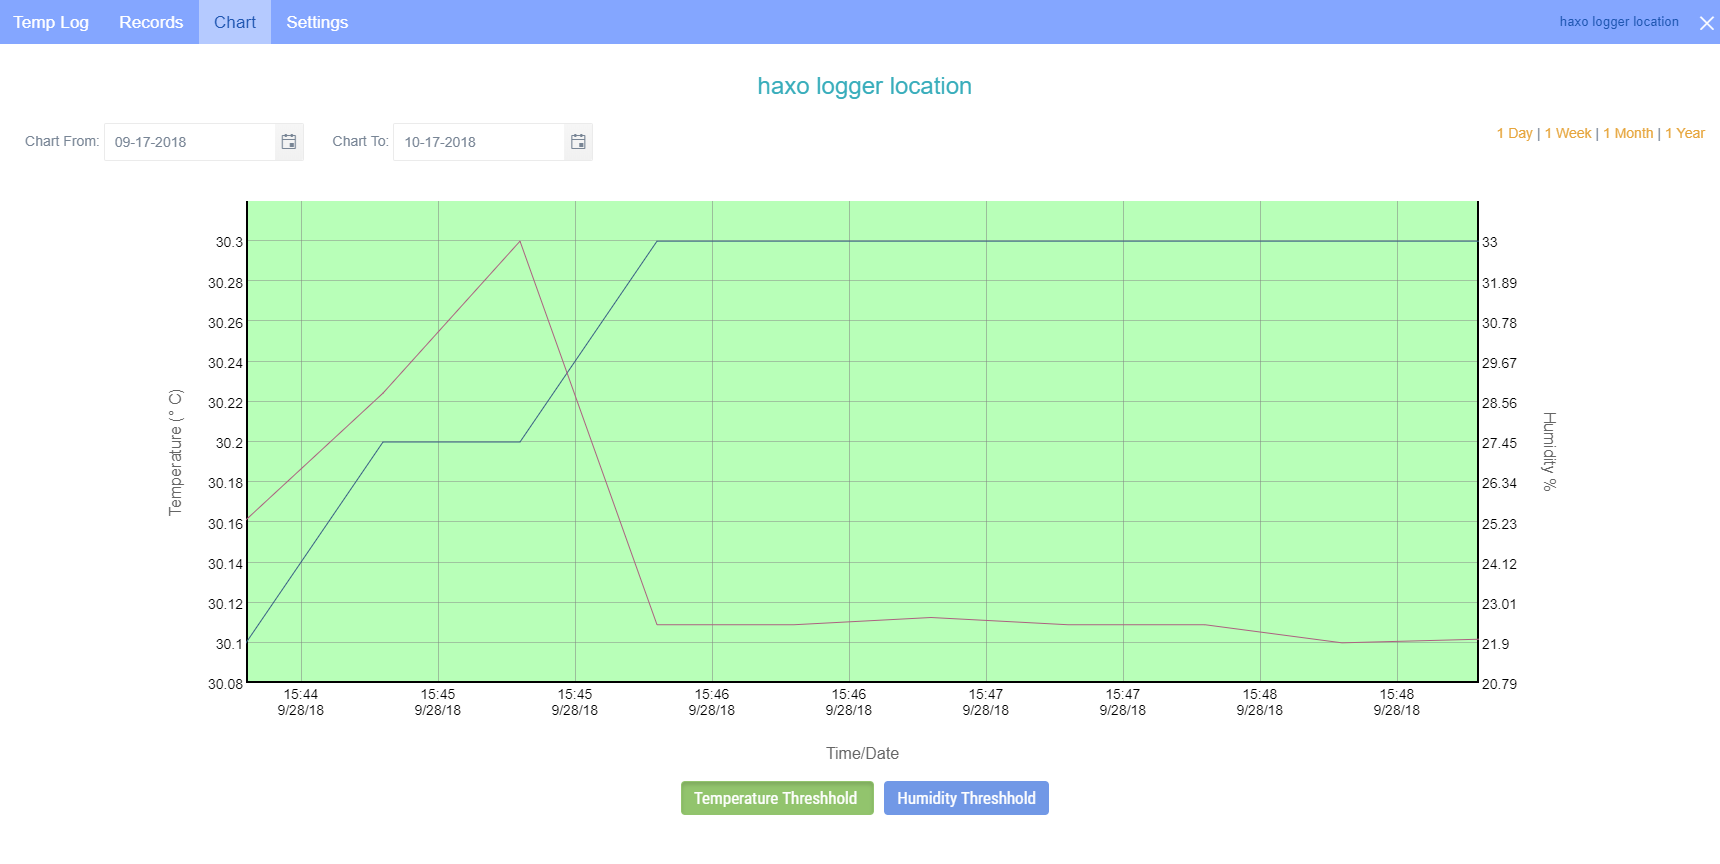
The file will initially open in the Chart tab allowing you to visually view the recorded data.
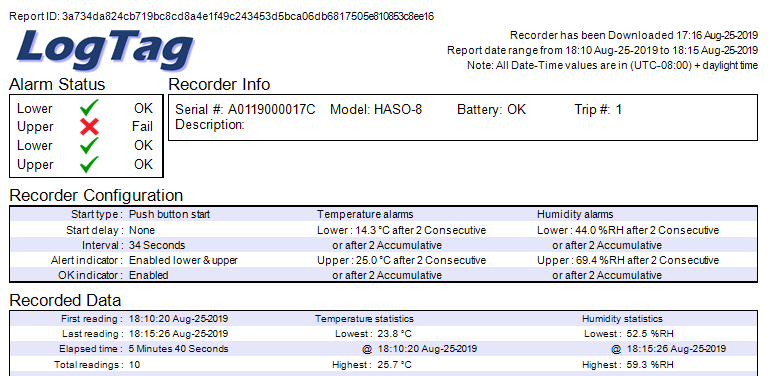
Going to the Report tab will allow you to view the recorded readings and also view and download a PDF report containing information about the data recorded in the file.
Data in LogTag online can be viewed visually in your Location or Shipment, or from a LogTag Drive file.
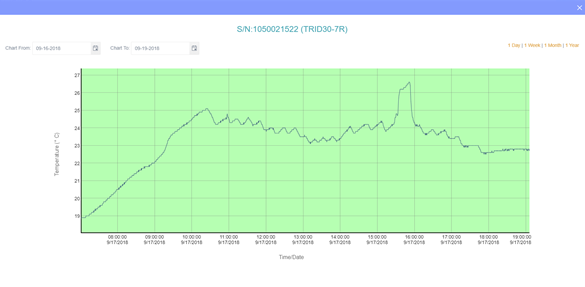
When you click and drag your mouse over a part of the data you are able to zoom in to your data. You are also able to select a data range or show 1 day, 1 week, 1 month or 1 year of data from the current date (Free accounts are limited to showing the last 3 months worth of data in locations).
You can also use the Date Pickers to adjust the readings being displayed.
If you’re using a logger with humidity such as a HAXO-8, humidity readings will also be displayed in the chart.
When an alarm has been detected, you will be notified via email/SMS (depending on your notification settings) and you will see the notification at the top right corner of your screen turn red (see image below). If you do not Acknowledge the Alarm on LogTag online, further reminder emails and/or SMS will be sent.
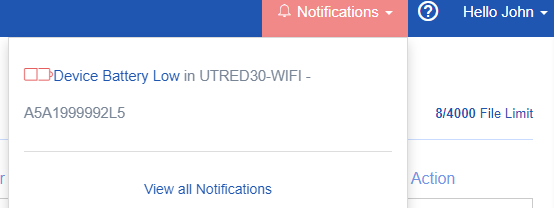
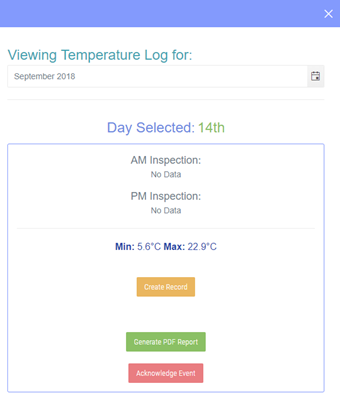
Click on the notification text, in this case “Upper Alarm detected in Fridge LogTag HQ”. The temperature log will pop-up on the date when the alarm has been detected.
You can acknowledge the alarm by clicking the button “acknowledge event”. You will also have the option to click the option “create record”. This will create a Vaccine Storage – Troubleshooting Record form.
The Location will continue to send Alarm notifications (SMS and Emails) until all Alarms on the device have been Acknowledged.
If the temperature environment then returns to the acceptable or normal temperature range, and then subsequently goes out of range and the temperatures are in breach of alarm thresholds, a new Alarm will be generated. This new Alarm must be Acknowledged as before to stop any further notifications from being sent.
You can set up Locations, so you can record your Logger's readings to a certain Location.
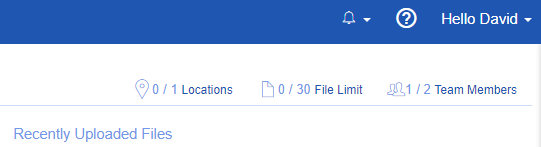
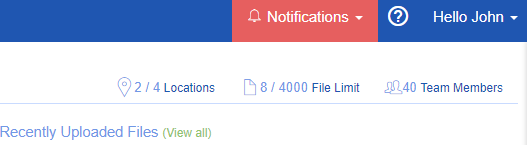
The number of locations you can create is limited to 1 or to the number of locations you have paid for in your subscription. Once you have used all your Locations you will be unable to create any more new locations until you have deleted one of your previous locations.
The Dashboard displays the number of locations you currently have, and the number you can create, see the example images below.
You can create a new Location from the dashboard, or by clicking at the bottom of the screen on ‘Locations’ and then ‘Add a Location’.
The following screen will pop up.
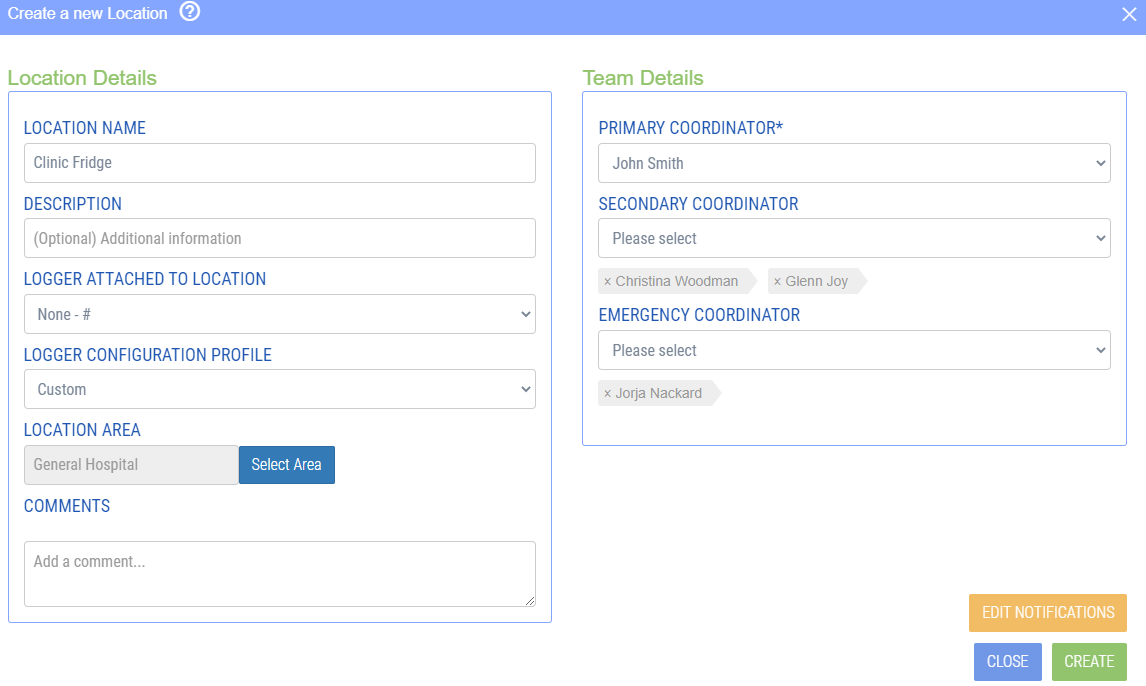
Location name
Give your location an easy recognizable name, e.g. refrigerator 3, 2nd floor.
Description
Fill in any additional information in here, if applicable.
Logger attached to location
Link your logger with the location. All your registered devices show up in this list. Choose one Logger that is monitoring this location. Just be aware, that when you save the location without a Logger, no data will be recorded. The loggers data will then appear in this location whenever the data is uploaded to LogTag Online.
Team details
The primary coordinator and optional secondary coordinator(s) are the first people that will receive a notification when the Location has an alarm. The emergency contacts will also receive delayed notifications when an alarm has been detected and has not been dealt with via acknowledging the alarm.
You can only set up team members to be notified when an alarm has been detected. Which means they need to create an account and be part of your team within LogTag Online. Note that free accounts only support a maximum of 2 team members per team.
When you click on edit notifications, you are able to set up who will receive notifications via email and/or text.